Viral Scoopable Cookies
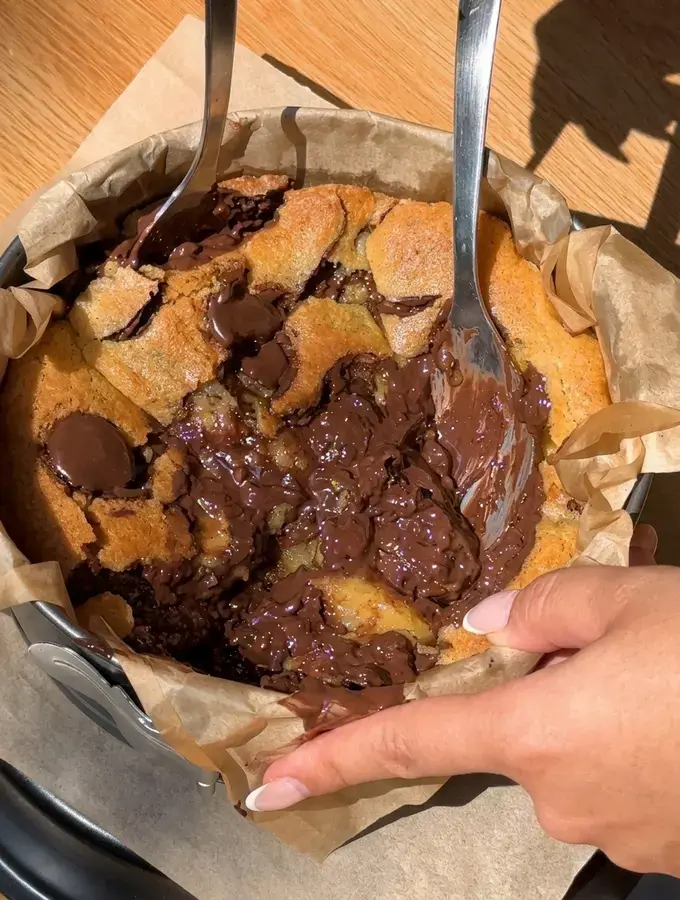
Viral scoopable cookies are the dessert everyone is baking right now, and once you try them you will understand why. Instead of spacing dough balls apart on a sheet pan, you nestle them close together in a small baking dish. As they bake, they merge into one thick, gooey layer with crisp golden edges and a soft, melty middle.
The dough needs no chilling, so you can mix and bake in under half an hour. Serve it warm straight from the pan with a big spoon or an ice cream scoop, and watch it disappear. This recipe serves 8 people and makes 6 stuffed dough balls baked into a single shareable dessert.

Here is my favorite part: the contrast. Every spoonful gives you a crunchy edge, a molten chocolate pocket, and that soft center that clings to your fork. It is basically warm cookie dough and a baked cookie in one pan.
Jump to:
- Viral Scoopable Cookies
- What are scoopable cookies?
- Why this recipe works
- Ingredients
- Instructions
- Expert Tips
- Troubleshooting
- Storing And Reheating
- Freezing
- Substitutions
- Variations
- Serving Tips
- Equipment
- More Uncategorized
- FAQs
- What makes these scoopable cookies different from regular chocolate chip cookies?
- How do you get a molten chocolate center in scoopable cookies?
- Why should I use only egg yolks instead of a whole egg in this recipe?
- How do I reheat leftover scoopable cookies so they become gooey again?
- Viral Scoopable Cookies
- Ingredients
- Instructions
- Last Step:
- Nutrition
- Did you make this recipe?
What are scoopable cookies?
Scoopable cookies sit somewhere between a traditional baked cookie and warm, spoonable cookie dough. Rather than baking individual balls across a sheet pan, you pack the dough balls tightly into a small pan. During baking, they spread into each other and set as one thick, soft layer.
The edges turn golden and gently crunchy because they touch the hot sides of the dish. The middle stays incredibly melty because the crowded dough insulates itself. That is the whole magic of the trend.
This dessert is meant to be eaten warm, straight from the pan, with spoons. The classic finish is a big scoop of cold vanilla ice cream on top and a sprinkle of flaky salt. It is messy, it is indulgent, and it is exactly the kind of treat that makes everyone gather around the table.
Why this recipe works
Several smart choices make this recipe nearly foolproof, and I love each one of them.
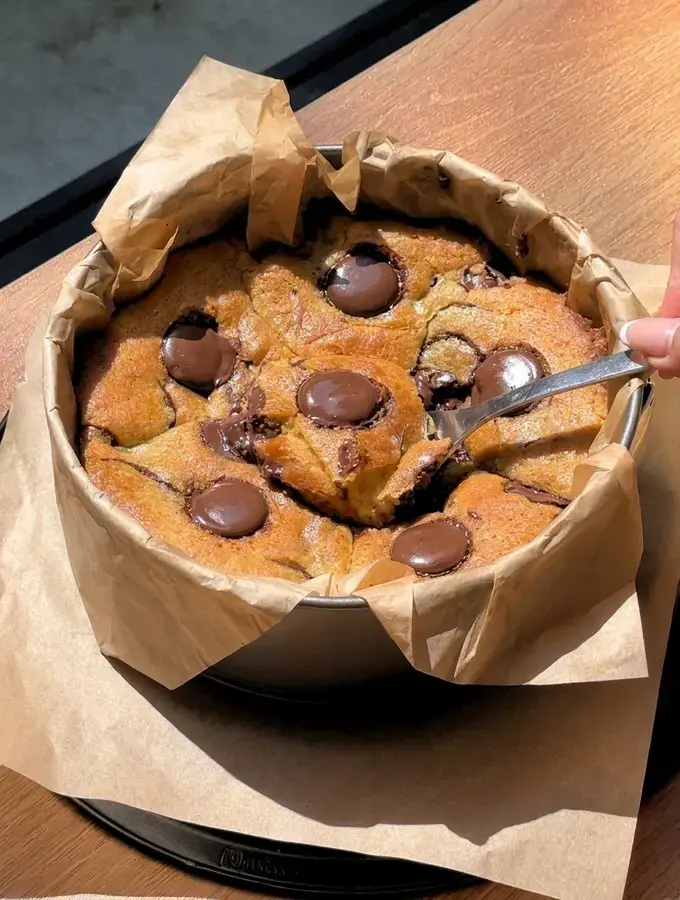
- No chilling required. Because the dough bakes in a dish instead of as free cookies, it does not need to firm up on a sheet pan. You can mix and bake immediately, which makes this a genuine weeknight dessert.
- Melted butter, not softened. Melted butter creates a fudgier, denser texture than softened butter, and it keeps the cookies soft even after they cool.
- A crowded pan. Baking the balls close together in a small pan gives you crisp golden edges while the centers stay gooey and spoonable.
- One bowl, one spoon. Everything mixes in a single bowl with a whisk and a spatula, so cleanup is wonderfully easy.
- A stuffable dough. The dough is firm enough to wrap around fillings like Nutella, peanut butter, or Biscoff for an extra gooey middle.
I tested this on a busy Friday night when my family wanted something sweet fast, and it delivered. One bowl, no waiting, and the pan came out with those glossy melted chocolate pools that make people reach for a spoon before you even call them.
Ingredients
Measure and prepare everything before you start. Full quantities are listed in the recipe card, but here is what each ingredient does and why it matters.
- Unsalted butter, melted and cooled: this is the backbone of the chewy, fudgy texture. Let it cool slightly so it does not scramble the yolks or break the emulsion.
- Light brown sugar: light brown is classic here, though dark brown works too. It brings moisture and a deep caramel flavor.
- Granulated sugar: this helps the dough spread and creates those lightly crisp golden edges.
- 2 egg yolks: yolks add richness and density. Skipping the whites keeps the dessert from turning cakey.
- Vanilla extract: use pure vanilla or vanilla bean paste for that bakery level aroma.
- All purpose flour: this gives the dough its structure.
- Baking soda: just a touch, for a slight lift.
- Kosher salt: it balances all that sweetness and makes the chocolate taste more chocolatey.
- Chocolate chips, coins, or chunks: use high quality chocolate. Cheap bake stable chips resist melting, while good chopped chocolate melts into luscious pools.
The quality of your chocolate is the single biggest upgrade you can make here. Chop a good bar and you will taste the difference in every spoonful.
Instructions
Preheat your oven to 350°F (180°C). Line an 18cm (7 inch) baking dish with parchment paper, leaving a little overhang on the sides so you can lift the dessert out easily later.
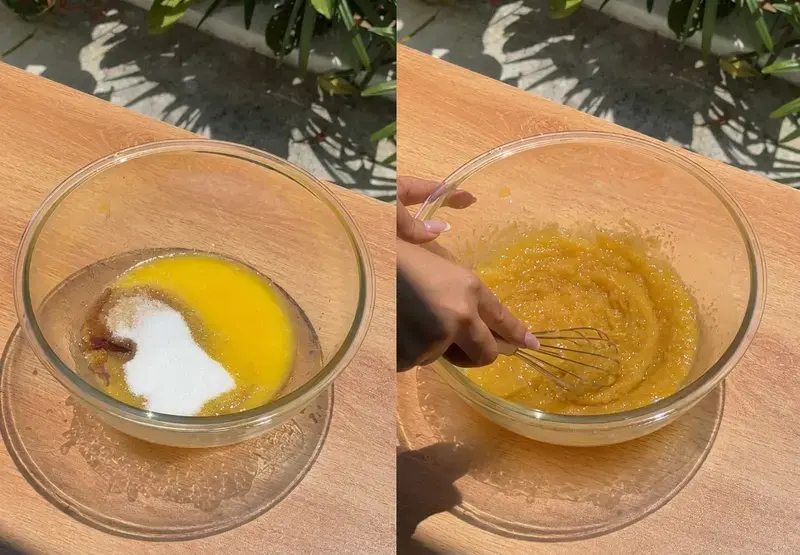
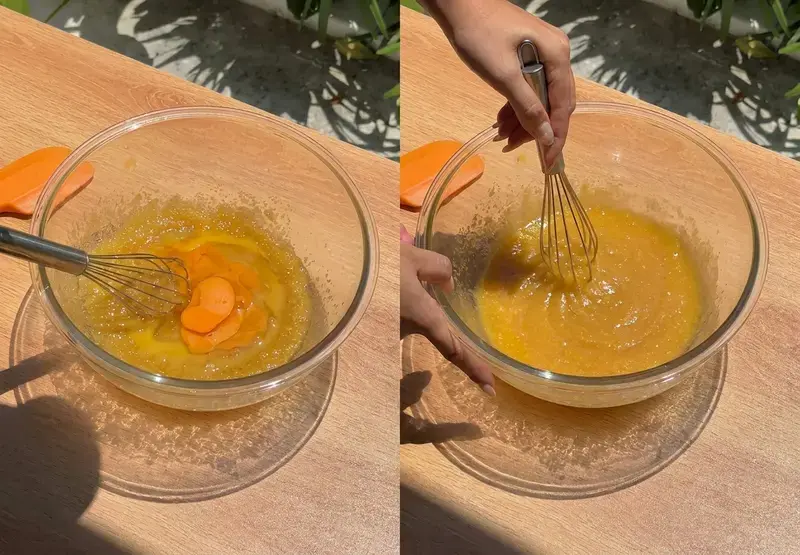
In a medium bowl, whisk together the melted butter, brown sugar, granulated sugar, kosher salt, and vanilla extract until well combined. Keep whisking until the mixture lightens slightly in color. Then add the 2 egg yolks and mix until smooth and glossy.
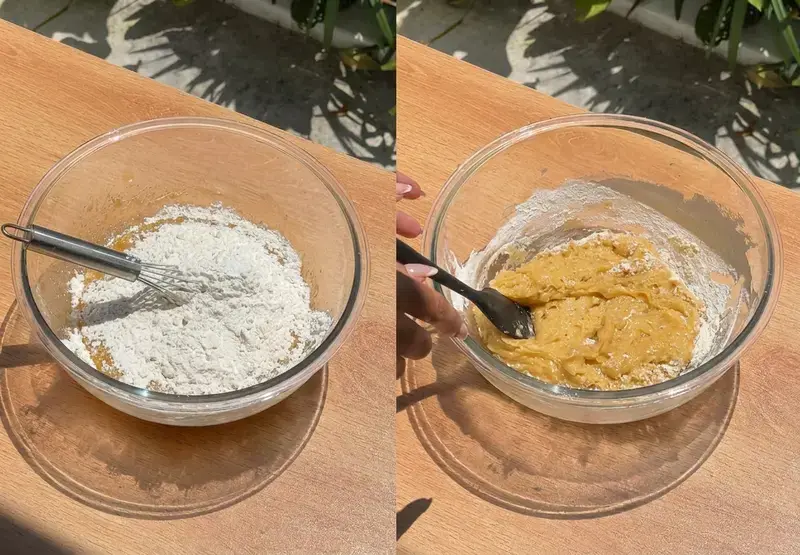
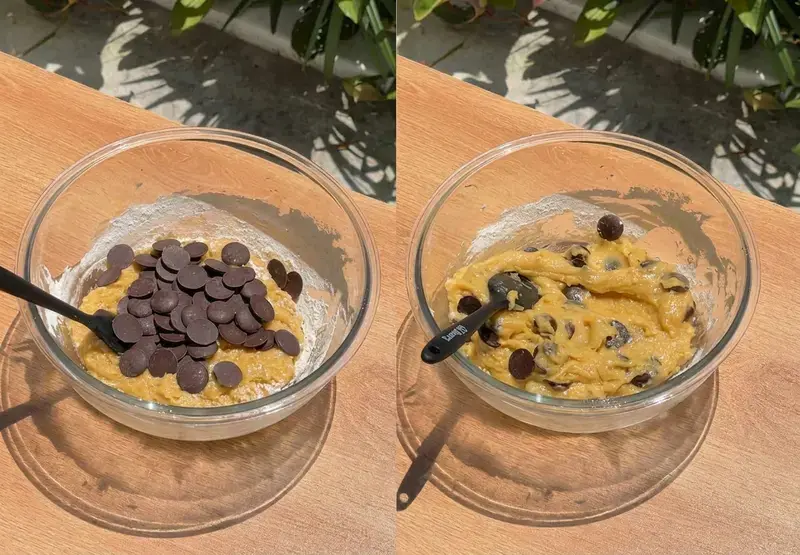
Switch to a spatula and fold in the flour and baking soda. Mix just until the flour disappears. Do not overmix, or the texture will tighten up. Fold in three quarters of your chocolate chips or chunks and save the rest for the centers.
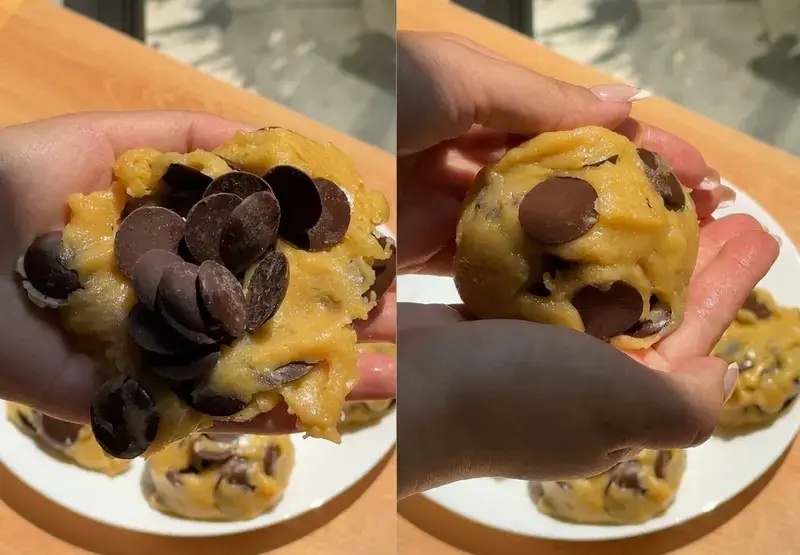
Divide the dough into 6 equal portions. Flatten each piece slightly in your hand, tuck a few chocolate coins or large chunks into the center, and roll the dough back into a ball to seal the chocolate inside. Press the seam closed so the chocolate stays put while baking.
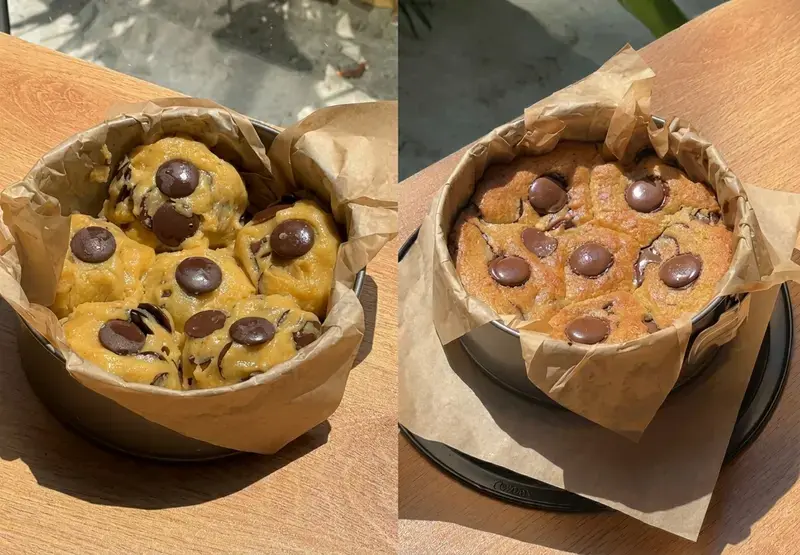
Place the 6 balls into your prepared baking dish, positioned close together so they merge as they bake. That is what creates the signature scoopable texture.
Bake for 20 minutes. You want the edges golden brown while the centers still look soft and gooey. Trust the look of the edges, not the center.
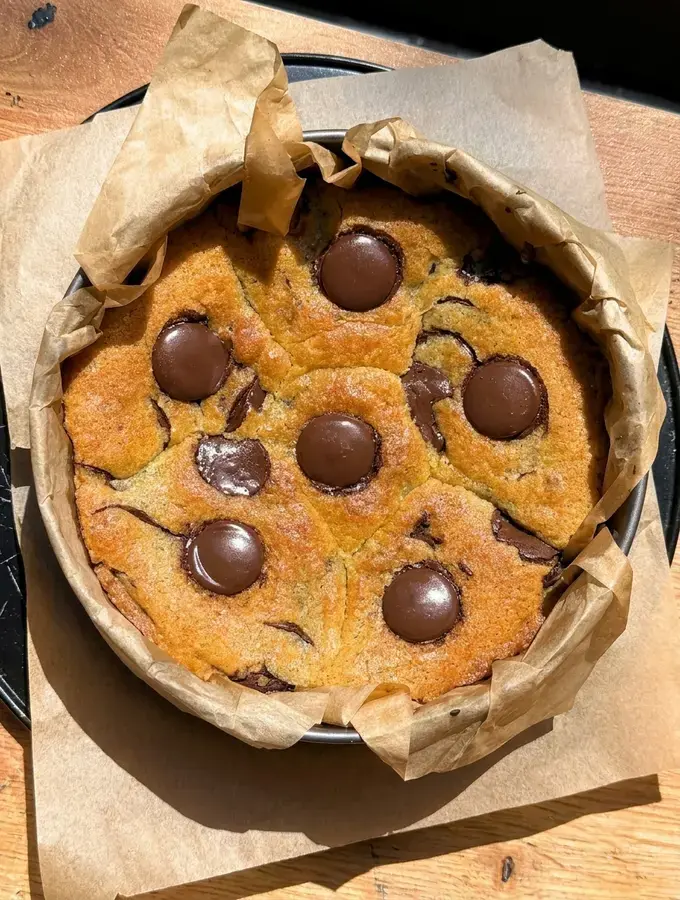
Remove the dish from the oven, sprinkle with flaky salt if you like, and serve immediately while hot with a big scoop of vanilla ice cream. Prep takes about 10 minutes, the bake is 20 minutes, and the total time is just 30 minutes.
Expert Tips
These small techniques make a big difference. I learned a few of them the hard way.
- Follow the 80% rule. Pull the dish when the edges are golden but the center still looks underdone. The hot pan keeps baking the middle for another 10 minutes on the counter. If you wait for the center to look done, you will overbake it.
- Create an insulation seal. Seal the dough tightly around each chocolate center so the filling stays liquid while the cookie bakes. Any gaps let the chocolate leak out.
- Respect thermal contrast. Wait 2 minutes before adding ice cream. The cookie stays hot enough to scoop, and the ice cream softens slowly instead of melting instantly.
- Do the emulsion check. Whisk the melted butter and sugar until the mixture lightens in color. This properly bonds the fats and prevents a greasy bottom layer.
- Layer your salt. Use kosher salt inside the dough and flaky salt on top. The crisp flakes give a lovely crunch against the molten center.
Troubleshooting
Something went wrong? It happens to everyone. Here is how to fix the most common problems.
- The chocolate did not melt. Bake stable chips are usually to blame. Their stabilizers help them hold their shape, which is the opposite of what you want here. Use chopped chocolate bars or couverture coins with a high cocoa butter content instead.
- The center is too runny. Your dish may be too deep. Tent the top with foil to protect the edges and bake 3 to 5 more minutes, then let the dish rest for 10 minutes. Residual heat finishes setting the center.
- The cookies are dry or cakey. This comes from over measuring flour or over mixing. Use a kitchen scale if you can, and stop mixing the moment the flour streaks disappear.
- The dough looks greasy. Your melted butter was probably too hot and broke the emulsion. Chill the assembled dish in the freezer for 10 minutes before baking to reset the fats.
Storing And Reheating
Leftovers keep in an airtight container for about 2 days at room temperature or up to 4 days in the fridge. Because the scoopable texture depends on liquid fats, the center will firm up as it cools. That is normal.
To bring back the molten middle, microwave individual portions for 10 to 15 seconds. For a whole dish, reheat at 350°F (180°C) for 5 minutes until the chocolate glistens again.
Freezing
This dessert freezes beautifully at both stages.
- Freeze the dough balls: place them in a sealed bag for up to 3 months. Bake them straight from frozen in the 7 inch dish, adding 3 minutes to the normal bake time.
- Freeze baked cookies: flash freeze the dish for 1 hour to set the chocolate, then wrap tightly. Thaw at room temperature and reheat before serving to restore that spoonable texture.
I keep a bag of stuffed dough balls in my freezer for surprise guests, and it has saved me more than once.
Substitutions
A few swaps work well if you need them.
- Gluten free: replace the all purpose flour with a 1:1 gluten free flour blend. The cookies may be slightly less chewy.
- Salted butter: you can use it in place of unsalted, just omit the added kosher salt in the dough.
- Vegan option: replace the egg yolks with a tablespoon of applesauce or a flax egg. Expect a softer cookie with less of the traditional rich chew.
Variations
Once you master the base, try one of these fun twists.
- S’mores: fold mini marshmallows and crushed graham crackers into the dough, top with extra chocolate coins, and bake until the marshmallows are toasted and gooey.
- Nutella stuffed: place a chilled teaspoon of Nutella in the center of each dough ball instead of chocolate chunks before sealing.
- Triple chocolate: use a mix of white, milk, and dark chocolate chunks for maximum chocolate impact.
Serving Tips
Serve the cookies warm, about 5 to 10 minutes after they come out of the oven, so the center is still molten. Top the dish with a large scoop of cold vanilla ice cream and a drizzle of chocolate sauce.
Then hand out spoons and eat it straight from the pan while the chocolate is melty. Trust me, nobody will complain about the lack of plates.
Equipment
You need only a small set of basic tools.
- An 18cm (7 inch) round or square baking dish
- Parchment paper for easy release and cleanup
- A medium mixing bowl
- A whisk to blend the melted butter with the sugars
- A rubber spatula for folding in the flour and chocolate without overmixing
- A kitchen scale or measuring cups for accurate measuring
- A cookie scoop or large spoon to divide the dough into even portions
- Oven mitts to handle the hot dish safely
More Uncategorized
More sweet, simple recipes are coming soon to keep your dessert rotation exciting.
FAQs
What makes these scoopable cookies different from regular chocolate chip cookies?
How do you get a molten chocolate center in scoopable cookies?
Why should I use only egg yolks instead of a whole egg in this recipe?
How do I reheat leftover scoopable cookies so they become gooey again?

Viral Scoopable Cookies
Viral Scoopable Cookies Viral scoopable cookies are the dessert everyone is baking right now, and once you try them you will understand why. Instead of spacing dough balls apart on a sheet pan, you nestle them close together in a small baking dish.
- Total Time: 30 min
- Yield: 6 cookies (balls of dough) 1x
Ingredients
Cookie Dough
1/2 cup Butter, unsalted, melted
1/2 cup Brown sugar, light brown sugar
1/3 cup Granulated sugar
1 teaspoon Vanilla extract
1/2 teaspoon Kosher salt
2 Egg yolks
2/3 teaspoon Baking soda
1 1/3 cups Flour
1 cup Chocolate Chips, or chocolate coins, or chocolate chunks
Instructions
Main Instructions
1-Preheat your oven to 350°F (180°C): Preheat your oven to 350°F (180°C). Line an 18cm (7-inch) baking dish with parchment paper, leaving a bit of overhang on the sides for easy removal.
2-In a medium bowl, whisk together the: In a medium bowl, whisk together the melted butter, brown sugar, granulated sugar, salt, and vanilla extract until well combined.
3-Add the egg yolks and mix until: Add the egg yolks and mix until smooth.
4-Fold in the flour and baking soda: Fold in the flour and baking soda using a spatula. Mix just until the flour disappears. Do not overmix.
5-Fold in 3/4 of your chocolate chips: Fold in 3/4 of your chocolate chips or chunks.
6-Divide the dough into 6 equal portions: Divide the dough into 6 equal portions. Flatten each piece slightly in your hand, place a few chocolate coins or large chunks in the center, and roll the dough back into a ball to seal the chocolate inside.
7-Place the 6 balls into your prepared: Place the 6 balls into your prepared baking dish. They should be placed close together so they merge as they bake, creating that signature scoopable texture.
8-Bake for 20 minutes: Bake for 20 minutes. The edges should be golden brown, but the centers will still look soft and gooey.
9-Remove from the oven and sprinkle with: Remove from the oven and sprinkle with flaky salt if desired. For the best experience, serve immediately while hot with a big scoop of vanilla ice cream!
Last Step:
Please leave a rating and comment letting us know how you liked this recipe! This helps our business to thrive and continue providing free, high-quality recipes for you.- Prep Time: 10 min
- Cook Time: 20 min
- Method: bake
Nutrition
- Calories: 390
- Sugar: 35
- Sodium: 334
- Fat: 19
- Saturated Fat: 12
- Carbohydrates: 52
- Fiber: 1
- Protein: 3
- Cholesterol: 79