
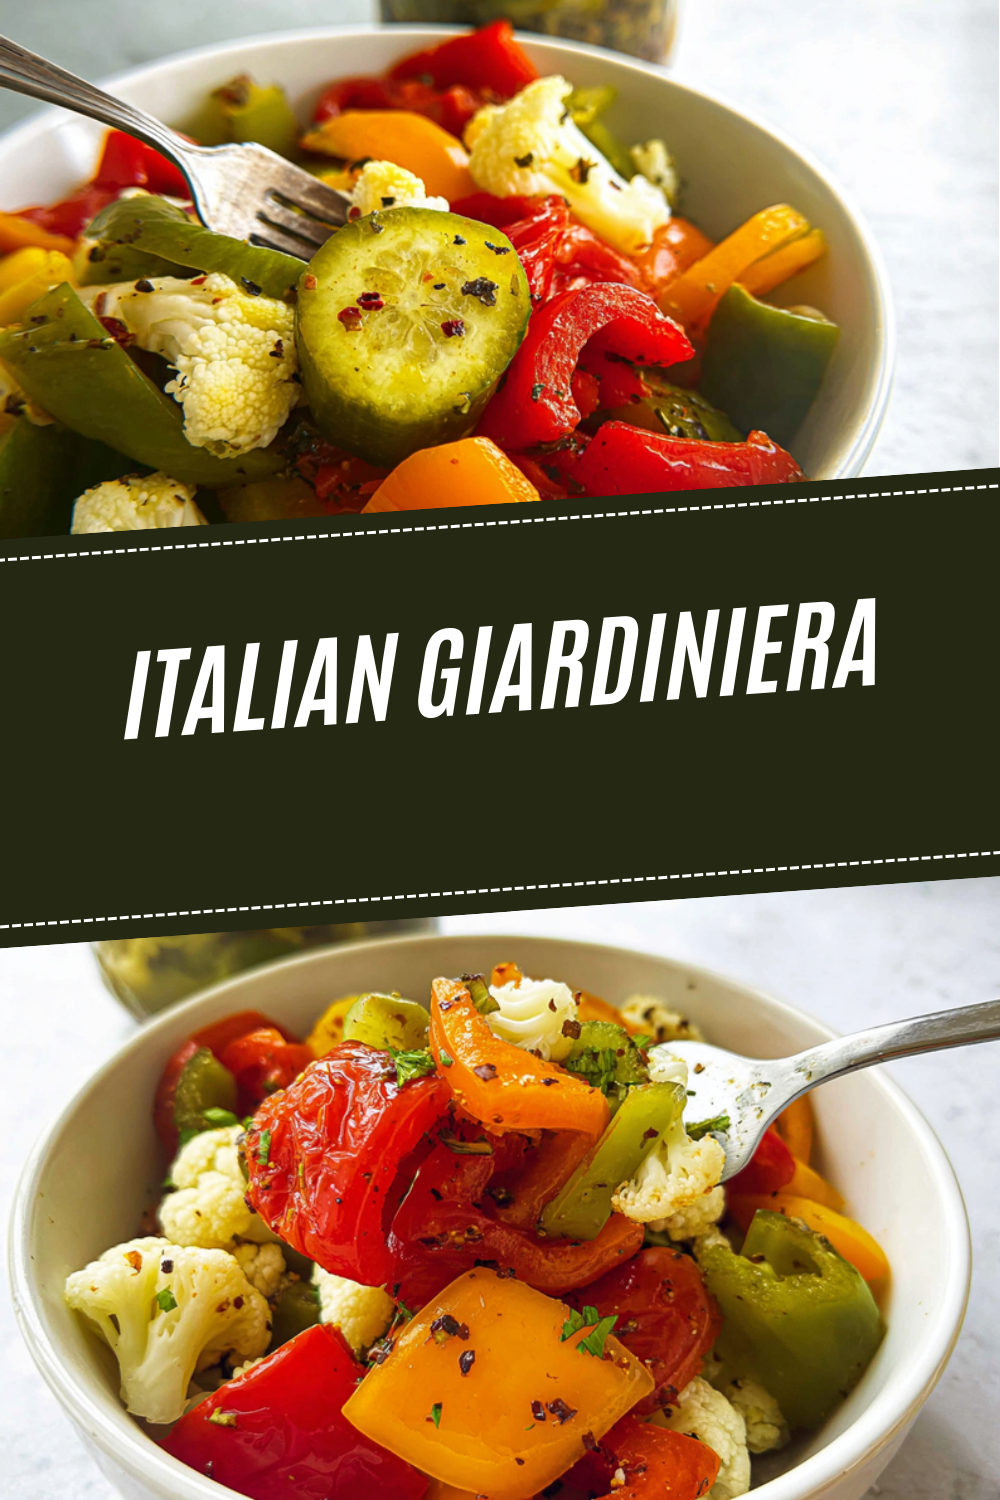
Why You’ll Love This Italian Giardiniera
Italian Giardiniera brings a burst of tangy and crunchy goodness to your table, making it a favorite among home cooks who enjoy fresh flavors. This recipe stands out because it’s simple to whip up, even on busy days, using everyday vegetables that you might already have on hand. Beyond its ease, it packs a nutritional punch with veggies full of vitamins that support daily wellness.
One key reason many people enjoy this dish is its health benefits, as it features nutrient-rich elements like cauliflower and carrots that offer antioxidants and essential vitamins. The combination of pickled vegetables also makes it versatile for various meals, from quick snacks to hearty lunches. Whether you’re a beginner in the kitchen or a seasoned cook, this Italian Giardiniera adds excitement to your plate without much effort.
For those watching their diet, it fits perfectly into vegan, gluten-free, or low-calorie plans, showing how adaptable it can be. Imagine topping your sandwich with these zesty pickles or serving them as a side to grilled meats; the possibilities are endless. This recipe not only satisfies your taste buds but also encourages you to experiment with simple ingredients for memorable meals.
According to experts, adding fermented foods like Italian Giardinieracan boost your gut health, thanks to the pickling process. Many home cooks love how it turns ordinary veggies into something special, perfect for family gatherings or solo dinners. With just a short preparation time, you’ll find yourself making it again and again for its fresh taste and ease.
The blend of spices and vinegar creates a unique flavor that elevates everyday eating. If you’re new to pickling, this is a great starting point for exploring Italian cuisine. Overall, it’s a recipe that brings joy and variety to your cooking routine, inspiring you to try more veggie-based dishes like our easy salad recipes on the blog.
Key Benefits at a Glance
- It’s quick to prepare, taking less than 30 minutes of active time before it steeps.
- Loaded with vegetables, it provides vitamins that support immune health and digestion.
- Adaptable for different diets, ensuring everyone can enjoy it without hassle.
- Offers a delightful crunch and tang that enhances any meal, from sandwiches to platters.
To learn more about the star ingredients, check out resources that highlight their nutrition, such as how carrots support eye health. This simple recipe from my kitchen shows how a few fresh items can create something truly special for your family.
Jump to:
- Why You’ll Love This Italian Giardiniera
- Key Benefits at a Glance
- Essential Ingredients for Italian Giardiniera
- Main Vegetables
- Pickling Brine
- Spices
- Finishing Touch
- Why These Ingredients Work
- How to Prepare the Perfect Italian Giardiniera: Step-by-Step Guide
- Step-by-Step Breakdown
- Dietary Substitutions to Customize Your Italian Giardiniera
- Protein and Main Component Alternatives
- Vegetable, Sauce, and Seasoning Modifications
- Mastering Italian Giardiniera: Advanced Tips and Variations
- How to Store Italian Giardiniera: Best Practices
- FAQs: Frequently Asked Questions About Italian Giardiniera
- Can I use apple cider vinegar instead of white vinegar for making Italian giardiniera?
- How long should I steep vegetables in the brine to keep them crunchy?
- What’s the best way to store homemade Italian giardiniera for long-term use?
- Do the vegetables need to be fully covered by brine or oil in the jar?
- Can I use frozen pearl onions if fresh ones are not available?
- Italian Giardiniera
- Ingredients
- Instructions
- Last Step:
- Notes
- Nutrition
- Did you make this recipe?
Essential Ingredients for Italian Giardiniera
Gathering the right ingredients is the first step to making delicious Italian Giardiniera that captures its traditional essence. This section outlines everything you need, focusing on the key vegetables, brine, spices, and oil that make this recipe shine. By using precise measurements, you’ll ensure your batch turns out perfectly every time.
Here’s a complete list of ingredients based on the classic recipe. I’ve formatted it clearly so you can follow along easily and pick up exactly what’s required.
Main Vegetables
- 3/4 pound cauliflower florets
- 1/2 pound firm carrots sliced on bias
- 2 firm celery stalks sliced on bias into 2-inch pieces
- 1/4 pound whole peeled pearl or small cipollini onions
- 1 red bell pepper sliced into strips or 1-inch rectangles
Pickling Brine
- 1 cup white wine vinegar
- 1 cup distilled white vinegar
- 1 cup spring or filtered water
- 1 tablespoon kosher salt
- 1 tablespoon sugar
Spices
- 1/2 teaspoon whole black peppercorns
- 1/2 teaspoon red pepper flakes
- 1/4 teaspoon whole cloves
- 1/4 teaspoon whole juniper berries
- 1 dried bay leaf
Finishing Touch
- 3 tablespoons extra-virgin olive oil (typically 1 tablespoon per jar)
This structured list covers all the items needed for a full batch, making it straightforward for you to shop and measure. For special dietary options, note that this recipe is naturally vegan and gluten-free, and you can reduce the oil for a lower-calorie version. Remember, fresh ingredients like these not only add crunch but also bring nutritional value to your table.
Why These Ingredients Work
| Ingredient Category | Role in Recipe | Dietary Notes |
|---|---|---|
| Vegetables | Provide crunch and nutrition | Vegan and low-calorie |
| Vinegar and Brine | Create tang and preserve flavors | Gluten-free option |
| Spices | Add depth and heat | Easily adjustable |
| Oil | Enhances richness and seals jars | Can be reduced for diets |
Using these ingredients ensures a balanced flavor profile that’s both fun and functional for your meals.
How to Prepare the Perfect Italian Giardiniera: Step-by-Step Guide
Creating Italian Giardiniera at home is straightforward and rewarding, starting with the simple act of preparing your vegetables. Begin by placing the vegetables in a large bowl to get them ready for the pickling process. Next, heat the vinegar, water, salt, and sugar in a pot until they dissolve, then boil for 3 minutes to create the brine.
Once the brine is ready, carefully steep the vegetables in it for about a minute to soften them slightly while keeping their crunch. After that, pack the vegetables into sterilized jars along with the spice mix for added flavor. Pour the hot brine 과 over the vegetables, leaving about 1/2 to 3/4 inch of space at the top, and add the olive oil before sealing the jars.
To finish, gently invert the jars to distribute the oil and flavors evenly, then let them sit at room temperature for 24 hours before moving to the refrigerator. For the best taste, allow the giardiniera to cure for about one week. It can be stored in the fridge for up to 3 months, making it a handy option for meal prep.
Step-by-Step Breakdown
- Prepare vegetables by washing and chopping them as specified.
- Heat the brine mixture and boil for 3 minutes.
- Steep vegetables briefly in the hot brine.
- Pack into jars with spices.
- Add brine and oil, then seal and invert jars.
- Refrigerate after 24 hours and wait a week for full flavor.
This method keeps things simple while ensuring great results, and it’s easy to adapt for variations like adding pepperoncini for extra heat. For more tips on vegetable preparation, check out our beginner’s guide to pickling on the blog.

Dietary Substitutions to Customize Your Italian Giardiniera
Making Italian Giardiniera your own is all about tweaking the ingredients to fit your needs. For protein additions, consider including marinated tofu or tempeh to boost the dish for vegan diets, or add cooked chicken breast if you prefer a non-vegetarian twist. These changes keep the recipe flexible while maintaining its core appeal.
Protein and Main Component Alternatives
Consider adding marinated tofu or tempeh to increase protein content for vegan diets or substituting with cooked chicken breast for a non-vegetarian variation.
Vegetable, Sauce, and Seasoning Modifications
Swap traditional vegetables like cauliflower with seasonal options such as zucchini or bell peppers for variety. Use balsamic vinegar instead of white wine vinegar for a sweeter profile or experiment with different herbs like basil or thyme. Adjust spice levels with fresh chili or omit pepper flakes to suit sensitive palates, and remember tips like adding green olives for a New Orleans style twist.
Variations can include adjusting olive oil for richness, making it easier to tailor to your taste. This way, you can enjoy the recipe no matter your dietary preferences.
Mastering Italian Giardiniera: Advanced Tips and Variations
Once you’re comfortable with the basics, you can elevate your Italian Giardiniera with some pro techniques. For instance, lightly roasting some vegetables before pickling can bring out their natural sweetness and add depth to the flavor. Experimenting with additions like capers, olives, or sun-dried tomatoes can give it an Italian-inspired boost that surprises your taste buds.
Presentation matters too; serve your giardiniera in small glass jars or on decorative platters with fresh herbs for a visually appealing appetizer. If you’re planning ahead, make large batches and store them in airtight containers for up to two weeks, which is perfect for busy schedules. Remember, adjusting olive oil can enhance richness, while adding pepperoncini introduces extra heat.
Here are a few quick variations to try:
- Add pepperoncini for a spicy kick.
- Incorporate green olives for a New Orleans flair.
- Roast veggies first for deeper flavors.
When you master these tips, Italian Giardiniera becomes more than a side it’s a staple that brings creativity to your kitchen.
How to Store Italian Giardiniera: Best Practices
Proper storage keeps your Italian Giardiniera fresh and flavorful for as long as possible. Start by refrigerating it in a sealed glass jar, where it will stay good for up to two weeks if handled correctly. Freezing isn’t ideal due to texture changes, but if needed, use airtight containers and thaw slowly in the fridge.
Serve it cold or at room temperature to preserve its crispness, as reheating can soften the vegetables. For meal prep, consider making larger batches and dividing them into smaller jars for easy grab-and-go options. Given that it can last up to 3 months in the fridge when prepared right, it’s a smart choice for weekly planning.
Key storage tips include:
- Always use clean, sealed jars to prevent spoilage.
- Check for any signs of change before eating.
- Label your jars with dates for easy tracking.
FAQs: Frequently Asked Questions About Italian Giardiniera
Can I use apple cider vinegar instead of white vinegar for making Italian giardiniera?
How long should I steep vegetables in the brine to keep them crunchy?
What’s the best way to store homemade Italian giardiniera for long-term use?
Do the vegetables need to be fully covered by brine or oil in the jar?
Can I use frozen pearl onions if fresh ones are not available?

Italian Giardiniera
🥒 Transform fresh vegetables into a tangy, crunchy Italian delicacy that adds vibrant flavor and texture to sandwiches, salads, and antipasto platters
️ Master the traditional art of Italian pickling with this versatile condiment that brings the authentic taste of Italy to your kitchen and elevates any meal with its zesty, herbaceous profile
- Total Time: 1 week 25 minutes
- Yield: About 3 jars
Ingredients
– 3/4 pound cauliflower florets
– 1/2 pound firm carrots sliced on bias
– 2 firm celery stalks sliced on bias into 2-inch pieces
– 1/4 pound whole peeled pearl or small cipollini onions
– 1 red bell pepper sliced into strips or 1-inch rectangles
– 1 cup white wine vinegar
– 1 cup distilled white vinegar
– 1 cup spring or filtered water
– 1 tablespoon kosher salt
– 1 tablespoon sugar
– 1/2 teaspoon whole black peppercorns
– 1/2 teaspoon red pepper flakes
– 1/4 teaspoon whole cloves
– 1/4 teaspoon whole juniper berries
– 1 dried bay leaf
– 3 tablespoons extra-virgin olive oil (typically 1 tablespoon per jar)
Instructions
1-Prepare vegetables by washing and chopping them as specified.
2-Heat the brine mixture and boil for 3 minutes.
3-Steep vegetables briefly in the hot brine.
4-Pack into jars with spices.
5-Add brine and oil, then seal and invert jars.
6-Refrigerate after 24 hours and wait a week for full flavor.
Last Step:
Please leave a rating and comment letting us know how you liked this recipe! This helps our business to thrive and continue providing free, high-quality recipes for you.Notes
🥒 Cut vegetables uniformly for even pickling and attractive presentation – aim for similar sizes so everything pickles at the same rate
🌶️ Adjust the heat level by varying red pepper flakes or adding pepperoncini for spicier giardiniera that suits your taste preference
⏰ Be patient with the curing process – while giardiniera can be eaten after 24 hours, the full week of refrigeration develops deep, complex flavors that make it truly authentic
- Prep Time: 20 minutes
- Curing Time: 1 week
- Cook Time: 5 minutes
- Category: Condiment
- Method: Pickling
- Cuisine: Italian
- Diet: Vegan, Gluten-Free
Nutrition
- Serving Size: 1/4 cup
- Calories: 35
- Sugar: 3g
- Sodium: 480mg
- Fat: 2g
- Saturated Fat: 0g
- Unsaturated Fat: 2g
- Trans Fat: 0g
- Carbohydrates: 4g
- Fiber: 1g
- Protein: 1g
- Cholesterol: 0mg


Absolutely loved this Italian giardiniera recipe.
I made a batch yesterday and it brightened up my sandwiches and salads.
Would you recommend canning for longer shelf life or is refrigeration enough for 4-6 weeks? 😊