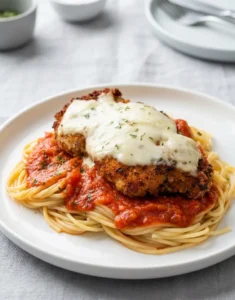
Crispy, Saucy, and Melted to Perfection
There is something truly special about a dish that delivers a golden, crispy crust, a rich, savory marinara, and a blanket of bubbly, melted cheese all in one bite. Baked Chicken Parmesan is that dish. It takes the classic Italian American comfort food you love from your favorite restaurant and brings it home without a single pot of hot oil. No deep frying required. Just an oven, a little patience, and a whole lot of flavor. This version lets the chicken stay the star, with a coating that turns perfectly crunchy in the heat and a sauce that stays bright and bold. It is a meal that feels both indulgent and approachable, the kind of dinner that makes a Tuesday night feel a little special.
Jump to:
- Crispy, Saucy, and Melted to Perfection
- Why You’ll Love This Recipe
- Ingredients You’ll Need
- For the Chicken
- For the Sauce and Topping
- Step by Step Instructions
- Step 1: Prep the Chicken
- Step 2: Set Up the Breading Station
- Step 3: Bake the Chicken
- Step 4: Add Sauce and Cheese
- Step 5: Garnish and Serve
- Pro Tips for Success
- Flavor Variations
- Make Ahead, Freezing and Reheating
- Nutrition Facts (Per Serving)
- Serving Suggestions
- The Flavor Science
- A Little History
- Final Flavor Notes
- FAQs
- How do you bake chicken parmesan without frying?
- What is the best temperature to bake chicken parmesan?
- Can you make baked chicken parmesan ahead of time?
- How long to bake chicken parmesan at 425?
- Is baked chicken parmesan healthier than fried?
- How to keep baked chicken parmesan crispy?
- Baked Chicken Parmesan
- Ingredients
- Instructions
- Last Step:
- Notes
- Nutrition
- Did you make this recipe?
Why You’ll Love This Recipe
This baked chicken parmesan recipe hits every note you want in a weeknight dinner. It delivers restaurant quality results without the heavy cleanup or extra calories that come with frying. The chicken stays tender and juicy inside, while the outside gets a satisfying crunch from a simple panko and Parmesan coating.

Baking instead of frying keeps things lighter, but it does not sacrifice an ounce of flavor. The whole family will ask for it again. You can also prep the breaded chicken ahead of time, which makes busy evenings much smoother. It is a foolproof, crowd pleasing meal that feels like a win from the first bite to the last.
Ingredients You’ll Need
For the Chicken
- 4 boneless, skinless chicken breasts (about 1.5 pounds total)
- 1 cup all purpose flour
- 2 large eggs
- 1 cup panko breadcrumbs
- 1/2 cup grated Parmesan cheese
- 1 teaspoon garlic powder
- 1 teaspoon dried oregano
- 1/2 teaspoon salt
- 1/4 teaspoon black pepper
- 2 tablespoons olive oil (for drizzling)

For the Sauce and Topping
- 1 1/2 cups good quality marinara sauce
- 1 cup shredded low moisture mozzarella cheese
- 1/4 cup grated Parmesan cheese
- Fresh basil leaves for garnish

Step by Step Instructions

Step 1: Prep the Chicken
Preheat your oven to 425 degrees Fahrenheit. Line a large baking sheet with parchment paper or a silicone mat for easy cleanup. Slice each chicken breast horizontally into two thin cutlets.

If your breasts are very large, you may get three. Aim for even thickness so they cook at the same rate. Pat the cutlets dry with paper towels. This step is important because moisture is the enemy of a crisp coating.
Step 2: Set Up the Breading Station
Grab three shallow bowls. In the first, add the flour. In the second, beat the eggs with a splash of water. In the third, mix the panko, grated Parmesan, garlic powder, oregano, salt, and pepper.

Working with one cutlet at a time, dip it first into the flour and shake off any excess. Next, dip it into the egg, letting the excess drip off. Finally, press the cutlet into the breadcrumb mixture, making sure both sides are fully coated. Place the breaded chicken on the prepared baking sheet. Let the coated pieces rest for 5 minutes before baking, which helps the crust adhere.
Step 3: Bake the Chicken
Drizzle a little olive oil over each breaded cutlet. Bake the chicken for 18 to 20 minutes, flipping the pieces halfway through. The cutlets should be golden brown and firm to the touch. If your oven runs hot, check at 15 minutes. The high heat is what creates that crunchy exterior.
Step 4: Add Sauce and Cheese
Remove the baking sheet from the oven. Spoon about 3 tablespoons of marinara sauce over each cutlet, spreading it gently. Top each with a generous sprinkle of shredded mozzarella and a little more Parmesan.

Return the pan to the oven and bake for another 8 to 10 minutes. You want the cheese melted and the sauce hot. For an extra golden, bubbly top, switch the oven to broil for the last 1 to 2 minutes, but watch it closely.
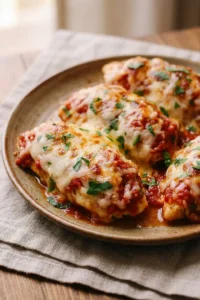
Step 5: Garnish and Serve
Let the baked chicken parmesan rest on the pan for about 3 minutes. This short rest helps the cheese set slightly so it does not slide off.

Tear a few fresh basil leaves over the top for a pop of color and fragrance. Serve immediately with your favorite sides.
Pro Tips for Success
Getting the perfect baked chicken parmesan comes down to a few small details. Use thin cutlets for even cooking; thick pieces will dry out before the coating crisps. Panko breadcrumbs are your secret weapon for that light, shattery crunch. Do not overload the cutlets with sauce.

A thin layer is enough to flavor the chicken without making the crust soggy. Let the breaded chicken rest for 5 minutes before baking; this gives the coating time to stick. If you want extra color on top, a quick broil at the end works wonders. Always keep an eye on the broiler, because it goes from golden to burnt in seconds.
Flavor Variations
Once you master the basic method, the possibilities are wide open. Swap the marinara for a spicy arrabbiata sauce if you want heat. Add a slice of provolone under the mozzarella for an extra layer of savory richness. Going low carb?

Use almond flour and crushed pork rinds in place of the breadcrumbs for a keto friendly version. For a vegetarian twist, try thick slices of breaded eggplant or portobello mushrooms instead of the chicken. Each variation keeps the same oven baked method but changes the flavor profile completely. It is an easy way to keep the dish fresh for repeat meals.
Make Ahead, Freezing and Reheating
This recipe works beautifully for meal prep. You can bread the chicken cutlets and refrigerate them for up to 24 hours before baking. If you want to freeze them, arrange the breaded, uncooked cutlets in a single layer on a baking sheet. Once solid, transfer them to a freezer bag or container.

To bake from frozen, place them on a sheet and cook at 400 degrees Fahrenheit for 25 to 28 minutes, then add sauce and cheese and finish. For reheating fully cooked leftovers, the oven is your best friend. Warm them at 375 degrees Fahrenheit for 8 to 10 minutes. Avoid the microwave, which turns the crisp coating soft. A little extra time in the oven keeps everything tasting fresh.
Nutrition Facts (Per Serving)
| Nutrient | Amount |
|---|---|
| Calories | 420 |
| Protein | 41 g |
| Carbohydrates | 20 g |
| Fat | 18 g |
These values are for one serving of the recipe as written, using standard ingredients. The numbers will shift slightly depending on your choice of breadcrumbs, oil, and specific cheese brands. For a lighter version, use part skim mozzarella and reduce the olive oil drizzle.

Serving Suggestions
Baked chicken parmesan is a natural partner for a plate of spaghetti tossed in a little extra marinara. A crisp Caesar salad with crunchy croutons and sharp Parmesan balances the richness. Garlic bread, warm and buttery, is perfect for soaking up any leftover sauce from the plate. For a lighter side, try a simple arugula salad with lemon vinaigrette. A glass of medium bodied red wine like a Chianti or a Sangiovese pairs beautifully with the tomato and cheese flavors. For a family friendly night, serve it with a side of roasted broccoli or green beans. It fits right in whether you are hosting a weekend dinner or feeding the crew on a busy Wednesday.
The Flavor Science
Why does this baked version work so well? The high oven temperature, 425 degrees Fahrenheit, does two important things at once. It quickly sets the breadcrumb coating into a crisp shell, and it cooks the thin chicken cutlet through before the interior dries out. The flour layer in the breading station acts as a glue, holding the egg and crumbs to the meat.

The resting period after breading gives the coating time to adhere, so it does not peel off during handling. Baking on a wire rack or a well greased sheet promotes even air circulation, which keeps the bottom from steaming. The final layer of sauce and cheese goes on after the crust is already set, so the moisture stays on top and does not penetrate the crispy layer. That is the science behind every crunchy, saucy bite.
A Little History
Chicken Parmesan, or Parmigiana, as it is known in Italy, has a story that starts far from the American dinner table. The original dish is Eggplant Parmigiana, a southern Italian specialty where slices of eggplant are breaded, fried, and layered with tomato sauce and cheese. When Italian immigrants came to the United States in the late 19th and early 20th centuries, they found chicken more affordable and widely available than eggplant. They adapted the recipe, swapping the vegetable for thin chicken cutlets. The dish became a staple in Italian American restaurants and homes across the country. Over time, the baked version emerged as a lighter alternative that kept all the flavor but cut out the deep fryer. It is a perfect example of how immigrant cooking created something entirely new and beloved.
Final Flavor Notes
Baked chicken parmesan is the kind of recipe that proves you do not need a fryer to get a golden, satisfying crust. It brings together the best of Italian American comfort food in a way that fits right into a busy week. You get tender chicken, a crunchy coating, rich marinara, and melted cheese all from a single baking sheet.

It is simple enough for a beginner cook but impressive enough for company. Every time you make it, you build a little more confidence in the kitchen. That is the whole point, to cook with joy, create memories, and share good food around the table.
FAQs
How do you bake chicken parmesan without frying?
What is the best temperature to bake chicken parmesan?
Can you make baked chicken parmesan ahead of time?
How long to bake chicken parmesan at 425?
Is baked chicken parmesan healthier than fried?
How to keep baked chicken parmesan crispy?

Baked Chicken Parmesan
🍗 Crispy golden panko crust meets bubbly melted mozzarella without a drop of hot oil—all the comfort of classic chicken parmesan made lighter in the oven.
🍝 A foolproof weeknight dinner that delivers restaurant-quality results with simple ingredients and easy cleanup.
- Total Time: 53 minutes
- Yield: 4 servings 1x
Ingredients
4 boneless, skinless chicken breasts (about 1.5 pounds total)
1 cup all purpose flour
2 large eggs
1 cup panko breadcrumbs
1/2 cup grated Parmesan cheese
1 teaspoon garlic powder
1 teaspoon dried oregano
1/2 teaspoon salt
1/4 teaspoon black pepper
2 tablespoons olive oil (for drizzling)
1 1/2 cups good quality marinara sauce
1 cup shredded low moisture mozzarella cheese
1/4 cup grated Parmesan cheese
Fresh basil leaves for garnish
Instructions
1-Prep the Chicken: Preheat oven to 425°F, line a baking sheet with parchment, slice chicken breasts into thin cutlets, and pat dry.
2-Set Up the Breading Station: Prepare three bowls with flour, beaten eggs, and panko-Parmesan mixture. Dredge each cutlet in flour, egg, then breadcrumbs, and let rest for 5 minutes.
3-Bake the Chicken: Drizzle oil over breaded cutlets and bake at 425°F for 18-20 minutes, flipping halfway, until golden and firm.
4-Add Sauce and Cheese: Top each cutlet with marinara sauce, mozzarella, and Parmesan, then bake an additional 8-10 minutes. Optionally broil for 1-2 minutes for a bubbly top.
5-Garnish and Serve: Let rest 3 minutes, garnish with fresh basil, and serve immediately.
Last Step:
Please leave a rating and comment letting us know how you liked this recipe! This helps our business to thrive and continue providing free, high-quality recipes for you.Notes
💡 Use panko breadcrumbs for the lightest, crunchiest crust—they make all the difference over regular breadcrumbs.
💡 Apply a thin layer of sauce only—too much will soften the crispy coating you worked hard to create.
💡 Let the breaded cutlets rest for 5 minutes before baking so the coating adheres and stays put during baking.
- Prep Time: 15 minutes
- Resting Time: 8 minutes
- Cook Time: 30 minutes
- Category: Main Dish
- Method: Baked
- Cuisine: Italian American
Nutrition
- Serving Size: 1 cutlet
- Calories: 480
- Sugar: 6g
- Sodium: 820mg
- Fat: 18g
- Saturated Fat: 7g
- Unsaturated Fat: 9g
- Trans Fat: 0g
- Carbohydrates: 26g
- Fiber: 2g
- Protein: 42g
- Cholesterol: 135mg