These lemon rolls are the kind of treat I want when the weather is warm and the morning feels slow. They are soft, fluffy, yeasted rolls with a gooey lemon sugar filling, baked until golden, and finished with a bright lemon icing. The recipe comes together in about 90 minutes, which I love for brunch.
I think of them as a lighter, sunnier cousin to cinnamon rolls. The lemon shows up in the dough, the filling, and the icing, so the flavor is clear but not harsh. Serve them warm with fresh lemon zest on top, and they look like they came from a bakery.
Let’s walk through each step so these turn out as amazing as possible. Here are the ingredient groups I keep ready before I start.
Lemon Roll Dough: 4 1/4 cups all purpose flour (530g) plus additional as needed, 4 1/2 tsp instant dry yeast or 2 packets (14g), 1 Tbsp plus 1 tsp poppy seeds (optional), 1 tsp fine salt, 1 cup buttermilk room temperature, 1/2 cup granulated sugar, 1/2 cup unsalted butter room temperature, 2 large eggs room temperature, and 2 Tbsp fresh lemon zest.
Lemon Roll Filling: 1/2 cup granulated sugar, 1/2 cup packed light brown sugar, 2 Tbsp fresh lemon zest, and 1/2 cup softened unsalted butter.
Lemon Icing: 2 cups powdered sugar, 1/4 cup fresh lemon juice, and 2 Tbsp melted unsalted butter.
Additional topping: fresh lemon zest.
Tools / Equipment
I use a stand mixer with a dough hook when I make these. If you do not have one, a Danish dough whisk works well for mixing by hand. I also keep a large bowl, a separate microwave safe bowl, a medium bowl, a whisk, a rolling pin, a 9 by 13 inch pan, foil, and unflavored dental floss nearby.
Step 1: Make the Lemon Roll Dough
Preheat your oven to 200 F / 95 C.
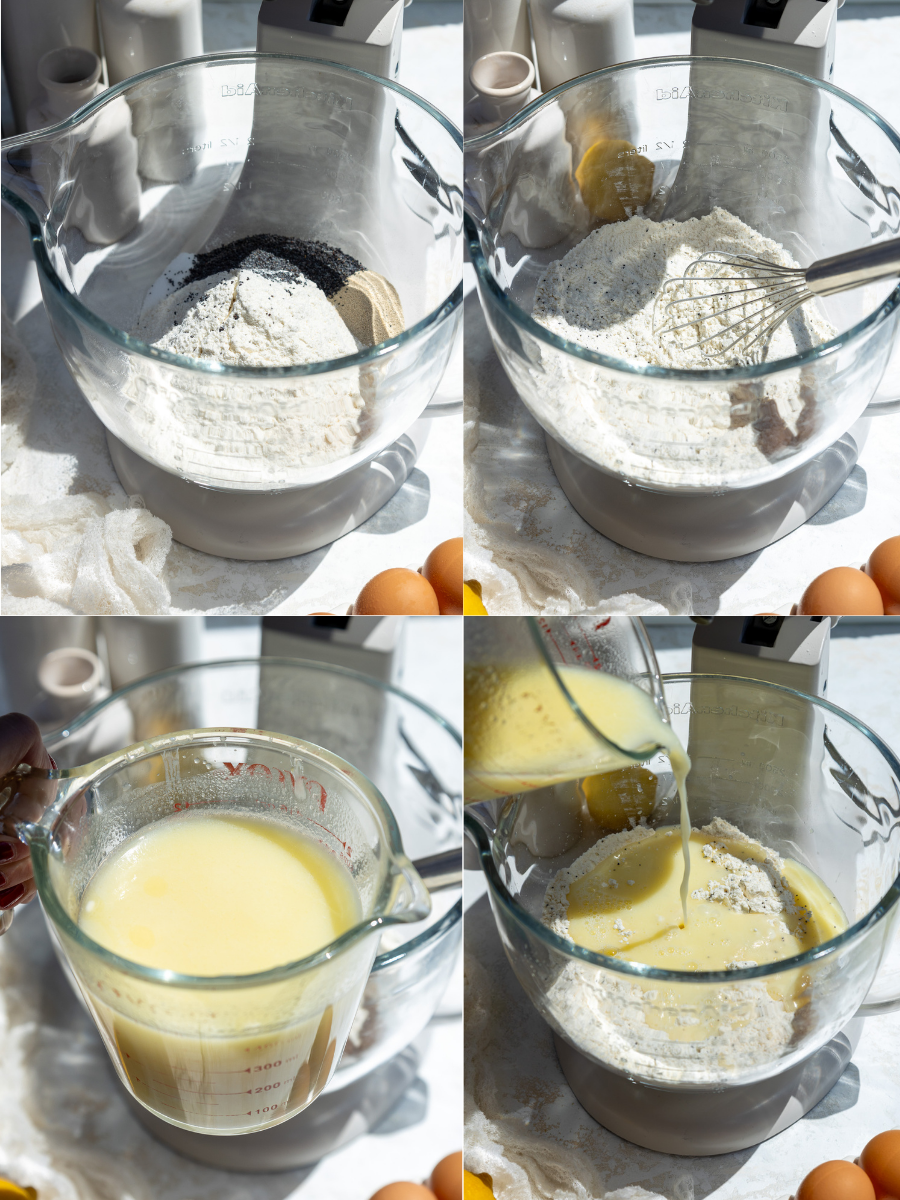
In a large bowl or stand mixer bowl, combine 4 1/4 cups flour, 4 1/2 tsp or 2 packets instant dry yeast, 1 Tbsp plus 1 tsp poppy seeds, and 1 tsp salt.
In a separate bowl, combine 1 cup buttermilk, 1/2 cup granulated sugar, and 1/2 cup butter cut into tablespoon sized pieces. Heat for 1 minute in the microwave, then stir. The butter should be mostly melted and the mixture should feel warm but not hot. If it is too hot, it can kill the yeast.
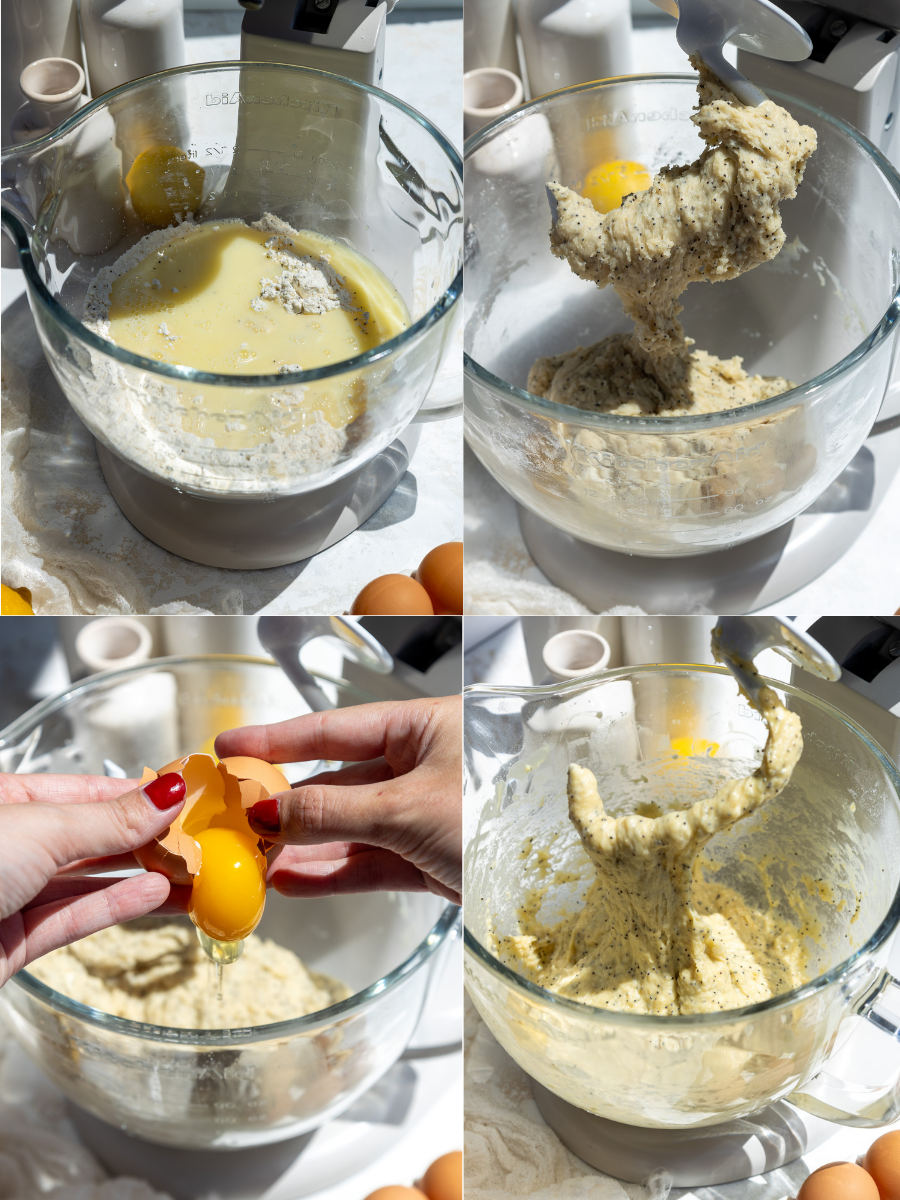
Slowly pour the warm buttermilk mixture into the dry ingredients and mix on medium speed with a dough hook or by hand with a dough whisk. If you do not have a dough whisk, use a large wooden spoon. The dough should be quite sticky at this point.
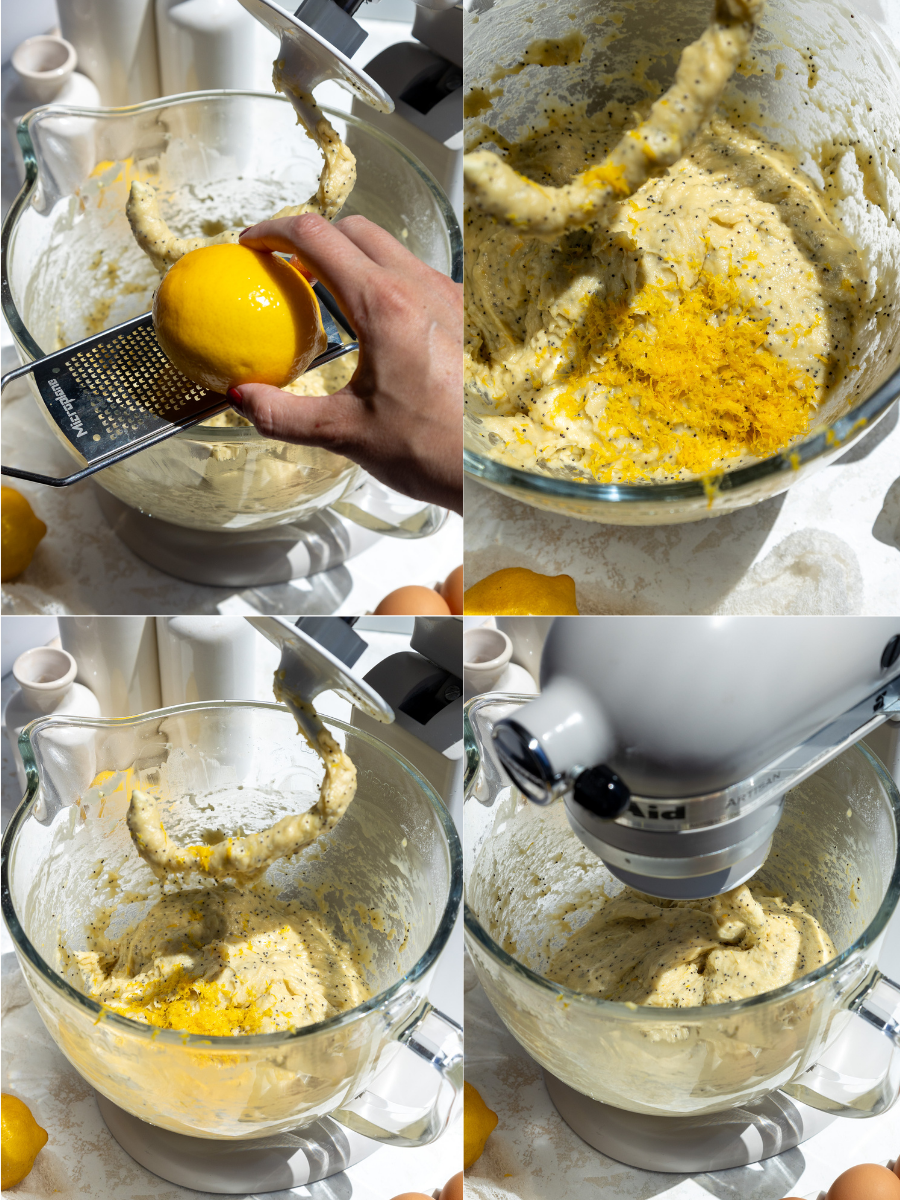
Mix in 2 large eggs, one at a time, on a medium low speed until a sticky dough ball forms. Keep mixing until each egg is fully combined. Then mix for a couple of minutes until the dough becomes more elastic. Mix in the zest of 2 large lemons.
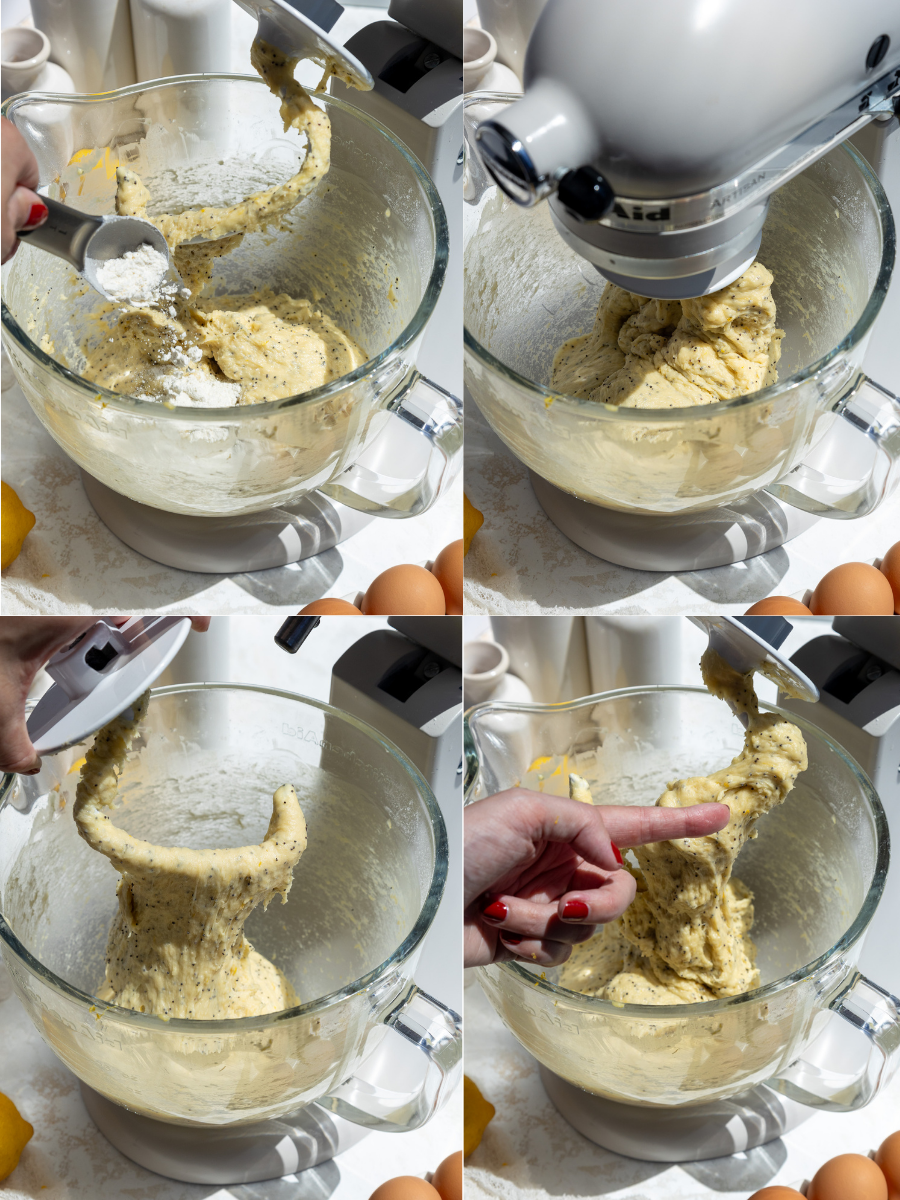
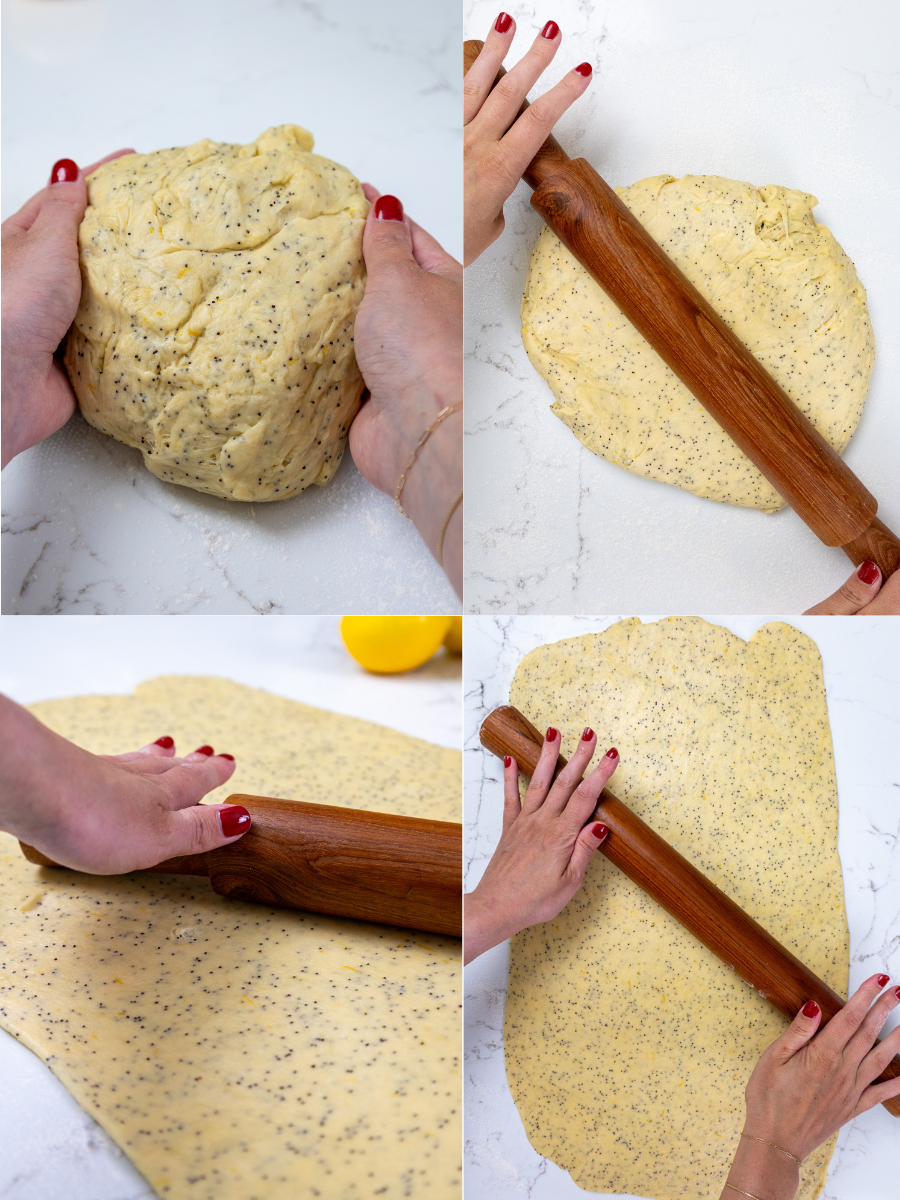
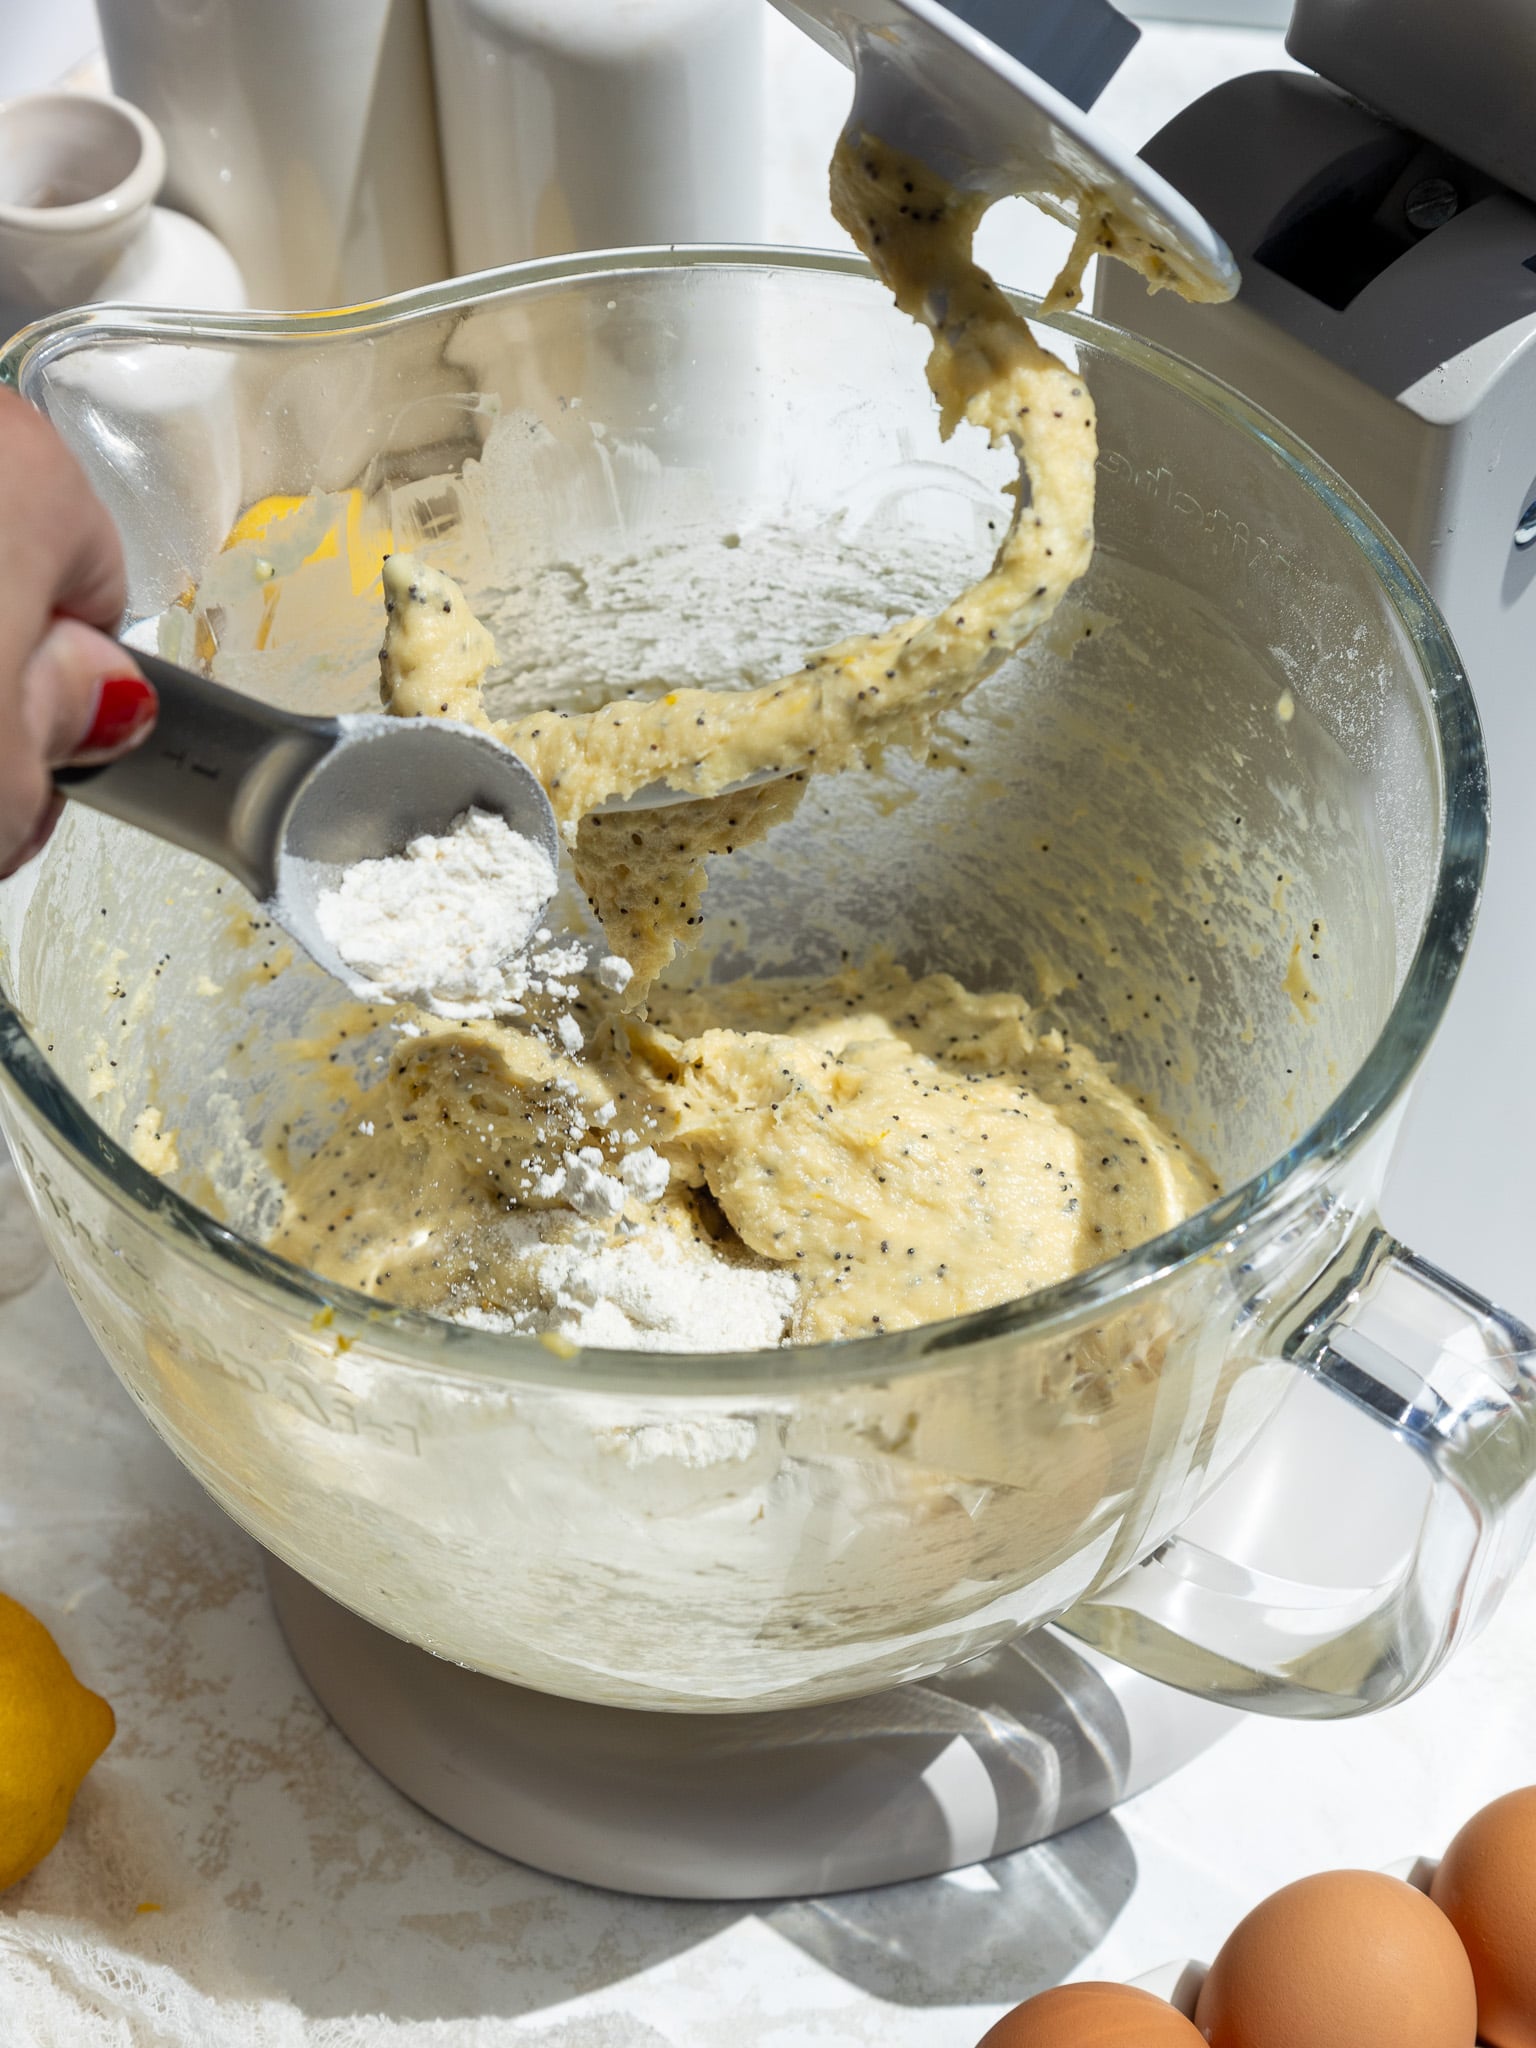
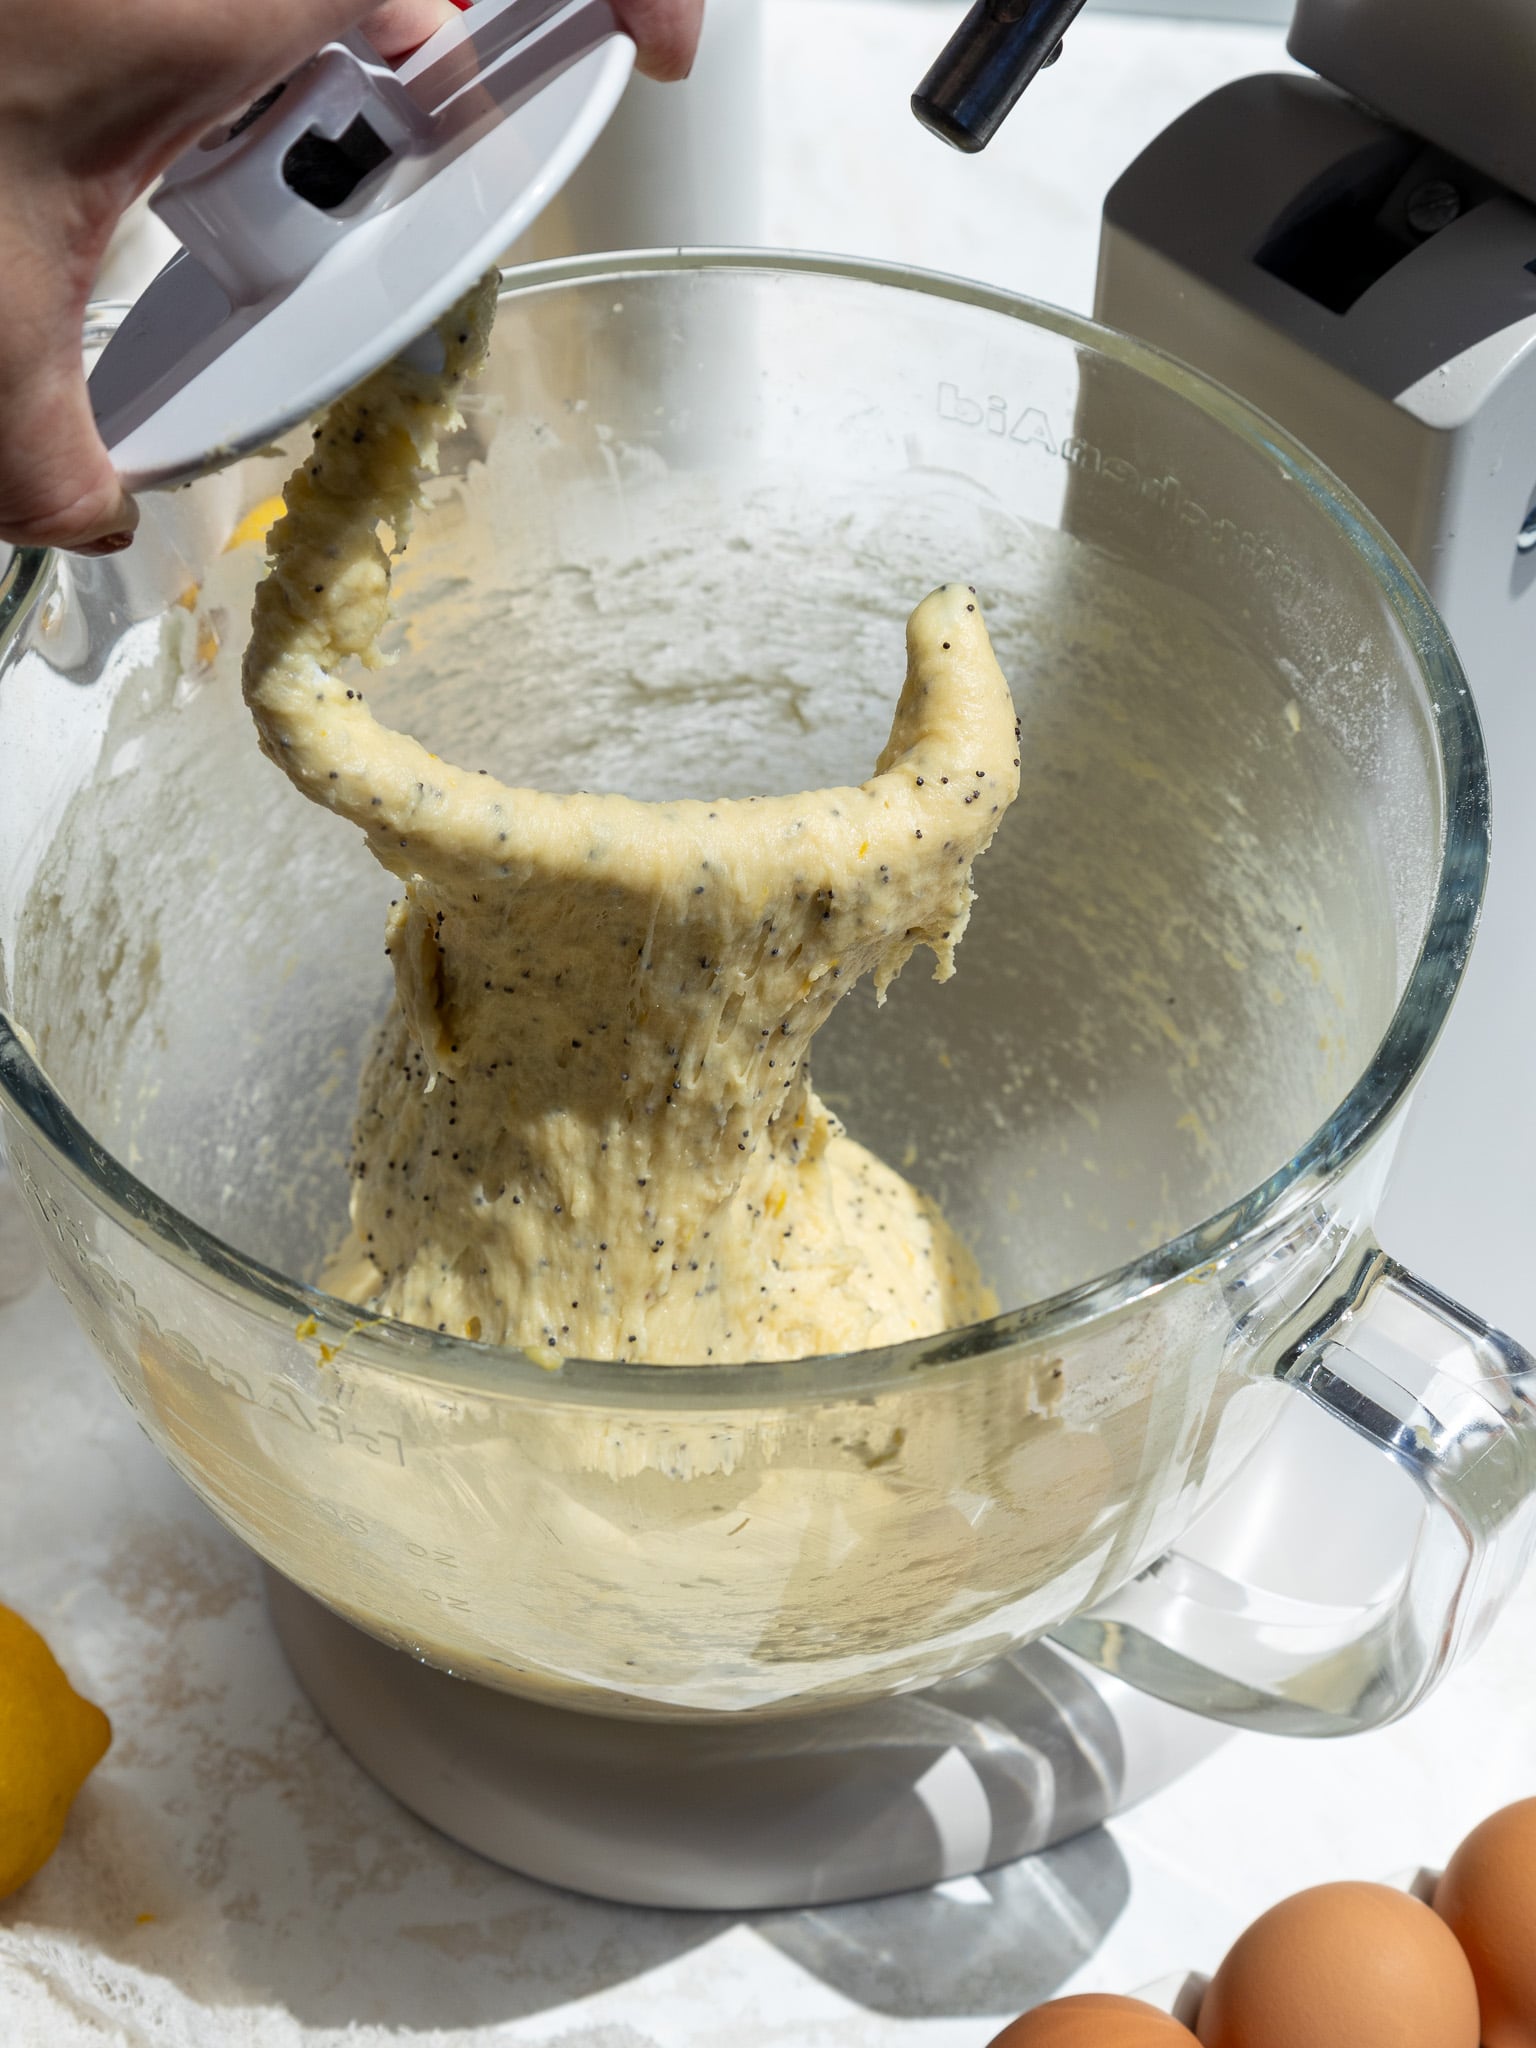
Add additional flour 1 tablespoon at a time until the dough begins to leave the sides of the bowl. I usually add about 3 additional tablespoons. Poke the dough with your finger. It should feel tacky but not sticky, and there should be no residue on your finger.
Cover the bowl with plastic wrap or a towel and let the dough rest for 10 to 20 minutes. This makes it much easier to roll out.
Step 2: Make the Lemon Roll Filling
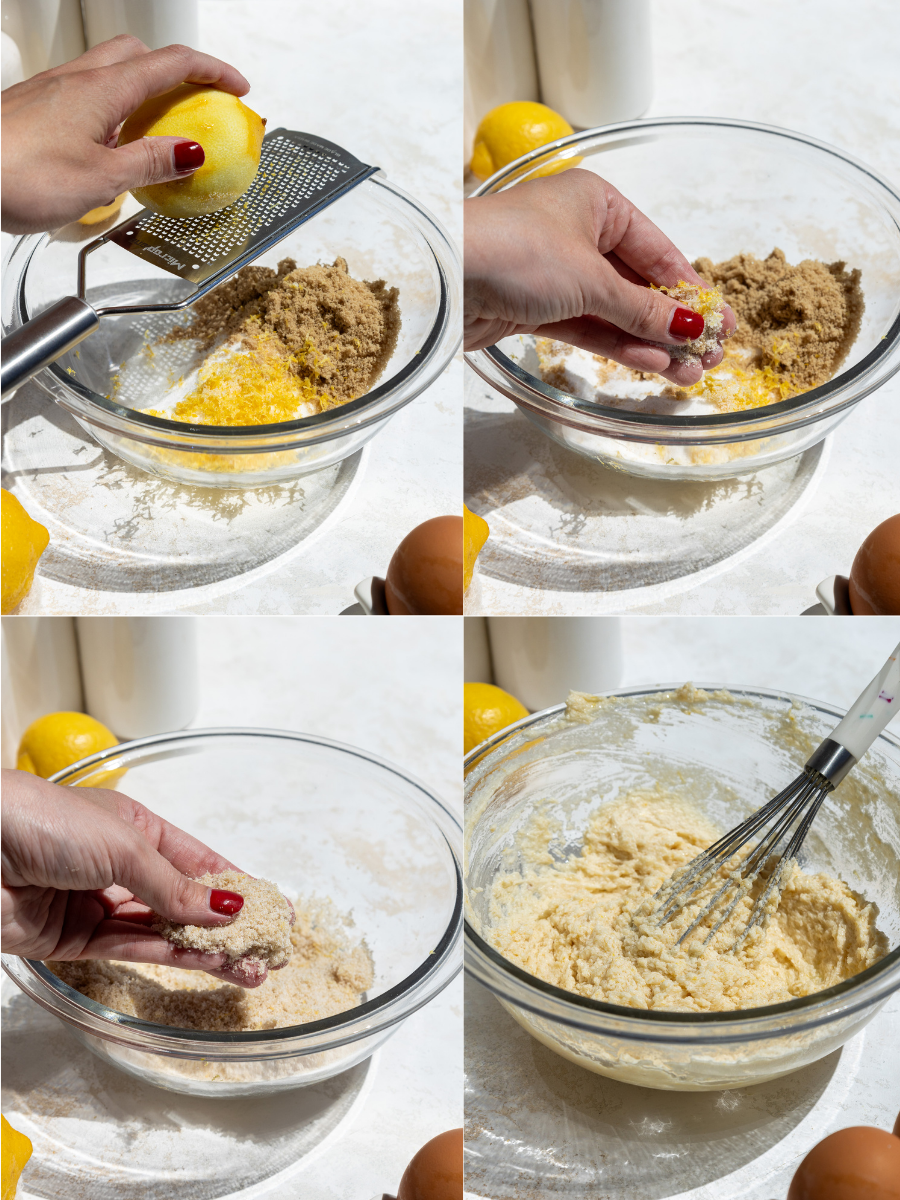
While the dough rests, make the filling. In a medium bowl, add 1/2 cup granulated sugar, 1/2 cup light brown sugar, and the zest of 2 large lemons.
Massage the zest into the sugar with your fingertips to release the lemon oils. The mixture should smell aromatic.
Add 1/2 cup softened butter, which should be soft to the touch and almost a bit melted. Whisk until combined, then set aside.
Step 3: Roll Up and Bake the Lemon Rolls
Once the dough has rested, place it on a lightly floured surface and roll it into a large rectangle about 12 by 18 inches and about 1/2 cm thick.
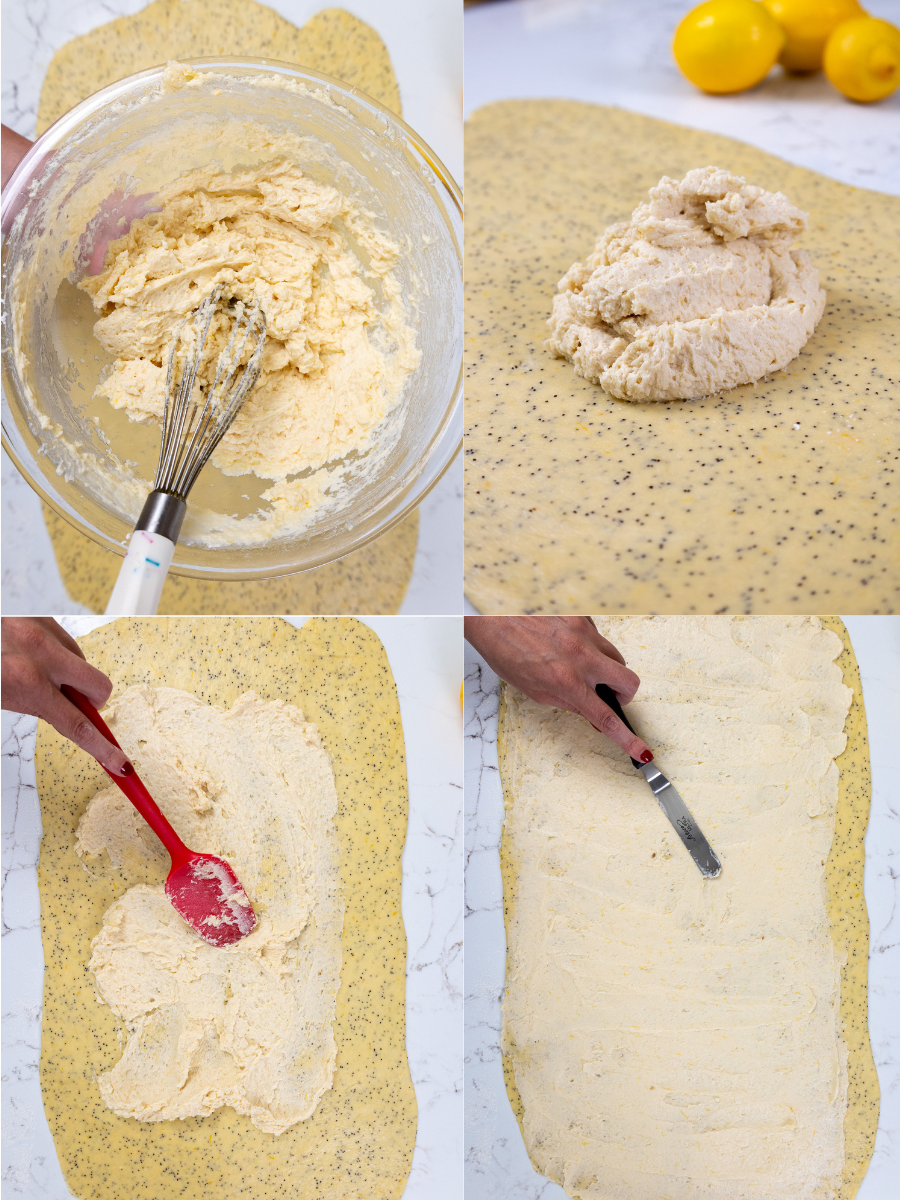
Spread the lemon roll filling over the dough, leaving 1/2 inch of dough uncovered on one long side. This helps seal the roll.
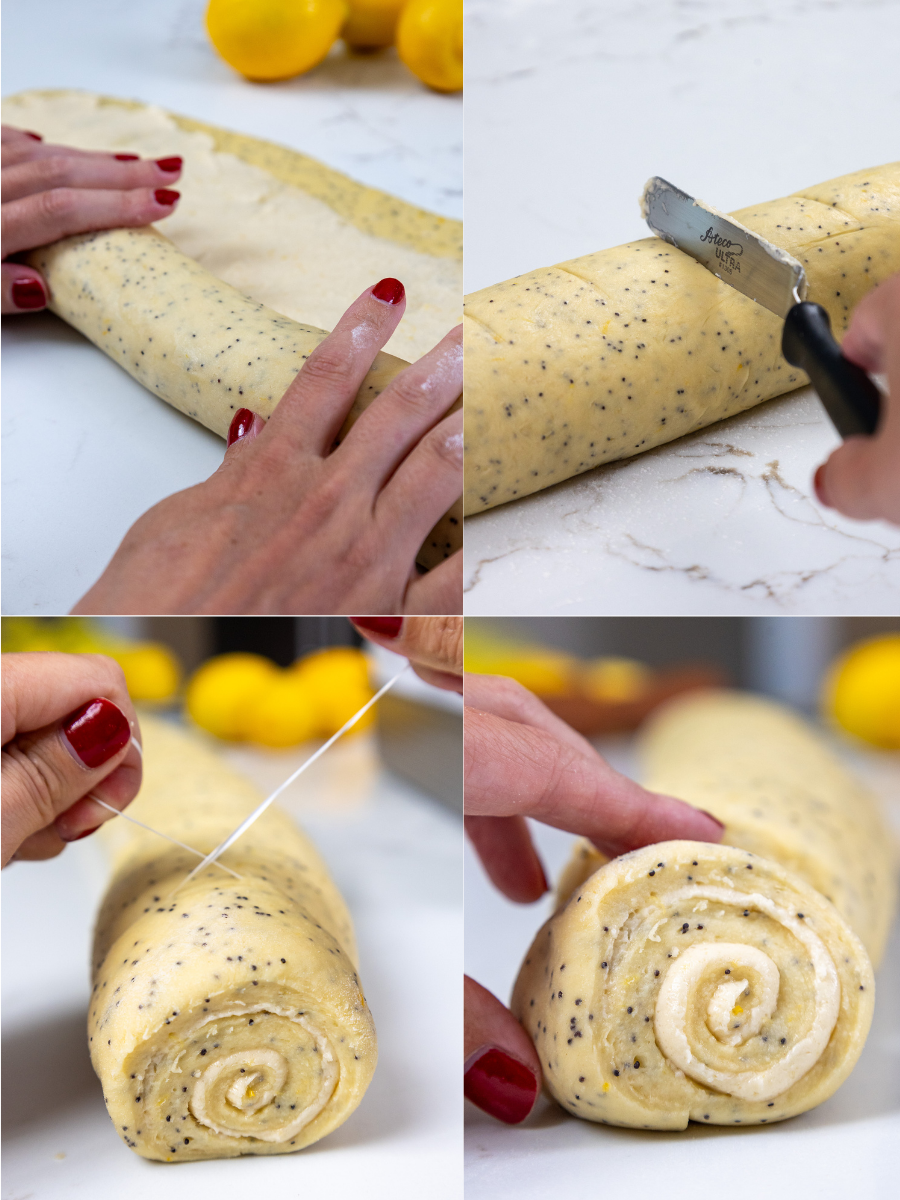
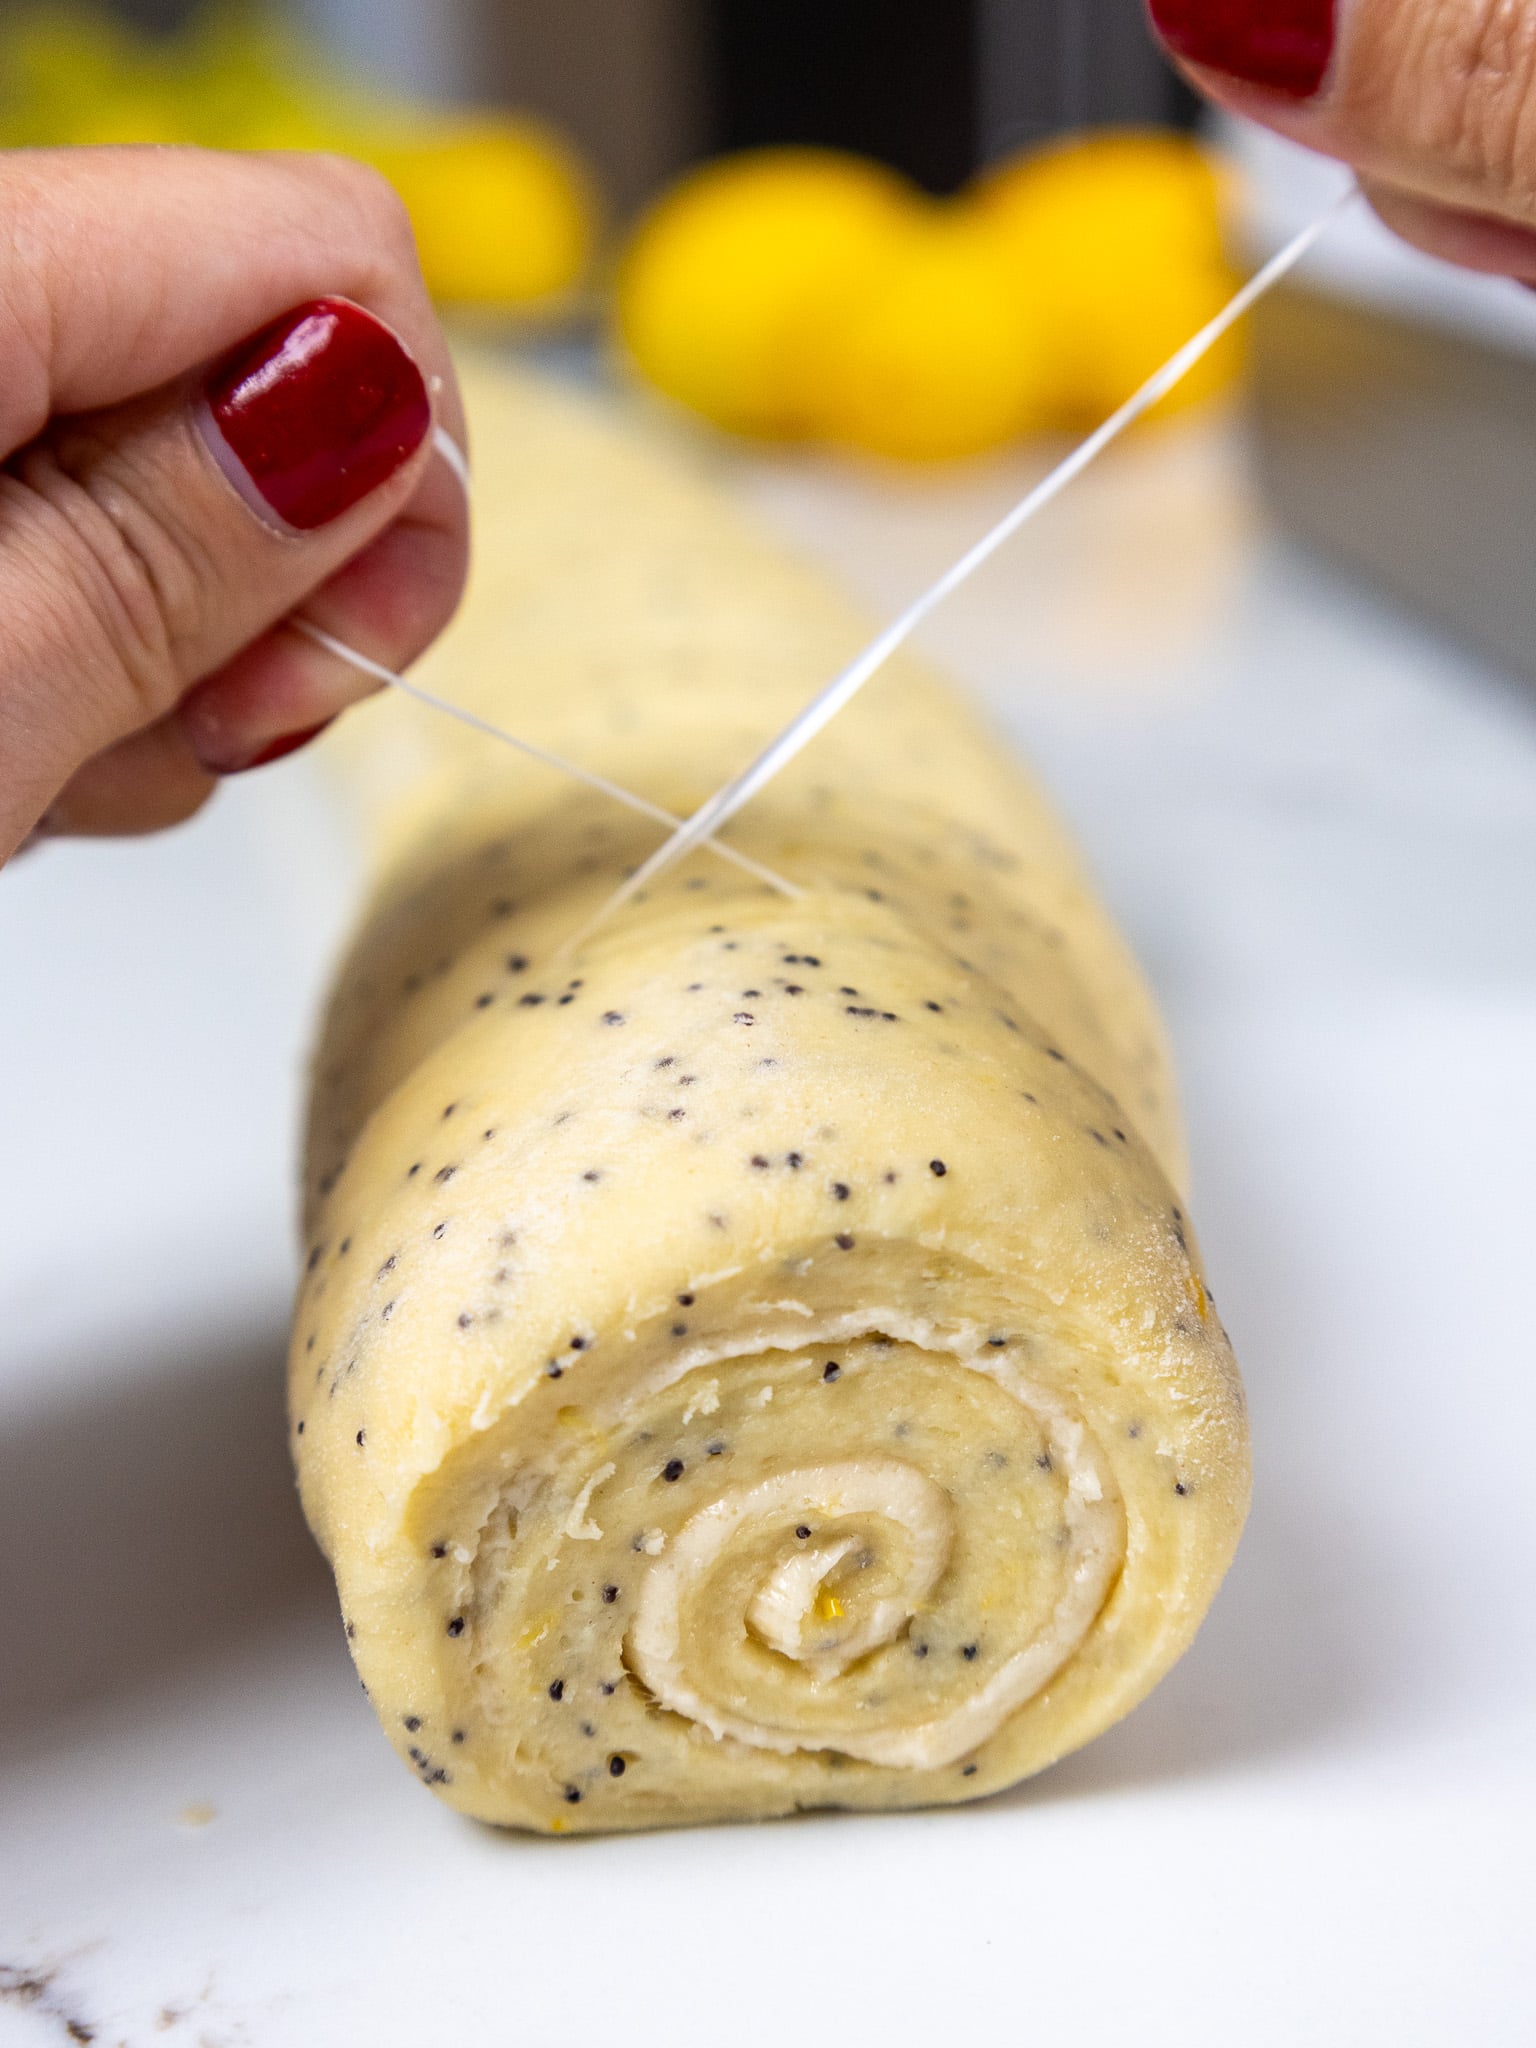
Roll the dough horizontally toward the uncovered strip and cut 12 equal pieces using dental floss.
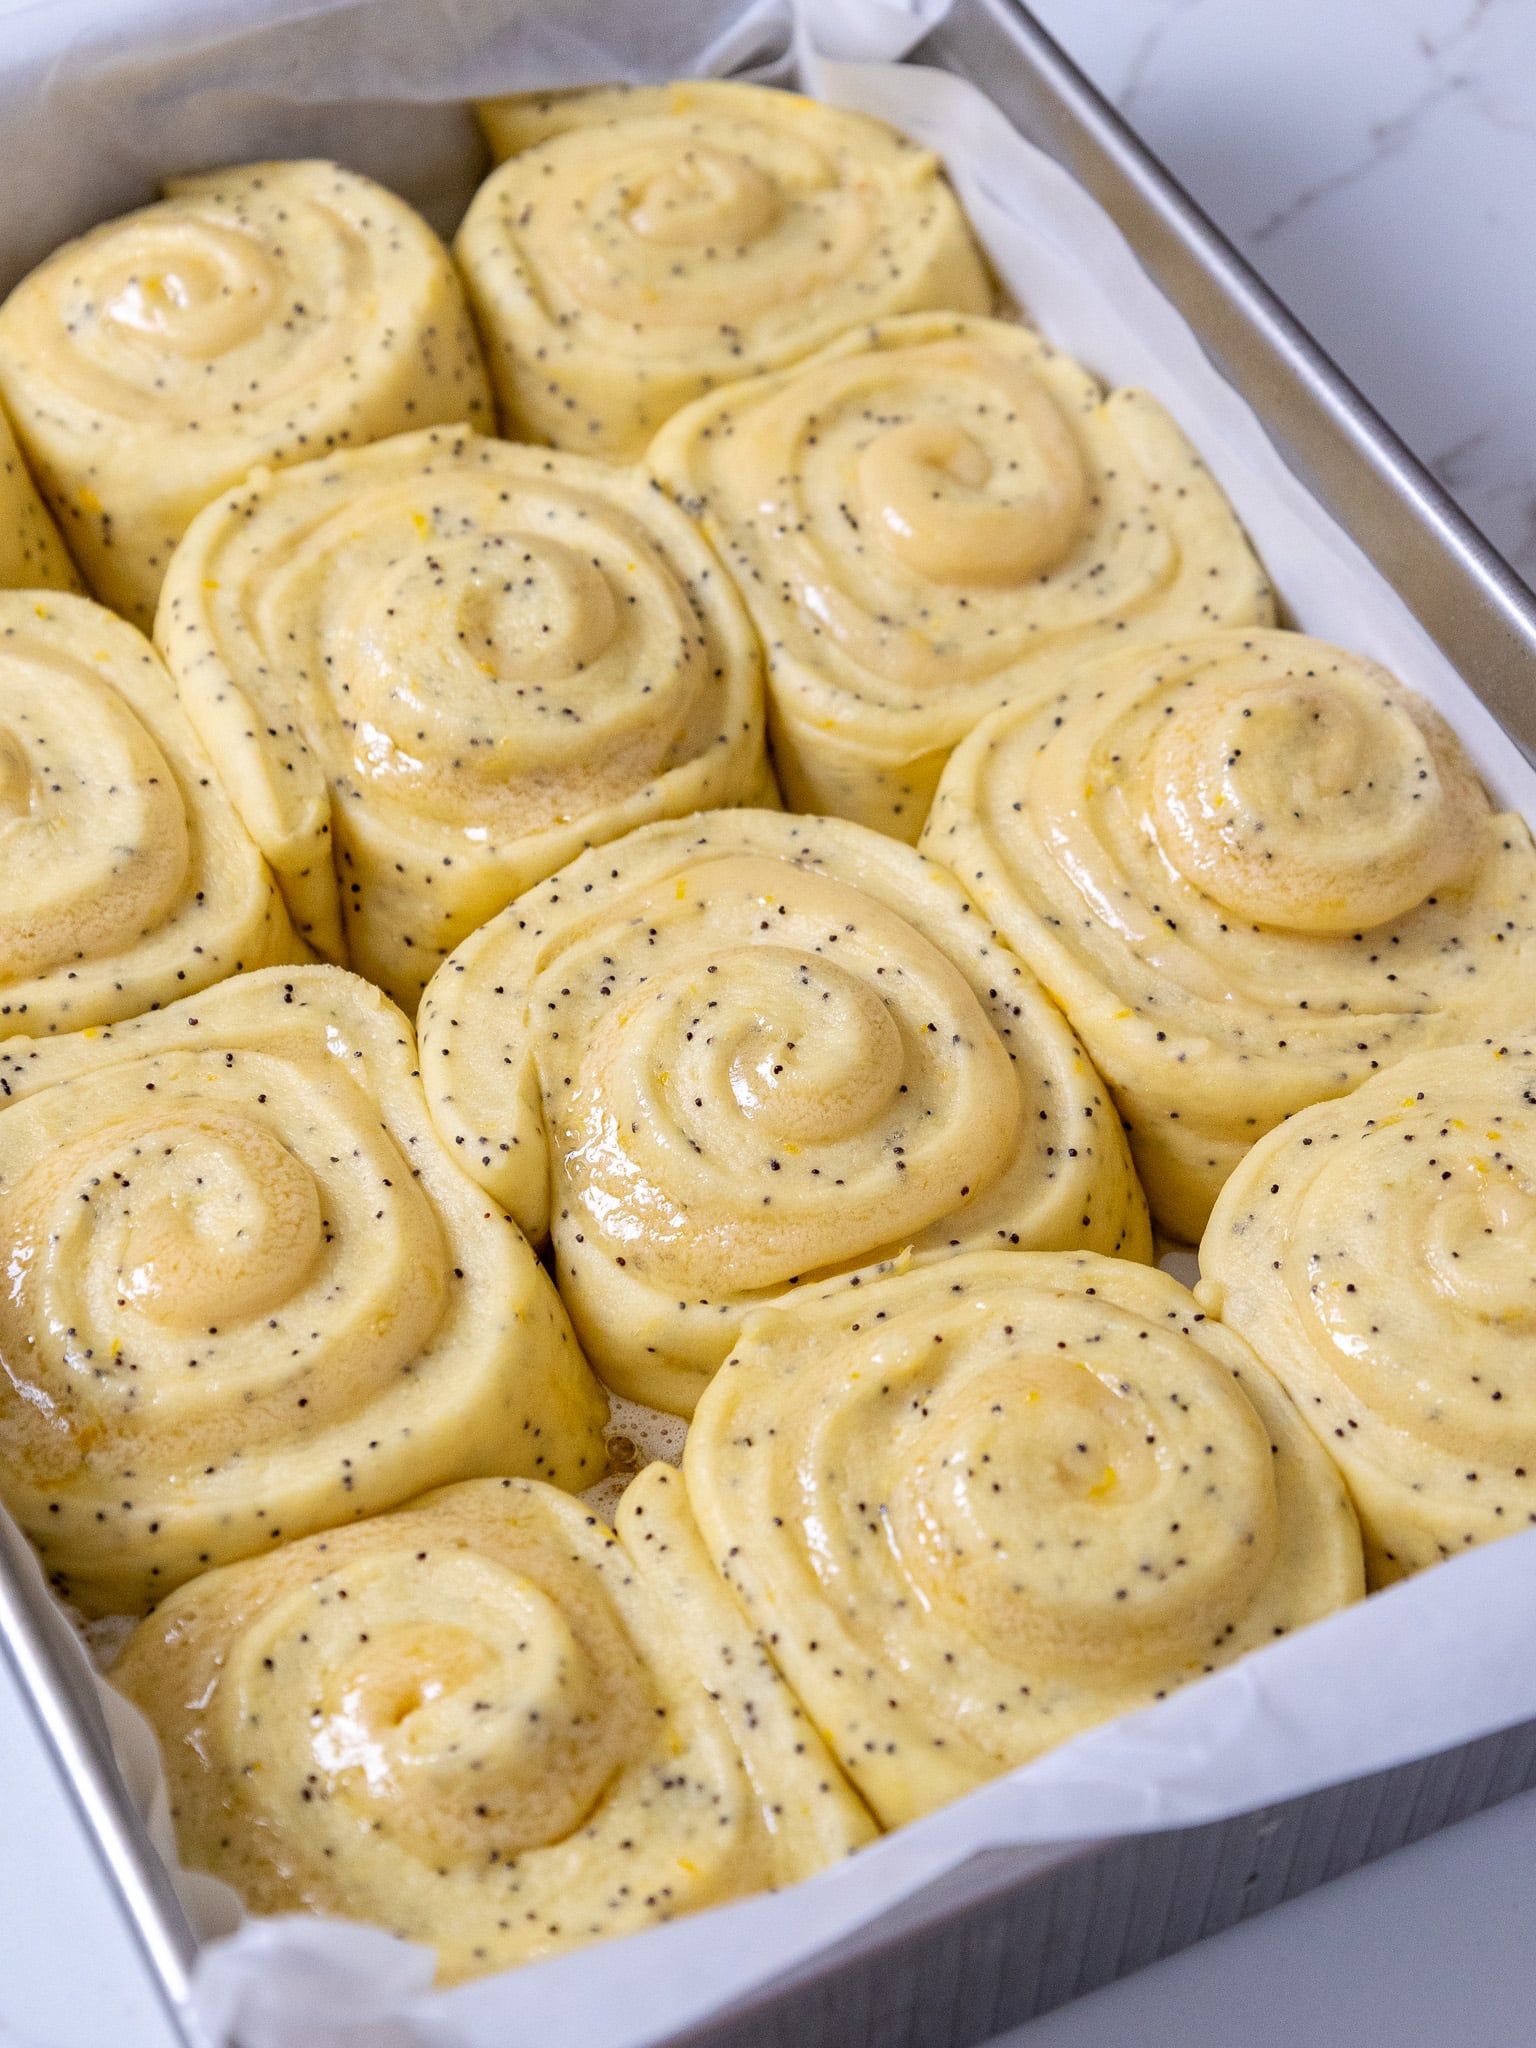
Place the rolls in a greased or lined 9 by 13 inch pan.
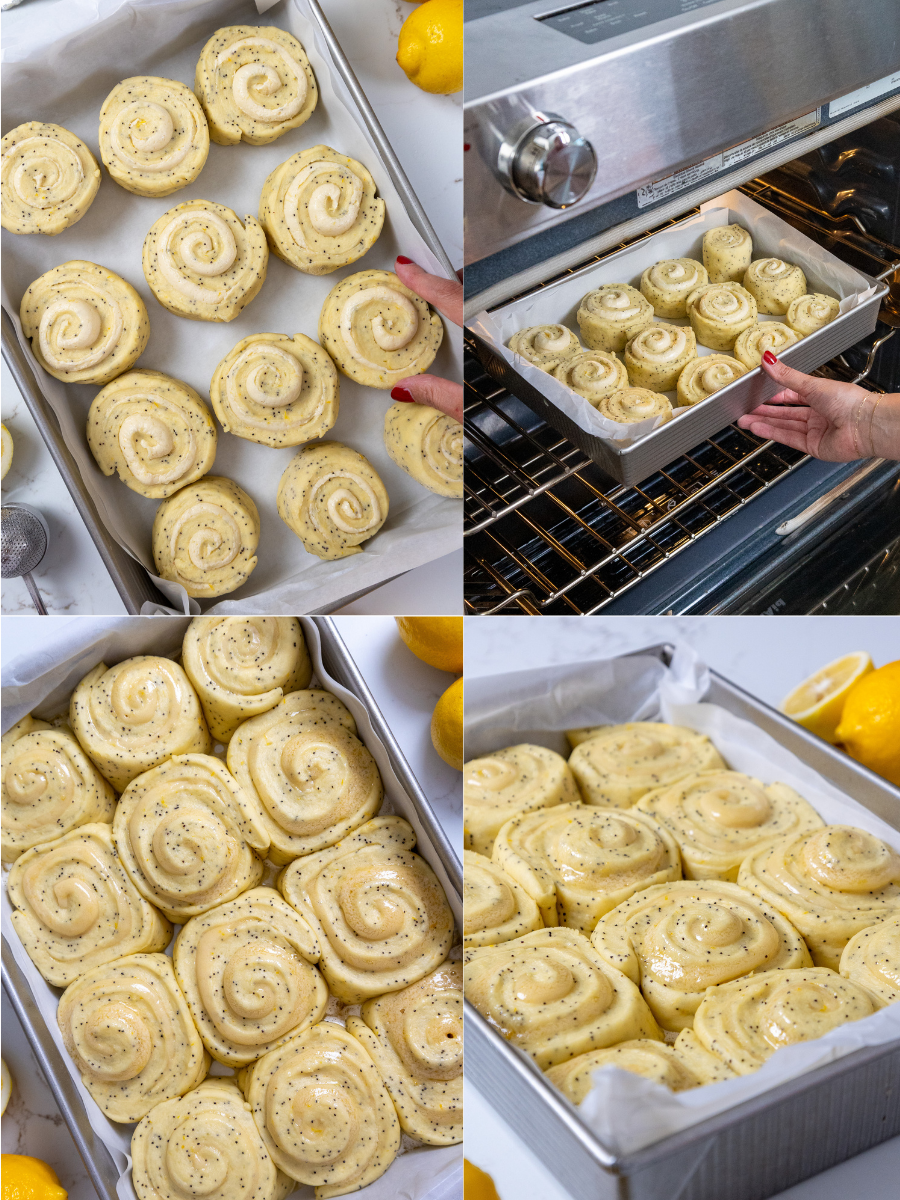
Turn the oven off. Cover the lemon rolls with foil and place them in the oven for about 30 minutes for an assisted rise. They should look puffier and bigger.
Remove them from the oven and take off the foil. Turn the oven back on and heat it to 350 F / 175 C.
Once the oven is preheated, bake the lemon rolls for 28 to 32 minutes or until golden brown.
Step 4: Make the Lemon Icing
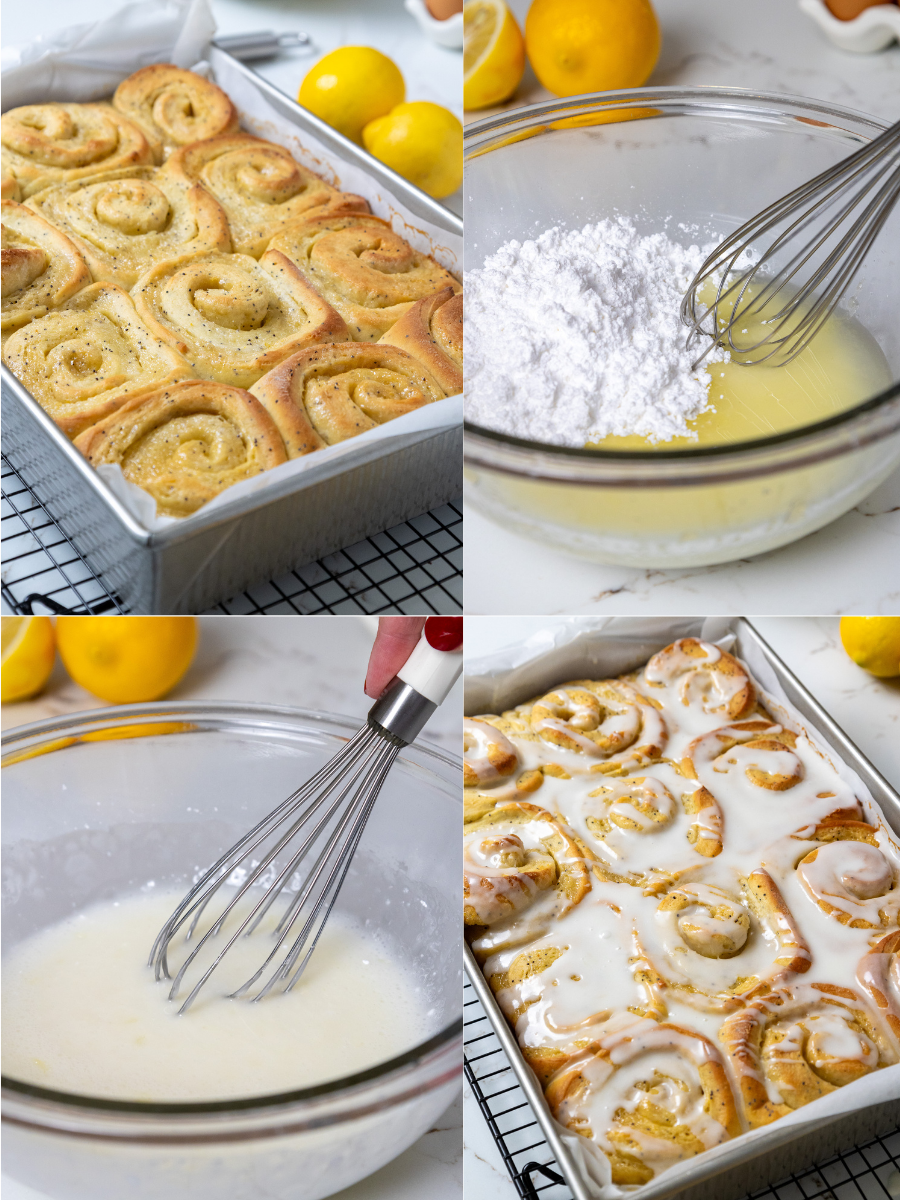
Whisk 2 cups powdered sugar, 1/4 cup fresh lemon juice, and 2 Tbsp melted butter until combined.
Let the rolls cool for 10 to 20 minutes, then spoon the icing over the rolls and top with fresh lemon zest.
How Much Flour Am I Supposed to Use?
This part can feel a little uncertain, but it is normal for the flour amount to vary from batch to batch and kitchen to kitchen. I do not dump in a big extra scoop. I add additional flour 1 tablespoon at a time until the dough behaves.
You want the dough to start pulling away from the sides of the bowl and feel tacky, not sticky. When I pull my finger away, there should be no residue. That is why this recipe gives a range. The goal is an elastic, workable dough without making it dense.
Making These Lemon Rolls By Hand vs. Using a Stand Mixer
I usually reach for my stand mixer because it is easier, but I have made this dough by hand with a dough whisk and some patience. Whichever method you use, the goal is the same: knead or mix until the dough gets an elastic texture and pulls away from the sides of the bowl or counter.
If you mix by hand, keep working the dough until it feels smooth and elastic. It takes a little more effort, but it is completely doable.
The Best Way to Cut These Lemon Rolls: Dental Floss
I know it sounds unusual, but dental floss is my favorite tool for cutting these rolls. Most knives press down and smush the dough before they slice through. A piece of unflavored floss cuts through smoothly and keeps the swirl clean.
Slide the floss under the rolled dough, cross the ends over the top, and pull. You get 12 even rolls without squishing the soft layers.
The Assisted Rise
This trick helps the lemon rolls come out soft, fluffy, and tall. The oven is preheated at a low temperature, 200 F / 95 C, and then turned off before the rolls go in. I cover the pan with foil and let them rise for about 30 minutes in that warm space.
This method gives a reliable rise no matter how cold your kitchen is. Just do not forget to turn the oven off before the rolls go in.
Substitutions and Swaps in This Recipe
I love the recipe as written, but I know some days you need to work with what you have. Here are the swaps that work well.
All Purpose Flour: A good gluten free blend such as King Arthur’s GF flour should work, though I have not tested it myself.
Instant Dry Yeast: Use active dry yeast and activate it first.
Unsalted Butter: Use salted butter and omit the added salt, or use vegan butter.
Buttermilk: Use whole milk or an alternative milk.
Lemons: Use limes for a different citrus flavor.
How to Make These Lemon Rolls in Advance
I am all about working ahead. You can make these lemon rolls the evening before and bake them the following morning. After cutting the rolls and placing them in the pan, cover and refrigerate them overnight. Before baking, let them warm up for 1 to 2 hours.
You can also freeze individually wrapped baked rolls for later. It makes a bright breakfast feel easy.
Tips for Making the Best Homemade Lemon Rolls
My biggest tip is simple: do not add too much flour. Add additional flour 1 tablespoon at a time and check the dough with the finger test. It should feel tacky but not sticky.
Do not add too much flour. When in doubt, add one tablespoon at a time and use the finger test.
Let the dough rest 10 to 20 minutes so it is easier to roll out.
Keep the buttermilk mixture warm but not hot so the yeast stays active.
Use unflavored dental floss for clean cuts.
Cool the rolls 10 to 20 minutes before icing so the icing does not slide off.
Spoon the icing over warm rolls, then finish with fresh lemon zest.
Try it just once. I think you will love how bright and soft they turn out.
FAQs
How do you make lemon rolls from scratch?
To make lemon rolls from scratch, combine 4 1/4 cups all-purpose flour, 4 1/2 tsp instant dry yeast, 1 Tbsp + 1 tsp optional poppy seeds, and 1 tsp fine salt. Mix in a warm mixture of 1 cup buttermilk, 1/2 cup granulated sugar, and 1/2 cup unsalted butter, then add 2 large eggs and 2 Tbsp fresh lemon zest. Rest the dough for 10-20 minutes, roll it into a 12×18 inch rectangle, spread the filling, cut into 12 equal pieces, rise in a turned-off 200°F oven for about 30 minutes, then bake at 350°F for 28-32 minutes until golden brown.
What is the best lemon icing for lemon rolls?
The best lemon icing for these rolls uses 2 cups powdered sugar, 1/4 cup fresh lemon juice, and 2 Tbsp melted butter whisked together. Let the baked rolls cool for 10-20 minutes, then spoon the icing over them while they are still warm but not piping hot. Finish with fresh lemon zest for extra brightness.
Can I make lemon rolls ahead of time?
Yes, you can make lemon rolls ahead of time. After cutting the rolls and placing them in a greased or lined 9×13-inch pan, cover and refrigerate them overnight, then let the rolls warm up for 1-2 hours before baking. Baked leftovers can be stored in an airtight container, or wrapped individually and frozen.
Why are my lemon rolls dense?
Lemon rolls usually become dense when too much flour is added or the liquid is too hot for the yeast. Add extra flour 1 Tbsp at a time until the dough feels tacky but not sticky and begins to pull away from the bowl. The warm buttermilk mixture should feel warm but not hot to the touch so the yeast stays active.
What Is Lemon Rolls? These lemon rolls are the kind of treat I want when the weather is warm and the morning feels slow.
Total Time:88 min
Yield:12 rolls 1x
Ingredients
Scale
Lemon Roll Dough 4 1/4 cups all-purpose flour, 530g, plus additional as needed 4 1/2 tsp instant dry yeast, or 2 packets (14g, 1/2 oz.) 1 Tbsp + 1 tsp poppy seeds, optional 1 tsp fine salt, 6g 1 cup buttermilk, room temperature, 240g 1/2 cup granulated sugar, 100g 1/2 cup unsalted butter, room temperature, 113g 2 large eggs, room temperature, 112g 2 Tbsp fresh lemon zest, or zest of 2 large lemons, 6g
Lemon Roll Filling 1/2 cup granulated sugar, 100g 1/2 cup packed light brown sugar, 100g 2 Tbsp fresh lemon zest, or zest of 2 large lemons, 6g 1/2 cup unsalted butter, softened, 113g
Lemon Roll Dough 1-Preheat your oven to 200 F /: Preheat your oven to 200 F / 95 C. In a large bowl or the bowl of a stand mixer, combine 4 1/4 cups flour, 4 1/2 tsp or 2 packets of instant dry yeast, 1 Tbsp + 1 Tsp poppy seeds, and 1 tsp salt. 2-In a separate bowl, combine 1 cup: In a separate bowl, combine 1 cup buttermilk, 1/2 cup granulated sugar, and 1/2 cup butter (cut into Tbsp-sized pieces). Heat for 1 minute in the microwave, then stir to combine the ingredients. The butter should be mostly melted, and the mixture should feel warm but not hot to the touch. If it’s too hot, it can kill the yeast! 3-Slowly pour the warm buttermilk mixture into: Slowly pour the warm buttermilk mixture into the dry ingredients and mix on medium speed with a dough hook or by hand with a dough whisk. If you don’t have a dough whisk, you can use a large wooden spoon. The dough should be quite sticky at this point. 4-Mix in 2 large eggs, one at: Mix in 2 large eggs, one at a time, on a medium-low speed until a sticky dough ball forms. It will take a while for each egg to get incorporated, but keep mixing until they are fully combined. Then continue to mix on a medium-low speed for a couple of minutes until the dough becomes more elastic. Once combined, mix in the zest of 2 large lemons on a medium speed until incorporated. 5-As the dough mixes, add additional flour: As the dough mixes, add additional flour 1 Tbsp at a time until the dough begins to leave the sides of the bowl. I usually add about 3 additional Tbsps of flour. My favorite way to know if my dough is ready is to poke it with my finger. It should feel tacky but not sticky. As you pull your finger away, there should be no residue on your finger. 6-Cover the bowl with plastic wrap or: Cover the bowl with plastic wrap or a towel and set aside to let the dough rest for 10-20 minutes. This will make it easier to roll out.
Lemon Roll Filling 7-As the dough rests, make the lemon: As the dough rests, make the lemon roll filling. In a medium-sized bowl, add 1/2 cup granulated sugar, 1/2 cup light brown sugar, and the zest of 2 large lemons. Massage the zest into the sugar with your fingertips to help release the oil from the zest. The mixture should be aromatic as you do this. 8-Add 1/2 cup softened butter (the butter: Add 1/2 cup softened butter (the butter should be soft to the touch, and almost a bit melted) to the mixture. Whisk until combined, then set aside.
Roll Up & Bake the Lemon Rolls 9-Once the dough has rested, place it: Once the dough has rested, place it on a lightly floured surface and roll it into a large rectangle that’s roughly 12 in x 18 in. It should be about 1/2 cm thick. 10-Spread the lemon roll filling over the: Spread the lemon roll filling over the dough, leaving 1/2 inch of dough on the long side of the rectangle uncovered (this will help you seal off the roll and keep it tight). 11-Then roll the dough horizontally, toward the: Then roll the dough horizontally, toward the uncovered strip and cut 12 equal pieces using dental floss. Place the rolls in a greased or lined 9×13-inch pan. 12-Turn the oven off: Turn the oven off! I REPEAT, TURN THE OVEN OFF. Then cover the lemon rolls with foil and place them in the oven for about 30 minutes to give them an assisted rise. They should look puffier and have grown in size once they’ve risen. 13-Remove them from the oven and take: Remove them from the oven and take off the tinfoil. Turn the oven back on and heat it to 350 F / 175 C. 14-Once the oven is preheated, bake the: Once the oven is preheated, bake the lemon rolls for 28-32 minutes or until the rolls are golden brown.
Lemon Roll Icing 15-Whisk 2 cups of powdered sugar, 1/4: Whisk 2 cups of powdered sugar, 1/4 cup of fresh lemon juice, and 2 Tbsp melted butter until combined. 16-Let the rolls cool for 10-20 minutes,: Let the rolls cool for 10-20 minutes, then spoon the icing over the rolls and top with fresh lemon zest.
Last Step:
Please leave a rating and comment letting us know how you liked this recipe! This helps our business to thrive and continue providing free, high-quality recipes for you.