The EASIEST Crispy Tofu Recipe
Let’s be honest for a second. Most of us have a complicated relationship with tofu. I know I did for years. I’d buy a block with good intentions, stare at it in the fridge for a week, and then attempt something that turned out bland, wet, and vaguely spongy. Not exactly the dinner win I was hoping for.
Then I stumbled on this method, and it genuinely changed how I cook at home. We are talking about golden, crispy edges that give way to a tender, meaty center, all with just three pantry staples.
No cornstarch, no endless marinating, and no deep frying required. You drain the tofu, press it, cube it, toss it with tamari and nutritional yeast, and let the oven do the heavy lifting.

What I love most is how flexible this recipe is. Some nights I drizzle in a little oil for an almost breaded crunch, and other nights I skip the oil completely and still pull a sheet pan of beautifully crisped cubes out of the oven.
They are vegan, naturally gluten free, and ready to toss into stir fries, pile onto grain bowls, or just eat straight off the baking sheet while you pretend to be portioning them out for the week.
The promise here is simple. No soggy tofu, no complicated techniques, and no disappointment. Just the easiest crispy tofu you will ever make, ready in about an hour with barely ten minutes of hands on work.
Jump to:
- The EASIEST Crispy Tofu Recipe
- Ingredients for Crispy Tofu
- How to Make Crispy Tofu Without Oil
- How to Make Crispy Tofu (With Oil)
- Serving Suggestions
- How to Store Baked Tofu
- Substitutions and Variations
- FAQs
- Do I need to press tofu for crispiness?
- How long do you bake crispy tofu at 420°F?
- Can I use firm tofu instead of extra firm for this recipe?
- What is the secret to crispy baked tofu without oil?
- The EASIEST Crispy Tofu Recipe
- Ingredients
- Instructions
- Last Step:
- Nutrition
- Did you make this recipe?
Ingredients for Crispy Tofu
You only need a handful of ingredients to pull this off, and I bet most of them are already sitting in your kitchen.
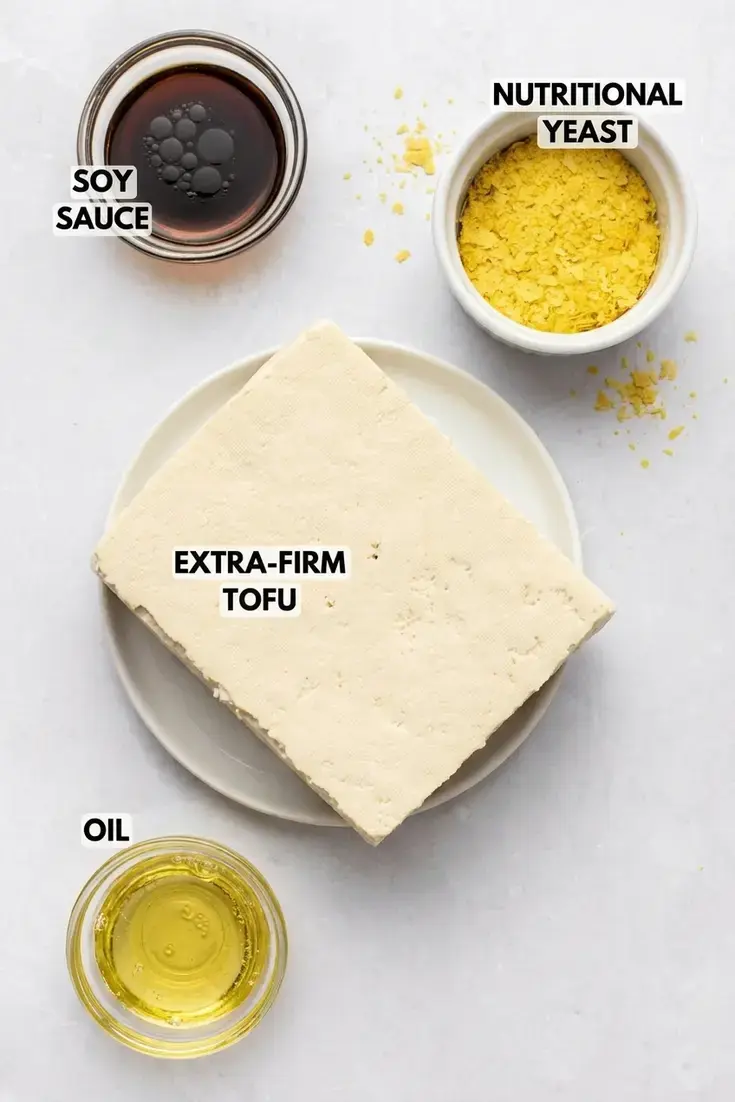
- Extra firm tofu: This is your starting point. You want a 14 ounce block of extra firm tofu. The texture is dense enough to hold its shape during baking but still yields that tender bite inside. Firm tofu works in a pinch, just know the cubes will be a little more delicate. I avoid super firm tofu here because it tends to bake up dry and almost chalky rather than crisp and juicy.
- Tamari or soy sauce: One tablespoon is all you need to season every cube. Tamari keeps the recipe gluten free, but regular soy sauce works exactly the same way. The salty, savory liquid clings to the tofu and helps the nutritional yeast stick.
- Nutritional yeast: This is the secret weapon. Use 2 tablespoons for the oil free version or 4 tablespoons when you add oil. Those golden flakes absorb extra moisture on the surface of the tofu, which is what creates that crisp crust in the oven. They also bring a subtle cheesy, umami depth that makes the cubes taste way more complex than the ingredient list suggests.
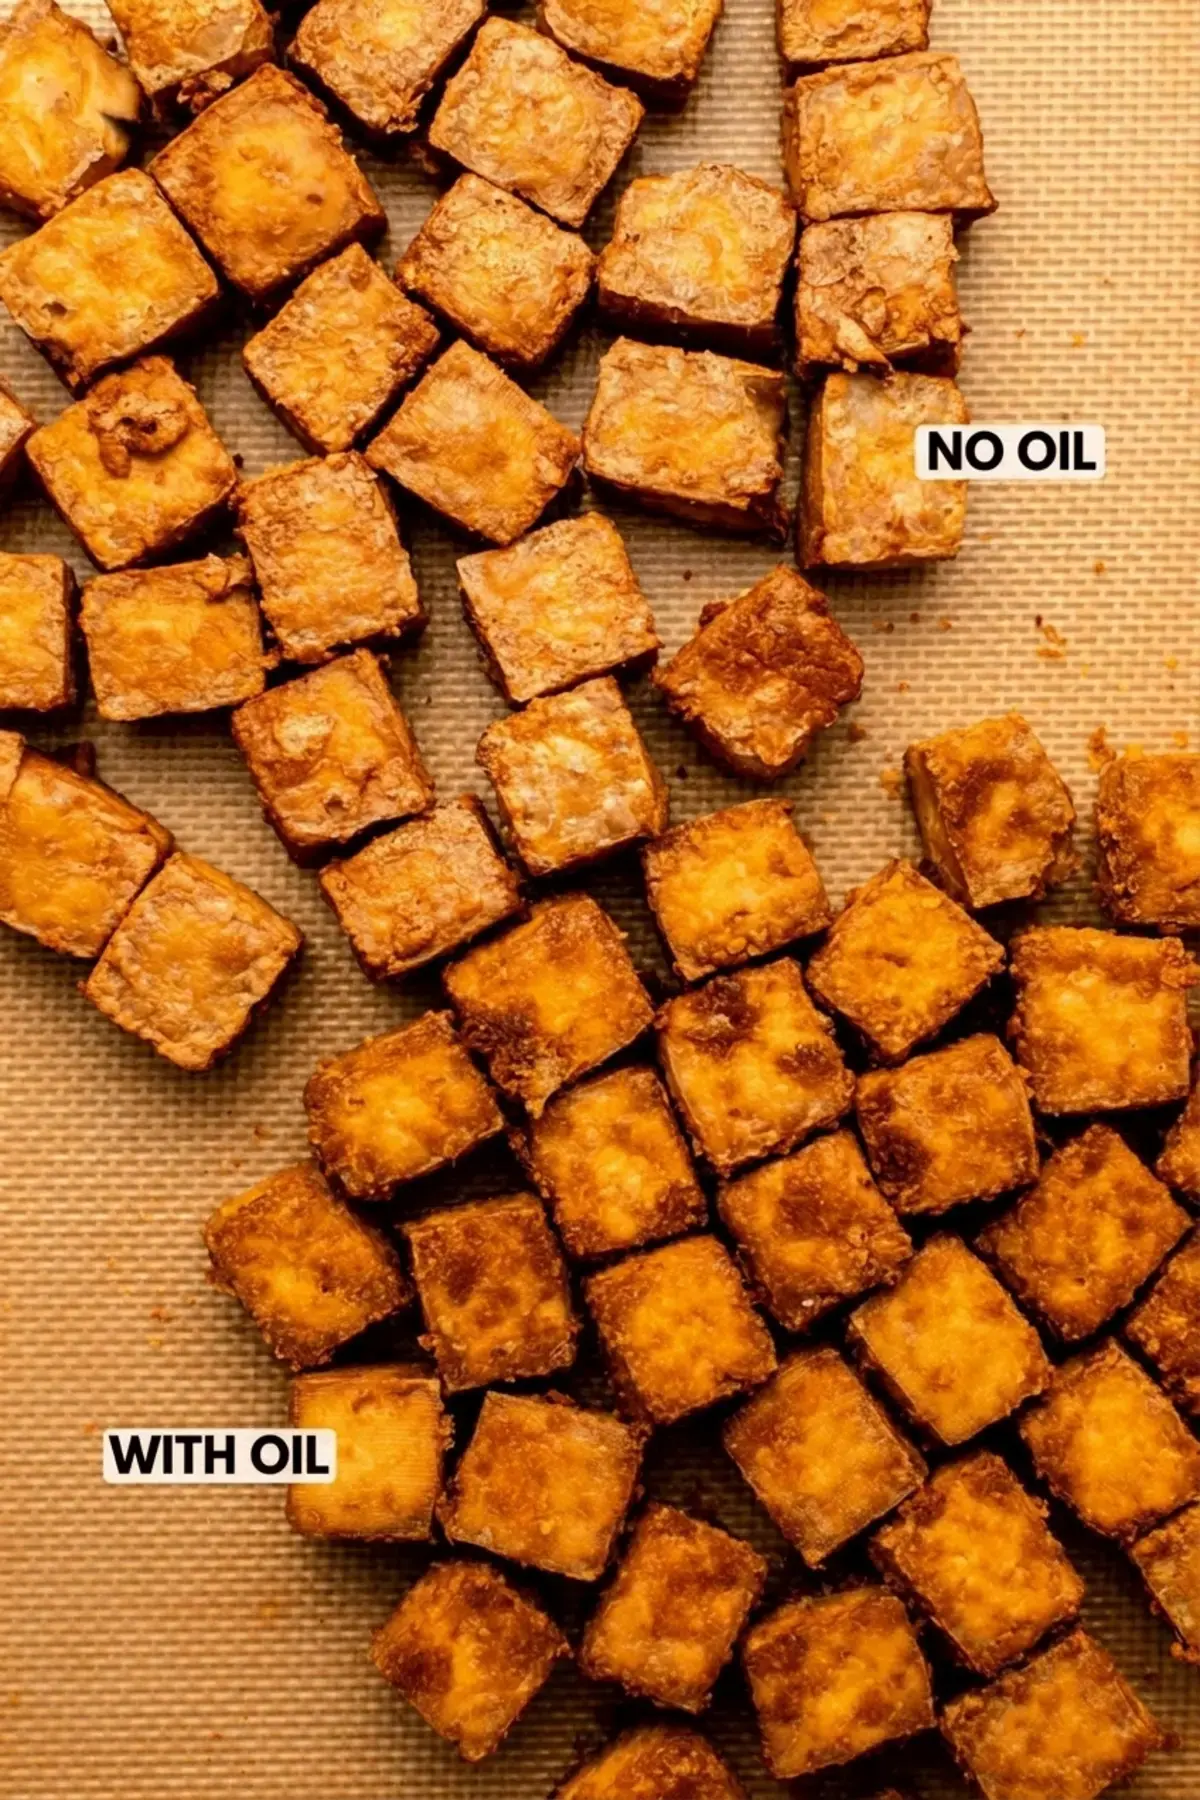
- Oil (optional): One tablespoon of olive oil or avocado oil gives the tofu a slightly richer, more breaded texture. Any high heat oil works. If you leave it out, you still get crispy results as long as you use a silicone baking mat.
How to Make Crispy Tofu Without Oil
Going oil free does not mean sacrificing crunch. I make this version at least twice a week, and the trick comes down to one piece of equipment. A silicone baking mat is non negotiable here.
Parchment paper can work, but the mat creates the kind of dry, direct heat that pulls moisture away from the tofu and gives you those crisp edges without any added fat.
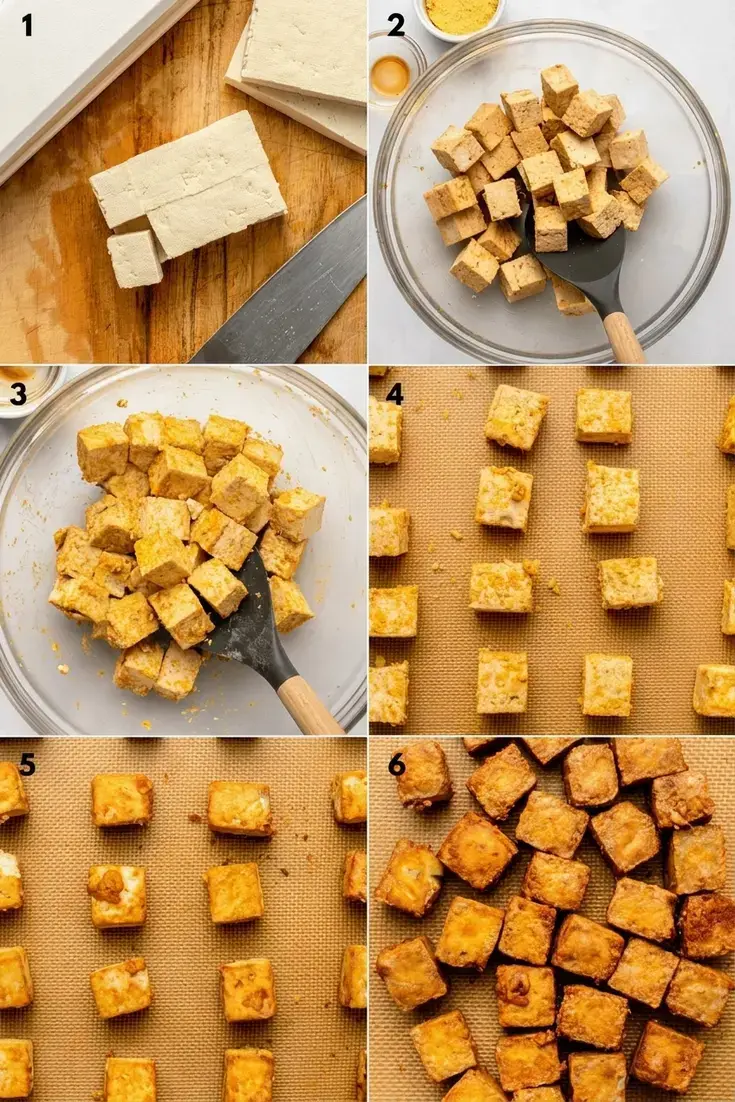
Start by draining the block and pressing it. I use a tofu press and let it sit for a good 10 minutes. You want to get as much liquid out as possible because water is the enemy of crispiness.
Once it feels firm and noticeably drier, cut the block in half lengthwise, then cube each half into 16 even pieces. You will end up with a pile of tidy little squares ready for seasoning.
Toss the cubes into a large bowl and drizzle the tablespoon of tamari over them. Use a spatula and a gentle pressing motion against the side of the bowl to coat everything without breaking the tofu apart. Then sprinkle 2 tablespoons of nutritional yeast right on top and toss again until every surface looks lightly dusted.
Spread the cubes across your silicone lined baking sheet so they have a little breathing room, then bake them on the top rack as you normally would. They come out lighter in color than the oil version, with a drier, crisp exterior and a tender middle that soaks up sauce beautifully. Serve them warm and watch them disappear.
How to Make Crispy Tofu (With Oil)
When I want tofu that reminds me of a light, golden breading, I reach for the oil version. The process starts exactly the same way. Drain, press, and cube your block, and line a baking sheet with a silicone mat for the best release.
This time, drizzle the tamari and a tablespoon of oil over the cubes and toss them together. The oil adds richness and helps the coating cling.
Because there is now extra moisture in the bowl, you will use 4 tablespoons of nutritional yeast instead of 2. That extra amount absorbs the oil and liquid, forming a thin, savory crust around each piece that crisps up in the oven.
Bake the tofu for 20 minutes on the top rack, then carefully flip each cube. Slide the pan back in and bake for another 15 to 20 minutes, or until the edges are as golden and crunchy as you like. The tofu will also firm up a little more as it cools on the counter.
A few tips I have learned along the way. If you do not own a tofu press, wrap the block in a clean kitchen towel, set it on a plate, and pile a heavy skillet or a couple of cookbooks on top.
Let it drain for 20 to 30 minutes and you will get a similar result. That silicone mat really is essential for the oil free version, so do not skip it if you are avoiding oil.
And for a chewier, almost spongy texture that reminds me of takeout tofu, try freezing the whole unopened block, thawing it overnight in the fridge, and then pressing out the liquid before you start the recipe.
The ice crystals create little pockets inside the tofu that give it a satisfying bite.
Serving Suggestions
These crispy cubes are honestly good enough to eat straight off the baking sheet, and I have definitely done that more times than I care to admit. But they also shine in all kinds of meals throughout the week.
Set out a bowl of spicy peanut sauce or a simple soy sesame dip and you have an instant snack or appetizer. For dinner, scatter the tofu over a nourish bowl with quinoa, roasted vegetables, and a lemon tahini drizzle. It adds the perfect protein punch without weighing things down.
They also hold up beautifully in saucy dishes. Toss warm cubes in a sticky orange glaze or teriyaki sauce and serve them over jasmine rice.
Fold them into a bubbling curry or a quick garlic green bean stir fry right at the end so they keep their crunch. I love tucking them into vermicelli noodle bowls or black rice bowls with fresh herbs and a bright lime dressing.
Even something as simple as a Vietnamese inspired rice bowl with pickled carrots and cucumber gets an upgrade with a handful of these on top.
How to Store Baked Tofu
I like to bake a double batch on Sunday so I have easy protein ready for the week. Let the tofu cool completely on the baking sheet first, then transfer it to an airtight container. It keeps in the refrigerator for up to 5 days and tastes great cold on salads or quickly reheated.
For longer storage, freezing works beautifully. Spread the cooled cubes in a single layer on a baking sheet and pop them in the freezer for about an hour. Once they are frozen solid, move them to a freezer safe bag or container.
They will keep for about 3 months this way, and you do not need to thaw them before reheating.
To bring the crispiness back, skip the microwave. A toaster oven or air fryer set to 375ºF will revive the edges in 8 to 10 minutes. Straight from frozen works perfectly, just give them a shake halfway through so they heat evenly.
Substitutions and Variations
This recipe is my go to canvas, and I have tweaked it enough times to know what works and what I would skip.
To keep things gluten free, use a tamari or soy sauce labeled gluten free. Coconut aminos are a popular swap, but I find the sweetness pulls the flavor in a direction I do not love here. It works, it just tastes different, so go in with that expectation.
If you are watching sodium, leave out the tamari entirely and toss the cubes with a tablespoon of diluted vegetable broth or plain water, then finish with a tiny pinch of salt. The nutritional yeast still gives you plenty of savory flavor.
When my nutritional yeast stash runs low, I stir a tablespoon or two of miso paste or tahini into the tamari before tossing. A splash of extra tamari, a drizzle of sesame oil, or a sprinkle of your favorite dried herbs can also step in.
I often add smoked paprika, garlic powder, black pepper, or cumin right along with the nooch for a flavor boost. Toasted sesame seeds stirred in at the end add a nice little crunch too.
FAQs
Do I need to press tofu for crispiness?
How long do you bake crispy tofu at 420°F?
Can I use firm tofu instead of extra firm for this recipe?
What is the secret to crispy baked tofu without oil?
The EASIEST Crispy Tofu Recipe
The EASIEST Crispy Tofu Recipe Let’s be honest for a second. Most of us have a complicated relationship with tofu.
- Total Time: 0 min
- Yield: Servings
Ingredients
1 14 ounce block Extra Firm Tofu
1 tbsp Tamari
2–4 tbsp Nutritional Yeast
1 tbsp oil
Instructions
1-Prep: Prep: Preheat the oven to 420F and line a baking sheet with a silicone mat.
2-Press the Tofu: Press the Tofu: Drain the liquid from the tofu and use a tofu press, or “press” the extra liquid out by wrapping it in a clean dish towel. Try to get it as dry as possible! If using a press, I like to let it sit for at least 10 minutes.
3-Cube the Tofu: Cube the Tofu: Cut the tofu into even cubes; I like to cut the block in half lengthwise, then cut each rectangle into 16 even cubes. (Note: I like to lightly press the cubes with the dish towel if I have extra time/patience)
4-Season: Season: Add the tofu to a large bowl and drizzle the tamari and oil (if using) on top. Use a spatula to mix well; I find that pressing the spatula into the sides of the bowl to toss the tofu (rather than trying to cut through it) results in less broken cubes. Sprinkle 2 tablespoons of nutritional yeast over the tofu, or 4 if you used oil. Mix again and add more nutritional yeast or additional seasonings to taste, if desired.
5-Bake: Bake: Place the tofu on the prepared baking sheet, spreading them out so each cube has some space around it. Bake on the top rack of the oven for 20 minutes, then carefully flip the cubes. Bake for another 15 to 20 minutes, depending on how crispy you like your tofu. The tofu will also get slightly crispier as it cools.
6-Serve & Store: Serve & Store: Serve warm. Store any leftovers in an airtight container in the refrigerator for up to 5 days. This tofu is best reheated in a toaster oven or air fryer if you’d like it to get crispy again!
Last Step:
Please leave a rating and comment letting us know how you liked this recipe! This helps our business to thrive and continue providing free, high-quality recipes for you.- Prep Time: 10 min
- Cook Time: 40 min
- Method: Oven
Nutrition
- Calories: 220kcal
- Sugar: 2g
- Sodium: 646mg
- Fat: 12g
- Saturated Fat: 1g
- Carbohydrates: 8g
- Fiber: 2g
- Protein: 21g