What Are 25 Minute Brownie Cookies?
Hi hi! These brownie cookies are my favorite shortcut when a full brownie craving hits but I want something round, chewy, and a little more fun.
They taste like the center of a fudgy brownie, but the edges stay slightly chewy and the tops get that shiny crinkly finish.
The whole batch comes together in about 25 minutes, with no chill time, so they are perfect for a busy weeknight or a last minute dessert with friends.

The secret is balance. Melted dark chocolate and butter give richness, while Dutch process cocoa deepens the chocolate flavor. A whipped egg and sugar mixture builds just enough structure to create those crackly tops without making the cookie cakey. The result is a soft brownie style center with a delicate outer edge that feels a little more set.
This recipe makes 8 cookies, and the size is easy to scale. I often double the batch and bake two trays, especially if I know the kids will ask for more.
I based my home testing on a reliable brownie cookie recipe method, then worked through the details in my own kitchen until the texture and shape felt just right.
- Fudgy brownie center in cookie form
- Shiny crackly top and chewy edges
- Ready in about 25 minutes
- No required chilling time
- Yields 8 bakery style cookies
Jump to:
- What Are 25 Minute Brownie Cookies?
- The Testing Journey
- Tips for Perfectly Round Cookies
- Batter and Baking Details
- Serving and Finish
- FAQs
- What makes brownie cookies crinkly on top?
- How long do you bake brownie cookies and how do you know when they are done?
- Do brownie cookies need to be chilled before baking?
- How should you store brownie cookies and can you freeze them?
- Soft and Chewy 25 Minute Brownie Cookies
- Ingredients
- Instructions
- Last Step:
- Did you make this recipe?
The Testing Journey
I will be honest. Getting this texture right took several batches and a few cookie sheets. I wanted a cookie that held its round shape, stayed soft in the middle, and still had that signature brownie crust. The process was not just about luck. I made small changes, took notes, and tasted every round.
My first test used a fudgy brownie base with added baking powder. It looked promising, but the crumb was too cakey. The second test increased the chocolate and cocoa, but the center still felt fluffy.
I knew the baking powder had to go. In the third and fourth tests, I removed it and increased the butter and chocolate, but the cookies had trouble spreading evenly.
The fifth test used a larger portion of batter. That helped the shape, but the cookies spread too much on the pan. The sixth test was the flavor and texture win.

I increased the brown sugar and flour by ten grams and used black cocoa for extra richness. The cookies were almost perfect, but the scoop was not giving me clean circles. Finally, I switched from a scoop to a piping bag.
That seventh test gave me the round, fudgy cookies I had been chasing.
Texture and shape were deliberate choices, not accidents.
Tips for Perfectly Round Cookies
If you have ever pulled a tray of cookies from the oven and wished they looked like they came from a bakery, this section is for you. The biggest trick is simple: use a piping bag.

- Fit a piping bag with a medium round tip.
- Trace eight 2 1/2 inch circles on parchment paper, leaving even space between them, then flip the paper over so the pencil side is down.
- Clip the piping bag above the tip and at the end to stop the batter from leaking.
- Hold the piping tip about 2 cm above the parchment.
- Pipe a dome to the diameter of each traced circle.
- Finish each cookie with a small flick of the wrist.
Do not stress if a few mounds look too small. Go back after piping and add a little more batter to the center of each one. It will settle and spread as the cookies bake.
A zip top bag with the corner cut off or a size #24 cookie scoop will also work in a pinch, but piping is the best way to get nice round cookies. The template and the bag work together to give you uniform cookies that bake evenly.
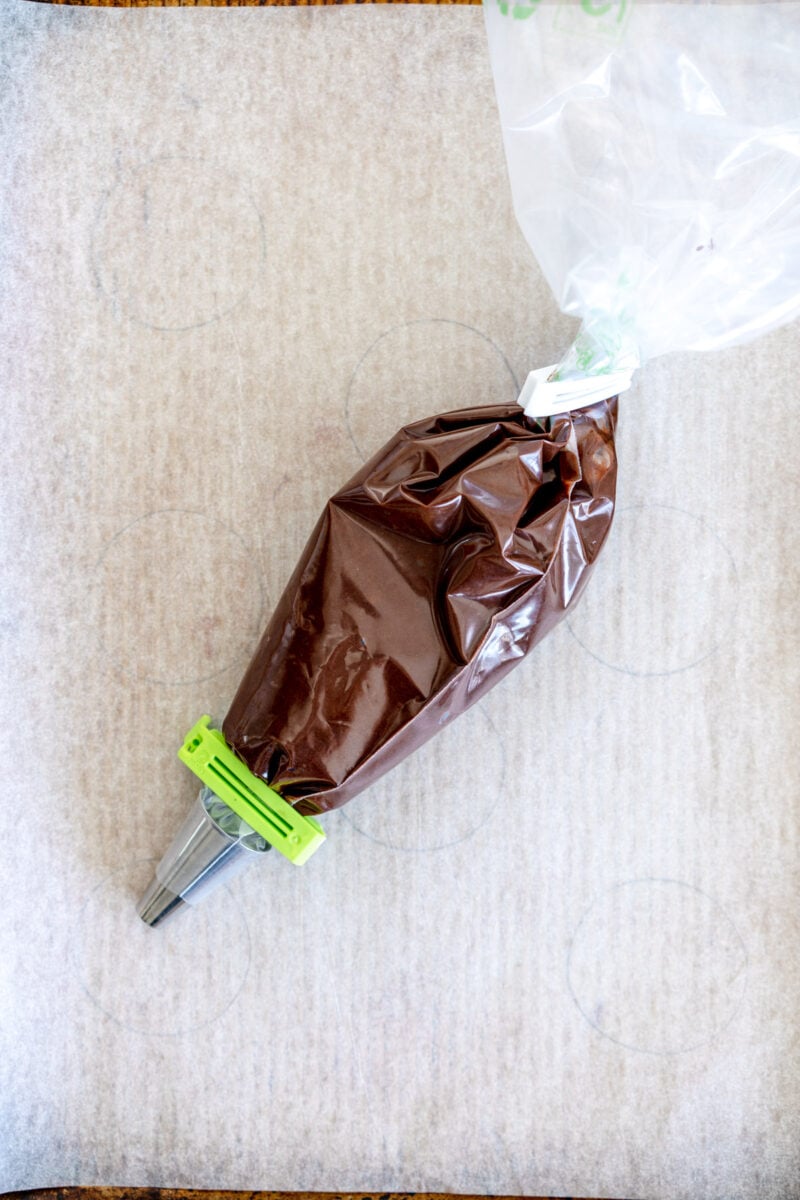
Clean, even circles come from piping onto a template, not from perfect scooping.
Batter and Baking Details
The batter should look glossy and smooth when it is mixed. You want a deep chocolate color, a slightly thick texture, and a finish that holds its shape in the piping bag without being stiff.

If the butter and chocolate are not fully melted, the batter may look grainy. If the egg mixture is not whipped enough, the tops will not crinkle as nicely.

Ingredients

- 100 g good quality dark chocolate, chopped; I used 72%
- 55 g unsalted butter, cold from the fridge is fine
- 12 g Dutch process cocoa; I used half black cocoa and half Dutch process
- 1 large egg, at room temperature; 50 g not including shell
- 75 g caster sugar; in the US regular granulated sugar will work fine
- 55 g brown sugar
- 55 g all purpose flour
- 1/4 tsp salt
Method
- Preheat the oven to 350°F / 180°C. Line a half sheet pan with parchment paper. Using a 2 1/2 inch cookie cutter and a pencil, trace 8 circles on the parchment, with one line of three, one line of two, then one line of three. Turn the paper over so the pencil side is down.
- Fit a piping bag with a medium round piping tip. A zip top bag with the corner cut off or a size #24 cookie scoop are alternatives, but piping is best for round cookies. Clip the bag above the tip and at the end to prevent leaking.
- In a heatproof bowl over a pan of simmering water, combine the dark chocolate and butter. Make sure the bowl does not touch the water. Heat, stirring frequently, until melted and smooth. You can also microwave in 30 second increments, stirring well after each.
- Sift the cocoa over the chocolate mixture and stir until combined. Leave to stand for 8 minutes. When 4 minutes remain, start whipping the egg mixture.
- In a large bowl, combine the egg, caster sugar, and brown sugar. Mix on medium to high speed with an electric handheld mixer for 4 minutes, until light and increased in volume. A stand mixer with a whisk attachment also works.
- Add the chocolate mixture to the egg mixture and mix with the electric mixer to combine.
- Add the all purpose flour and salt, then incorporate by hand until smooth and lump free. Transfer the batter to the piping bag.
- Pipe the batter onto the parchment, holding the tip about 2 cm above the surface. Pipe a dome the diameter of each template, then finish with a small flick of the wrist. If needed, add more batter to the center of each mound.
- Bake for 10 minutes until the cookies are just set and crinkly on top. Do not over bake, or they will dry out. Leave them to cool completely on the pan so they can set before moving.
- Store leftover brownie cookies in an airtight container at room temperature or in the fridge for up to a week.
Serving and Finish
Patience is hard here, but letting the cookies cool completely on the pan is important. They are quite soft when they first come out of the oven, so the pan time helps them set without breaking. Once they are ready, they should lift cleanly off the parchment and have that crackly, lightly set top.
I like them plain most of the time because the fudgy center is already enough. For a celebration version, I pipe on a little brownie frosting and add sprinkles. My kids love that.

You can also swirl in warmed peanut butter or Nutella with a knife before baking, or sprinkle chopped caramels on top right after piping. The caramels melt into little chewy pockets.

These cookies are lovely with cold milk, a cup of coffee, or a scoop of vanilla ice cream. They also make a simple dessert when friends stop by without much warning. Just pop them in the oven and keep an eye on the time.
The most important finish step: take the cookies out when the tops are just set and crinkly, then let the pan do the rest.
FAQs
What makes brownie cookies crinkly on top?
How long do you bake brownie cookies and how do you know when they are done?
Do brownie cookies need to be chilled before baking?
How should you store brownie cookies and can you freeze them?

Soft and Chewy 25 Minute Brownie Cookies
What Are 25 Minute Brownie Cookies? Hi hi!
- Total Time: 25 min
- Yield: 8 cookies 1x
Ingredients
Ingredients
100 g good quality dark chocolate, chopped; I used 72%
55 g unsalted butter, cold from the fridge is fine
12 g dutch process cocoa, I used half black cocoa and half dutch process
1 large egg, at room temperature; 50g not including shell
75 g caster sugar, if you are in the US, regular granulated sugar will work fine; see notes
55 g brown sugar
55 g all-purpose flour
¼ tsp salt
Instructions
Instructions
1-Preheat the oven to 350°f / 180°c: Preheat the oven to 350°f / 180°c. Line a half sheet pan with parchment paper. Using a 2 ½” (6.3cm) cookie cutter and a pencil, trace 8 circles on a piece of parchment paper (one line of three, one line of two, then one line of three), leaving even spacing between each. Turn the paper over so the pencil side is facing down.
2-Fit a piping bag with a medium: Fit a piping bag with a medium round piping tip. Alternatively you can use a ziploc bag with the corner cut off, or a size #24 cookie scoop, but piping is the best way to get nice round cookies. Place a clip above the piping tip and another at the end of the piping bag to stop any batter leaking out.
3-In a heatproof bowl over a pan: In a heatproof bowl over a pan of simmering water (make sure the bowl does not touch the water), combine the dark chocolate and butter. Heat, stirring frequently, until the chocolate and butter are melted and the mixture is smooth. Alternatively you can do this step in the microwave – microwave for 30 second increments, stirring well after each until the mixture is smooth and combined.
4-Sift the cocoa powder over top of: Sift the cocoa powder over top of the chocolate and butter mixture and stir until well combined. Leave to stand for 8 minutes. When there is 4 minutes to go, start whipping the egg mixture.
5-In a large bowl, combine the egg,: In a large bowl, combine the egg, granulated sugar, and brown sugar. Mix on medium to high speed with an electric handheld mixer for 4 minutes until the mixture has lightened and increased in volume. This step can also be done in a stand mixer using the whisk attachment.
6-Add the chocolate mixture to the sugar: Add the chocolate mixture to the sugar and egg mixture and mix to combine with the electric mixer.
7-Add the flour and salt and incorporate: Add the flour and salt and incorporate by hand until the mixture is smooth and does not have any lumps. Transfer the mixture to the piping bag.
8-Pipe the mixture onto the parchment paper: Pipe the mixture onto the parchment paper – you want to hold the tip about 2 cm above the parchment and squeeze until you pipe a dome the diameter of the template that you drew. Finish each one with a little flick of your wrist. Do not worry if you do not get them large enough – you can go back and add more batter once they are all piped out – just pipe it onto the middle of each mound and they will spread out.
9-Bake the cookies for 10 minutes, until: Bake the cookies for 10 minutes, until they are just set, and crinkly on the tops. Do not over bake as they will dry out. Leave to cool completely on the pan (they are quite soft so will need to set) before transferring to a storage container or serving.
10-Store leftover brownie cookies in an airtight: Store leftover brownie cookies in an airtight container at room temperature or in the fridge for up to a week.
Last Step:
Please leave a rating and comment letting us know how you liked this recipe! This helps our business to thrive and continue providing free, high-quality recipes for you.- Prep Time: 15 min
- Cook Time: 10 min
- Method: Baking