Why You’ll Love This Disneyland Grilled Cheese
If you have ever tasted the famous Disneyland Grilled Cheese and wished you could make that same cozy, melty sandwich at home, you are in the right place. This Disney Grilled Cheese Sandwich Toy Story Land Recipe brings together simple ingredients, bold cheese flavor, and a golden crisp bite that feels just a little bit magical. It is the kind of recipe that works for busy weeknights, quick lunches, and fun family meals.
For a little nutrition background while you build your sandwich, you can also read more about the health benefits of cheddar cheese and cream cheese nutrition facts. Those ingredients bring flavor and texture, and they also help create that rich, creamy filling people love.
- Easy to make: This sandwich uses everyday ingredients and simple steps, so it fits into a busy schedule without stress.
- Family-friendly: Kids and adults both love the gooey cheese center and buttery crisp bread. It is a great pick for lunch, dinner, or after-school snacks.
- Flexible: You can swap breads, cheese, or spreads to match what you have at home, including lighter or gluten-free choices.
- Big flavor: The mix of cheddar, provolone, cream cheese spread, and garlic spread gives each bite a rich, savory taste that stands out.
This is the kind of grilled cheese that feels like a treat, but it is still simple enough to make any day of the week.
If you enjoy easy comfort food recipes like this, you may also like our easy family dinner ideas and our simple lunch recipes for busy days.
Jump to:
- Why You’ll Love This Disneyland Grilled Cheese
- Essential Ingredients for Disneyland Grilled Cheese
- Cream Cheese Spread
- Garlic Spread
- Sandwich
- What each ingredient does
- Special dietary options
- How to Prepare the Perfect Disneyland Grilled Cheese: Step-by-Step Guide
- First Step: Mix the cream cheese spread
- Second Step: Mix the garlic spread
- Third Step: Prepare the bread
- Fourth Step: Build the cheese layer
- Fifth Step: Close the sandwiches
- Sixth Step: Coat the outside
- Seventh Step: Heat the pan
- Eighth Step: Grill the sandwiches
- Ninth Step: Check the melt
- Final Step: Slice and serve
- Protein and Main Component Alternatives
- Cheese swaps
- Spread swaps
- Diet-friendly ideas
- Vegetable, Sauce, and Seasoning Modifications
- Vegetable add-ins
- Sauce ideas
- Seasoning changes
- Seasonal ideas
- Mastering Disneyland Grilled Cheese: Advanced Tips and Variations
- Pro cooking techniques
- Flavor variations
- Presentation tips
- Make-ahead options
- How to Store Disneyland Grilled Cheese: Best Practices
- Refrigeration
- Freezing
- Reheating
- Meal prep considerations
- FAQs: Frequently Asked Questions About Disneyland Grilled Cheese
- Disneyland Grilled Cheese
- Ingredients
- Instructions
- Last Step:
- Notes
- Nutrition
- Did you make this recipe?
Essential Ingredients for Disneyland Grilled Cheese
Here is everything you need for this Disneyland Grilled Cheese recipe. The ingredients are grouped by spread and sandwich layer so the process stays clear and easy to follow.
Cream Cheese Spread
- 1/2 cup cream cheese
- 1/2 cup shredded sharp cheddar cheese
- 2 tablespoons heavy cream
- 1/4 teaspoon coarse salt
Garlic Spread
- 1 cup mayonnaise
- 1 1/2 teaspoons minced garlic
- 1/2 teaspoon coarse salt
Sandwich
- 8 slices of bread
- 8 cheddar cheese slices
- 8 provolone slices
What each ingredient does
| Ingredient | Purpose |
|---|---|
| Cream cheese | Creates a smooth, tangy base for the cheesy filling. |
| Sharp cheddar | Adds bold flavor and a stronger cheese taste. |
| Heavy cream | Helps the filling spread easily and stay creamy. |
| Coarse salt | Brings out the cheese and garlic flavor. |
| Mayonnaise | Makes the outside of the bread brown evenly and adds richness. |
| Minced garlic | Gives the sandwich a savory, restaurant-style taste. |
| Bread | Holds everything together and crisps up beautifully in the pan. |
| Cheddar and provolone slices | Create the gooey cheese pull and balanced flavor. |
Special dietary options
- Vegan: Use vegan cream cheese, dairy-free cheddar-style shreds, vegan provolone slices, and plant-based mayonnaise.
- Gluten-free: Choose sturdy gluten-free sandwich bread so the filling stays inside while grilling.
- Low-calorie: Use light mayonnaise, reduced-fat cheeses, and thinner bread slices if you want a lighter version.
How to Prepare the Perfect Disneyland Grilled Cheese: Step-by-Step Guide
Making this sandwich is easy, but a few small details help it turn out extra crisp, cheesy, and comforting. Set out all your ingredients before you start so the assembly feels smooth. This recipe makes 4 sandwiches, since the ingredient list uses 8 slices of bread and 16 total cheese slices.
First Step: Mix the cream cheese spread
In a small bowl, stir together 1/2 cup cream cheese, 1/2 cup shredded sharp cheddar cheese, 2 tablespoons heavy cream, and 1/4 teaspoon coarse salt. Mix until the spread is smooth and easy to spread. If your cream cheese feels firm, let it sit at room temperature for 10 to 15 minutes first so it blends better.
Second Step: Mix the garlic spread
In a second bowl, combine 1 cup mayonnaise, 1 1/2 teaspoons minced garlic, and 1/2 teaspoon coarse salt. Stir until the garlic is evenly mixed through the mayo. This spread will help the bread toast with a golden crust and bring a savory garlic flavor to the outside of the sandwich.
Third Step: Prepare the bread
Lay out 8 slices of bread on a clean work surface. Keep the slices in pairs so assembling the sandwiches feels quicker. If your bread is very soft, slightly sturdier sandwich bread works best because it holds the filling and browns well.
Fourth Step: Build the cheese layer
Spread the cream cheese mixture on 4 slices of bread. Divide it evenly so each sandwich gets that creamy center. Then place 2 cheddar cheese slices and 2 provolone slices on top of each cream cheese-covered slice. The mix of cheeses gives you a rich flavor and a great melt.
Fifth Step: Close the sandwiches
Top each cheese-loaded slice with one of the remaining bread slices to form 4 sandwiches. Press down gently so the layers stick together. Do not press too hard or the filling may squeeze out before grilling.
Sixth Step: Coat the outside
Spread the garlic mayonnaise mixture on the outside of each sandwich. Cover the top and bottom surfaces evenly. This helps the bread turn golden and crisp while the garlic adds a tasty finish.
Seventh Step: Heat the pan
Place a large skillet or griddle over medium-low heat. Give it a minute or two to warm up. A lower heat setting helps the bread brown slowly while the cheese melts all the way through.
Eighth Step: Grill the sandwiches
Place the sandwiches in the skillet, garlic side down first. Cook for about 3 to 4 minutes on the first side, or until deep golden brown. Flip carefully and cook the other side for another 3 to 4 minutes. If the bread browns too fast, lower the heat a little.
Ninth Step: Check the melt
Use a spatula to press gently on the top of the sandwich for just a second or two. This helps the cheese settle and melt together. If the bread is done but the cheese still needs more time, lower the heat and cover the pan for 1 minute.
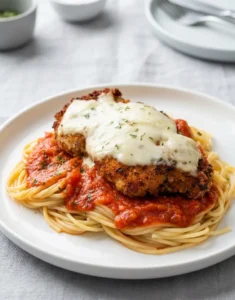
Final Step: Slice and serve
Move the sandwiches to a cutting board and let them rest for 1 minute. Slice each one in half and serve while warm. The cheese will be stretchy, the bread will be crisp, and the whole sandwich will taste rich and cozy.
For the best result, cook low and slow. That is the easiest way to get crisp bread and fully melted cheese at the same time.
Protein and Main Component Alternatives
Even though this recipe is built around cheese, you can still adjust the main components to fit different diets or what you already have in your kitchen. The heart of the sandwich is the creamy filling and the gooey cheese center, so the swaps should keep that same soft, rich feel.
Cheese swaps
If you do not have sharp cheddar, mild cheddar, Colby Jack, Monterey Jack, or mozzarella can work. Sharp cheddar gives the strongest flavor, but milder cheeses are great for picky eaters. Provolone can also be replaced with Havarti or Swiss if you want a softer melt and a slightly different taste.
Spread swaps
If you want to skip mayonnaise, softened butter can be used on the outside of the bread. It gives the sandwich a classic grilled cheese taste and still browns nicely. For the cream cheese spread, you can use whipped cream cheese for a lighter texture or Greek yogurt cream cheese if you want a tangier option.
Diet-friendly ideas
- Vegetarian: The recipe already fits vegetarian eating as written.
- Lower fat: Use reduced-fat cheese slices and light mayonnaise.
- Higher protein: Add a layer of sliced turkey or cooked chicken if your diet allows it.
- Dairy-free: Use plant-based cream cheese, dairy-free cheddar, and dairy-free provolone.
If you need another quick lunch idea that works well for everyday cooking, check out our easy lunch box recipes.
Vegetable, Sauce, and Seasoning Modifications
This Disneyland Grilled Cheese tastes great on its own, but you can also add vegetables, sauces, and seasonings to make it fit your mood. These little changes can help you use up what is already in the fridge and give the sandwich a fresh twist.
Vegetable add-ins
Thin tomato slices, caramelized onions, baby spinach, or sautéed mushrooms work well in this sandwich. Keep the layers thin so the bread can still close easily and the cheese melts around the vegetables. If you want a little crunch, add very thin slices of bell pepper or pickles, but use only a small amount so the bread does not get soggy.
Sauce ideas
The garlic mayo spread already brings plenty of flavor, but you can add a few extras if you want. A little Dijon mustard gives the sandwich a sharper bite. A thin layer of pesto brings a herby taste, while a tiny dab of hot sauce adds heat without taking over the cheese flavor.
Seasoning changes
Coarse salt works well here, but you can also try black pepper, onion powder, smoked paprika, or a pinch of Italian seasoning. If you like a stronger garlic taste, add a little extra minced garlic to the spread. For a kid-friendly version, keep the seasoning simple and let the cheese flavor stay in front.
Seasonal ideas
- Spring: Add thin asparagus tips or fresh spinach.
- Summer: Add tomato slices and basil.
- Fall: Pair the sandwich with tomato soup or roasted squash.
- Winter: Serve it with a warm bowl of soup for a cozy meal.
These changes keep the sandwich fun and flexible, which is one reason this Disneyland Grilled Cheese works so well for home cooks, students, and busy families.
Mastering Disneyland Grilled Cheese: Advanced Tips and Variations
Once you have made this sandwich once, it is easy to tweak the details and get an even better result next time. A few small kitchen tricks can help you get the perfect crust, the best cheese melt, and a more polished look on the plate.
Pro cooking techniques
Use a skillet that spreads heat well, such as cast iron or a heavy stainless pan. These pans help the bread brown evenly. If your pan runs hot, turn the heat down a little before the sandwiches go in. You can also cover the pan for the last minute of cooking to help the cheese melt faster without burning the bread.
Another helpful trick is to grate a little of the cheddar instead of using only slices. That tiny bit of extra surface area can help the cheese melt faster. If you want cleaner slices, let the sandwiches rest for a minute before cutting.
Flavor variations
- Extra cheesy: Add more shredded cheddar to the cream cheese mixture.
- Garlic lover’s version: Add another 1/2 teaspoon minced garlic to the mayo spread.
- Spicy version: Mix a pinch of cayenne or red pepper flakes into the cheese filling.
- Herb version: Add dried parsley, chives, or Italian seasoning.
Presentation tips
Serve the sandwiches on a wooden board or a simple plate with tomato soup, pickles, or a few fresh herbs. Cut each sandwich diagonally to show off the melty cheese center. That classic triangle shape also makes the sandwich feel a little more like a theme park treat.
Make-ahead options
You can mix both spreads up to 2 days ahead and keep them in sealed containers in the fridge. You can also assemble the sandwiches a few hours before cooking, then cover and chill them until mealtime. If you do that, let them sit at room temperature for a few minutes before grilling so they cook more evenly.
Small changes make a big difference with grilled cheese. A better pan, a lower heat, and a short rest time can turn a simple sandwich into something special.
How to Store Disneyland Grilled Cheese: Best Practices
Grilled cheese tastes best fresh, but leftovers can still be handled well if you store them the right way. Cool the sandwiches first so steam does not make the bread soggy.
Refrigeration
Wrap leftover sandwiches in foil or place them in an airtight container. Store them in the fridge for up to 3 days. If possible, keep any tomato or extra wet toppings out of the sandwich until serving time.
Freezing
For longer storage, wrap each cooled sandwich tightly in plastic wrap or foil, then place it in a freezer bag. Freeze for up to 1 month. The texture will be a little softer after thawing, but the sandwich will still work well for a quick meal.
Reheating
Reheat in a skillet over low heat so the bread crisps back up. You can also use an air fryer for a few minutes at 350 F. Avoid the microwave if you want to keep the bread from turning soft and chewy.
Meal prep considerations
If you are cooking for the week, prep the spreads ahead of time and keep the bread and cheese separate until you are ready to assemble. That keeps everything fresh and makes lunch or dinner come together quickly.

FAQs: Frequently Asked Questions About Disneyland Grilled Cheese
Print
Disneyland Grilled Cheese
🧀 Ooey-gooey triple-cheese bliss with garlic mayo crust – recreate Toy Story Land magic at home!
🥪 Crispy golden outside, ultra-melty provolone-cheddar inside – ultimate comfort food upgrade!
- Total Time: 25 minutes
- Yield: 4 sandwiches
Ingredients
– 1/2 cup cream cheese
– 1/2 cup shredded sharp cheddar cheese
– 2 tablespoons heavy cream
– 1/4 teaspoon coarse salt
– 1 cup mayonnaise
– 1 1/2 teaspoons minced garlic
– 1/2 teaspoon coarse salt
– 8 slices of bread
– 8 cheddar cheese slices
– 8 provolone slices
Instructions
1-First Step: Mix the cream cheese spread In a small bowl, stir together 1/2 cup cream cheese, 1/2 cup shredded sharp cheddar cheese, 2 tablespoons heavy cream, and 1/4 teaspoon coarse salt. Mix until the spread is smooth and easy to spread. If your cream cheese feels firm, let it sit at room temperature for 10 to 15 minutes first so it blends better.
2-Second Step: Mix the garlic spread In a second bowl, combine 1 cup mayonnaise, 1 1/2 teaspoons minced garlic, and 1/2 teaspoon coarse salt. Stir until the garlic is evenly mixed through the mayo. This spread will help the bread toast with a golden crust and bring a savory garlic flavor to the outside of the sandwich.
3-Third Step: Prepare the bread Lay out 8 slices of bread on a clean work surface. Keep the slices in pairs so assembling the sandwiches feels quicker. If your bread is very soft, slightly sturdier sandwich bread works best because it holds the filling and browns well.
4-Fourth Step: Build the cheese layer Spread the cream cheese mixture on 4 slices of bread. Divide it evenly so each sandwich gets that creamy center. Then place 2 cheddar cheese slices and 2 provolone slices on top of each cream cheese-covered slice. The mix of cheeses gives you a rich flavor and a great melt.
5-Fifth Step: Close the sandwiches Top each cheese-loaded slice with one of the remaining bread slices to form 4 sandwiches. Press down gently so the layers stick together. Do not press too hard or the filling may squeeze out before grilling.
6-Sixth Step: Coat the outside Spread the garlic mayonnaise mixture on the outside of each sandwich. Cover the top and bottom surfaces evenly. This helps the bread turn golden and crisp while the garlic adds a tasty finish.
7-Seventh Step: Heat the pan Place a large skillet or griddle over medium-low heat. Give it a minute or two to warm up. A lower heat setting helps the bread brown slowly while the cheese melts all the way through.
8-Eighth Step: Grill the sandwiches Place the sandwiches in the skillet, garlic side down first. Cook for about 3 to 4 minutes on the first side, or until deep golden brown. Flip carefully and cook the other side for another 3 to 4 minutes. If the bread browns too fast, lower the heat a little.
9-Ninth Step: Check the melt Use a spatula to press gently on the top of the sandwich for just a second or two. This helps the cheese settle and melt together. If the bread is done but the cheese still needs more time, lower the heat and cover the pan for 1 minute.
10-Final Step: Slice and serve Move the sandwiches to a cutting board and let them rest for 1 minute. Slice each one in half and serve while warm. The cheese will be stretchy, the bread will be crisp, and the whole sandwich will taste rich and cozy.
Last Step:
Please leave a rating and comment letting us know how you liked this recipe! This helps our business to thrive and continue providing free, high-quality recipes for you.Notes
🧄 Let spreads sit 10 minutes for flavors to meld before assembly.
🔥 Medium heat prevents burning crust while melting cheeses perfectly.
🍞 Use thick-sliced bread like sourdough for sturdier, restaurant-style hold.
- Prep Time: 15 minutes
- Cook Time: 10 minutes
- Category: Sandwiches
- Method: Skillet
- Cuisine: American
- Diet: Vegetarian
Nutrition
- Serving Size: 1 sandwich
- Calories: 850 kcal
- Sugar: 5 g
- Sodium: 1500 mg
- Fat: 70 g
- Saturated Fat: 25 g
- Unsaturated Fat: 40 g
- Trans Fat: 0 g
- Carbohydrates: 40 g
- Fiber: 2 g
- Protein: 25 g
- Cholesterol: 100 mg