Why You’ll Love These Ranch Chicken Thighs
These Ranch Chicken Thighs are the kind of weeknight dinner that feels easy, comforting, and full of flavor. With a short prep time and simple ingredients, this baked chicken recipe fits right into busy schedules without asking for much effort.
- Easy to make: You only need 5 minutes of prep, then the oven does most of the work. The chicken bakes until the skin turns crisp and golden, making this a smart choice for home cooks who want a low-stress meal.
- Great for balanced eating: Each serving has 31g of protein, which makes these baked ranch chicken thighs a filling option for people watching carbs or looking for a protein-rich dinner. You can read more about the health benefits of chicken if you want to learn more about why it works well in many meal plans.
- Full of bold flavor: The mix of dry ranch seasoning, garlic, lemon juice, and olive oil gives the chicken a savory coating that tastes rich without needing a long ingredient list.
- Flexible for many households: Ranch chicken thighs can fit busy parents, students, newlyweds, and anyone who wants a dinner that feels hearty but still simple. Serve them with vegetables, potatoes, salad, or rice for a meal that works in many ways.
When you want crispy skin, juicy meat, and big flavor with little fuss, ranch chicken thighs are a recipe worth keeping on repeat.
This dish also works well for meal prep, family dinners, or relaxed weekend cooking. If you enjoy quick chicken recipes, you may also like our garlic butter chicken recipe for another simple dinner idea.
Jump to:
- Why You’ll Love These Ranch Chicken Thighs
- Essential Ingredients for Ranch Chicken Thighs
- Main Ingredients
- Special Dietary Options
- How to Prepare the Perfect Ranch Chicken Thighs: Step-by-Step Guide
- First Step: Get the oven and pan ready
- Second Step: Season the chicken well
- Third Step: Bake until the skin starts to crisp
- Fourth Step: Mix the ranch coating
- Fifth Step: Brush the coating over the chicken
- Sixth Step: Finish baking until golden and cooked through
- Final Step: Rest and serve
- Dietary Substitutions to Customize Your Ranch Chicken Thighs
- Protein and Main Component Alternatives
- Vegetable, Sauce, and Seasoning Modifications
- Mastering Ranch Chicken Thighs: Advanced Tips and Variations
- Pro cooking techniques
- Flavor variations
- Presentation tips
- Make-ahead options
- Nutrition for Ranch Chicken Thighs
- How to Store Ranch Chicken Thighs: Best Practices
- FAQs: Frequently Asked Questions About Ranch Chicken Thighs
- What type of chicken thighs work best for ranch chicken thighs recipe?
- What internal temperature do ranch chicken thighs need to be cooked to?
- Can you make ranch chicken thighs in a slow cooker or air fryer?
- How do you store leftover ranch chicken thighs?
- Can you add vegetables when baking ranch chicken thighs?
- Ranch Chicken Thighs
- Ingredients
- Instructions
- Last Step:
- Notes
- Nutrition
- Did you make this recipe?
Essential Ingredients for Ranch Chicken Thighs
This baked ranch chicken thighs recipe uses a short list of pantry-friendly ingredients, which is one reason it is so practical for everyday cooking. Each item plays a clear role in flavor, texture, or moisture.
Main Ingredients
- 6 bone-in skin-on chicken thighs – The best choice for juicy meat and crispy skin. Bone-in thighs stay tender in the oven and hold up well to high heat.
- 1 ounce packet dry ranch salad dressing mix – Brings the classic ranch flavor that makes these ranch chicken thighs so savory and satisfying.
- 2 tablespoons olive oil – Helps the seasoning mixture spread smoothly over the chicken and supports browning.
- 1 clove garlic, pressed – Adds a fresh, sharp garlic note that deepens the ranch flavor.
- 1 tablespoon lemon juice, if needed to thin mixture – Helps loosen the coating so it brushes on evenly. Use it only if the seasoning mixture feels too thick.
- Black pepper to taste – Adds gentle heat and balances the creamy ranch flavor.
- Salt to taste – Season the chicken before baking so every bite tastes well balanced and full.
Special Dietary Options
- Vegan: Use thick cauliflower steaks or king oyster mushrooms with dairy-free ranch seasoning and olive oil for a plant-based version.
- Gluten-free: Use a gluten-free ranch dressing mix and check labels on all packaged ingredients.
- Low-calorie: Use skinless chicken thighs or boneless thighs, then reduce the oil slightly if needed.
If you like making seasoning blends at home, you may also enjoy this homemade ranch seasoning guide for more flavor ideas.
How to Prepare the Perfect Ranch Chicken Thighs: Step-by-Step Guide
First Step: Get the oven and pan ready
Preheat your oven to 400°F. This temperature is hot enough to help the skin crisp while the chicken cooks through evenly. Line a baking sheet with foil, nonstick side up, so cleanup is easier later. If you have a wire rack, place it over the sheet for even better airflow and crunch, but the recipe works well without one.
Pat the chicken thighs dry with paper towels before they go on the pan. This matters because dry skin browns better than wet skin. Arrange the thighs on the baking sheet with the fattest side facing up. Leave space between each piece so the heat can move around the chicken instead of trapping steam.
Second Step: Season the chicken well
Season the chicken thighs with salt and black pepper to taste. Do not be shy here, because good seasoning at the beginning helps the final baked chicken taste richer and more complete. If the thighs have a bit of extra fat, leave it on. That fat helps the skin crisp and keeps the meat juicy as it bakes.
For the best shape and even cooking, unroll the thighs if they are folded or tucked in. This helps the meat cook more evenly and gives the skin more surface area to brown. A little attention at this stage can make a big difference in the finished texture.
Third Step: Bake until the skin starts to crisp
Place the pan in the oven and bake the chicken thighs for 25 minutes. At this point, the skin should begin to tighten and crisp a little. This first bake gives the chicken a head start before the ranch coating goes on.
If you are cooking for a family meal or planning leftovers, keep the pieces in a single layer and avoid overcrowding the pan. Crowding can trap moisture and keep the skin from getting crisp. If your chicken pieces are very large, you may need a few extra minutes before adding the sauce mixture.
Fourth Step: Mix the ranch coating
While the chicken bakes, combine the dry ranch salad dressing mix, olive oil, pressed garlic, and lemon juice if needed in a small bowl. Stir until the mixture looks smooth and spoonable. If the seasoning clumps, add a little water to loosen it. That small adjustment helps the coating spread more evenly over the chicken.
The coating should be thick enough to cling to the skin, but not so thick that it sits in one blob. If you like a stronger garlic flavor, you can let the mixture sit for a minute or two so the garlic blends into the oil and ranch seasoning.
Fifth Step: Brush the coating over the chicken
Remove the baking sheet from the oven and brush the ranch mixture over each chicken thigh. Try to coat the top and any exposed sides, since the seasoning will bake into the skin and create that savory ranch flavor. If you have extra mixture, use it to add a second light coat.
At this point, the chicken should already be smelling great. Keep the coating even, because thick patches can darken too fast while thin spots may dry out. A light, careful brush-on layer gives the best balance of flavor and crispness.
Sixth Step: Finish baking until golden and cooked through
Return the chicken to the oven and continue baking until the thighs are crispy, golden brown, and reach 165°F in the thickest part. For the most accurate reading, insert an instant-read thermometer into the meatiest part without touching the bone. Many cooks like to start checking around 160°F in the oven, since the temperature will rise a little while the chicken rests.
If you want extra crunch, broil the thighs for about 5 minutes at the end. Watch them closely during broiling, because the skin can go from golden to too dark very fast. This final step is optional, but it is a nice touch when you want more texture.
Final Step: Rest and serve
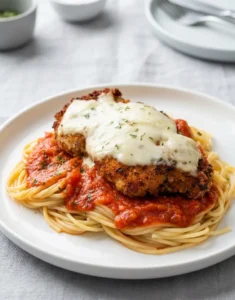
Let the ranch chicken thighs rest for 5 to 10 minutes before serving. Resting helps the juices settle back into the meat, so every bite stays tender. After that, serve the chicken hot with your favorite sides, such as roasted vegetables, mashed potatoes, a simple salad, or rice.
For the best results, cook to temperature, not just time. A thermometer is the easiest way to keep chicken safe and juicy.
Recipe timing: Prep 5 minutes, cook 45 minutes, total 50 minutes, serves 6.
| Recipe Detail | Amount |
|---|---|
| Prep Time | 5 minutes |
| Cook Time | 45 minutes |
| Total Time | 50 minutes |
| Servings | 6 |
| Oven Temperature | 400°F |

Dietary Substitutions to Customize Your Ranch Chicken Thighs
Protein and Main Component Alternatives
If you do not have bone-in, skin-on thighs, you can still make a version of ranch chicken thighs with other cuts. Boneless, skinless chicken thighs work well and cook a bit faster, though they will not have the same crispy skin. Chicken breasts can also be used, but they need closer attention so they do not dry out.
For a lighter meal, skinless thighs are a good option. They still hold flavor well and work nicely with the ranch coating. If you want a vegetarian meal, roasted cauliflower steaks or thick mushroom caps can carry the seasoning in a satisfying way.
Vegetable, Sauce, and Seasoning Modifications
You can add vegetables like carrots, potatoes, or green beans to the baking sheet for a full one-pan dinner. Just cut them into even pieces so they cook at a similar pace. A little olive oil and extra black pepper can help them roast well beside the chicken.
If you want a different flavor, add smoked paprika, dried parsley, or a pinch of onion powder to the ranch mixture. You can also swap lemon juice for a splash of water if you only need to thin the coating. For lower sodium, look for a reduced-sodium ranch mix and season lightly with salt at the start.
Mastering Ranch Chicken Thighs: Advanced Tips and Variations
Pro cooking techniques
A few small habits can make your ranch chicken thighs turn out better every time. First, pat the chicken dry before baking. Second, bake uncovered so the skin can crisp instead of steaming. Third, do not trim all the fat from the thighs, because that fat helps create flavor and texture while the chicken cooks.
Use a rack if you have one, since airflow under the chicken helps the skin brown more evenly. Also, avoid overcrowding the pan. A crowded baking sheet traps moisture, and that can lead to soft skin instead of crisp skin.
Flavor variations
If you want to change the flavor a little, try adding a pinch of cayenne for heat or extra garlic for a stronger savory taste. You can also mix in dried dill or parsley if you want the ranch flavor to taste a bit fresher. For a smoky twist, a small amount of paprika works nicely with the ranch seasoning.
Another easy variation is to add a touch of grated Parmesan near the end of baking. It gives the skin a salty finish and pairs well with the ranch coating. This is a good option for readers who enjoy a more cheese-forward dinner.
Presentation tips
Serve the chicken thighs on a warm platter with fresh herbs, lemon wedges, or roasted vegetables around the edges. A simple garnish makes the meal look inviting without adding much work. If you are serving guests, place the crispiest thighs on top so the best texture is easy to see.
Make-ahead options
You can season the chicken a few hours ahead or even the night before. Store it covered in the refrigerator, then bake when ready. The ranch coating can also be mixed earlier in the day and kept chilled until needed. That makes this recipe especially helpful for busy weeknights, meal prep, or casual weekend dinners.
Nutrition for Ranch Chicken Thighs
Each serving, based on 1 chicken thigh, has 340 calories, 1g carbohydrates, 31g protein, 25g fat, 6g saturated fat, 18g polyunsaturated fat, 168mg cholesterol, and 270mg sodium. That makes this ranch chicken thighs recipe a solid option for people looking for a filling protein main with very few carbs.
Because the recipe uses a flavorful ranch coating, you get a satisfying dinner without a long sauce list or heavy breading. The result is hearty, crisp, and easy to fit into a wide range of meal plans.
How to Store Ranch Chicken Thighs: Best Practices
Let leftover ranch chicken thighs cool completely before storing them. Place them in an airtight container and keep them in the refrigerator for up to 3 to 4 days. This helps protect the texture and keeps the chicken safe to eat later.
For longer storage, freeze the thighs in a freezer-safe bag or container for up to 3 months. Thaw them overnight in the refrigerator before reheating. To reheat, warm in a 350°F oven for 10 to 15 minutes, or microwave gently until the chicken reaches 165°F again.
If you use the chicken for meal prep, portion it with sides in separate containers. That makes lunches and quick dinners much easier during a busy week. You can also shred the leftovers for salads, wraps, tacos, or rice bowls.

FAQs: Frequently Asked Questions About Ranch Chicken Thighs
What type of chicken thighs work best for ranch chicken thighs recipe?
What internal temperature do ranch chicken thighs need to be cooked to?
Can you make ranch chicken thighs in a slow cooker or air fryer?
How do you store leftover ranch chicken thighs?
Can you add vegetables when baking ranch chicken thighs?

Ranch Chicken Thighs
🍗 Savor crispy, golden chicken thighs bursting with zesty ranch flavor – juicy inside, crunchy outside for the ultimate comfort food!
🔥 High-protein (31g per thigh) family dinner ready in 50 minutes with minimal effort and cleanup!
- Total Time: 50 minutes
- Yield: 6 servings
Ingredients
– 6 bone-in skin-on chicken thighs
– 1 ounce packet dry ranch salad dressing mix
– 2 tablespoons olive oil
– 1 clove garlic, pressed
– 1 tablespoon lemon juice, if needed to thin mixture
– Black pepper to taste
– Salt to taste
Instructions
1-First Step: Get the oven and pan ready
Preheat your oven to 400°F. This temperature is hot enough to help the skin crisp while the chicken cooks through evenly. Line a baking sheet with foil, nonstick side up, so cleanup is easier later. If you have a wire rack, place it over the sheet for even better airflow and crunch, but the recipe works well without one.
Pat the chicken thighs dry with paper towels before they go on the pan. This matters because dry skin browns better than wet skin. Arrange the thighs on the baking sheet with the fattest side facing up. Leave space between each piece so the heat can move around the chicken instead of trapping steam.
2-Second Step: Season the chicken well
Season the chicken thighs with salt and black pepper to taste. Do not be shy here, because good seasoning at the beginning helps the final baked chicken taste richer and more complete. If the thighs have a bit of extra fat, leave it on. That fat helps the skin crisp and keeps the meat juicy as it bakes.
For the best shape and even cooking, unroll the thighs if they are folded or tucked in. This helps the meat cook more evenly and gives the skin more surface area to brown. A little attention at this stage can make a big difference in the finished texture.
3-Third Step: Bake until the skin starts to crisp
Place the pan in the oven and bake the chicken thighs for 25 minutes. At this point, the skin should begin to tighten and crisp a little. This first bake gives the chicken a head start before the ranch coating goes on.
If you are cooking for a family meal or planning leftovers, keep the pieces in a single layer and avoid overcrowding the pan. Crowding can trap moisture and keep the skin from getting crisp. If your chicken pieces are very large, you may need a few extra minutes before adding the sauce mixture.
4-Fourth Step: Mix the ranch coating
While the chicken bakes, combine the dry ranch salad dressing mix, olive oil, pressed garlic, and lemon juice if needed in a small bowl. Stir until the mixture looks smooth and spoonable. If the seasoning clumps, add a little water to loosen it. That small adjustment helps the coating spread more evenly over the chicken.
The coating should be thick enough to cling to the skin, but not so thick that it sits in one blob. If you like a stronger garlic flavor, you can let the mixture sit for a minute or two so the garlic blends into the oil and ranch seasoning.
5-Fifth Step: Brush the coating over the chicken
Remove the baking sheet from the oven and brush the ranch mixture over each chicken thigh. Try to coat the top and any exposed sides, since the seasoning will bake into the skin and create that savory ranch flavor. If you have extra mixture, use it to add a second light coat.
At this point, the chicken should already be smelling great. Keep the coating even, because thick patches can darken too fast while thin spots may dry out. A light, careful brush-on layer gives the best balance of flavor and crispness.
6-Sixth Step: Finish baking until golden and cooked through
Return the chicken to the oven and continue baking until the thighs are crispy, golden brown, and reach 165°F in the thickest part. For the most accurate reading, insert an instant-read thermometer into the meatiest part without touching the bone. Many cooks like to start checking around 160°F in the oven, since the temperature will rise a little while the chicken rests.
If you want extra crunch, broil the thighs for about 5 minutes at the end. Watch them closely during broiling, because the skin can go from golden to too dark very fast. This final step is optional, but it is a nice touch when you want more texture.
7-Final Step: Rest and serve
Let the ranch chicken thighs rest for 5 to 10 minutes before serving. Resting helps the juices settle back into the meat, so every bite stays tender. After that, serve the chicken hot with your favorite sides, such as roasted vegetables, mashed potatoes, a simple salad, or rice.
Last Step:
Please leave a rating and comment letting us know how you liked this recipe! This helps our business to thrive and continue providing free, high-quality recipes for you.Notes
🌡️ Cook to 165°F internal temperature; it will carryover to perfect juiciness after resting 5-10 minutes.
🧼 Pat chicken dry thoroughly before seasoning for the crispiest skin possible.
🛒 Don’t overcrowd the pan or trim excess fat – it leads to even cooking and flavor.
- Prep Time: 5 minutes
- Cook Time: 45 minutes
- Category: Main Dishes
- Method: Oven
- Cuisine: American
- Diet: High Protein
Nutrition
- Serving Size: 1 chicken thigh
- Calories: 340
- Sugar: 1g
- Sodium: 270mg
- Fat: 25g
- Saturated Fat: 6g
- Unsaturated Fat: 18g
- Trans Fat: 0g
- Carbohydrates: 1g
- Fiber: 0g
- Protein: 31g
- Cholesterol: 168mg