What Are Slice and Bake Heart Cookies?
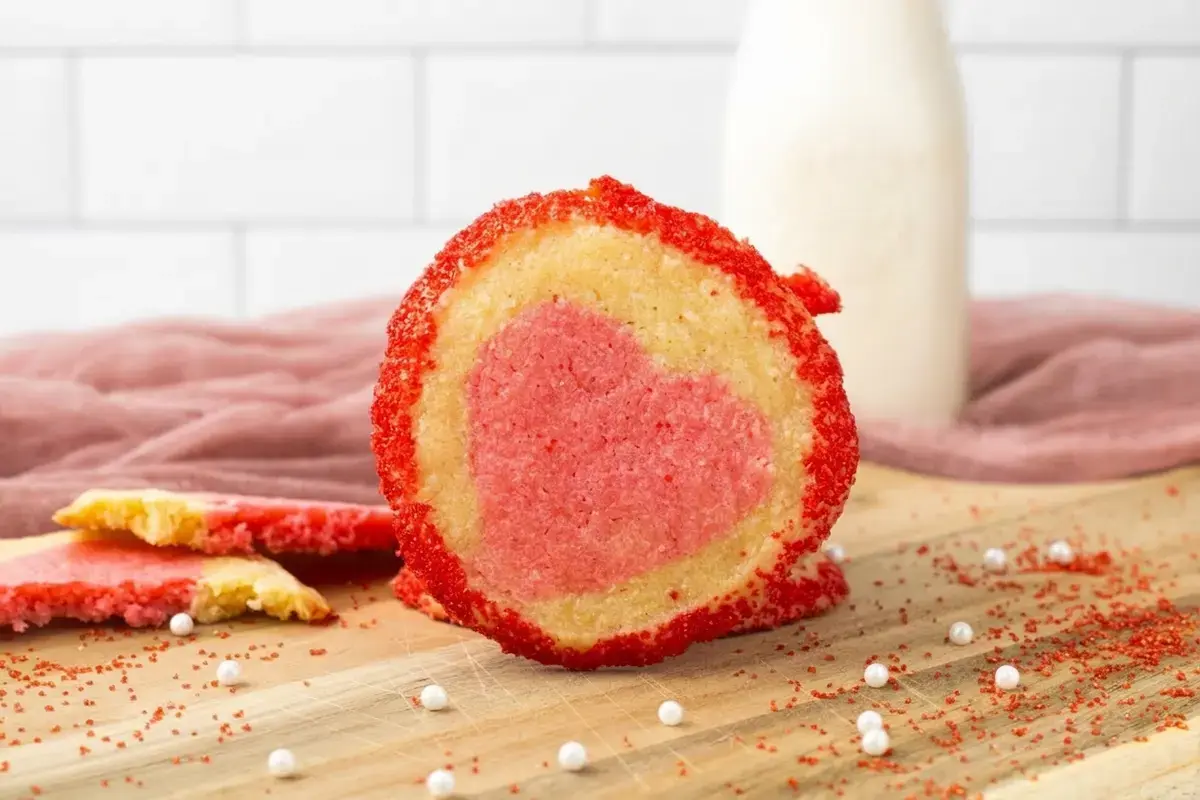
Slice and bake heart cookies are the kind of Valentine’s Day treat that makes everyone smile the moment they see them. Each buttery cookie hides a cheerful pink heart baked right into the center, so every bite looks like a tiny celebration. They are the sweetest way to say “I love you” without a single piping bag or frosting tip.
I first made these for our family Valentine’s party when my kids were still small enough to stand on a step stool to reach the counter.

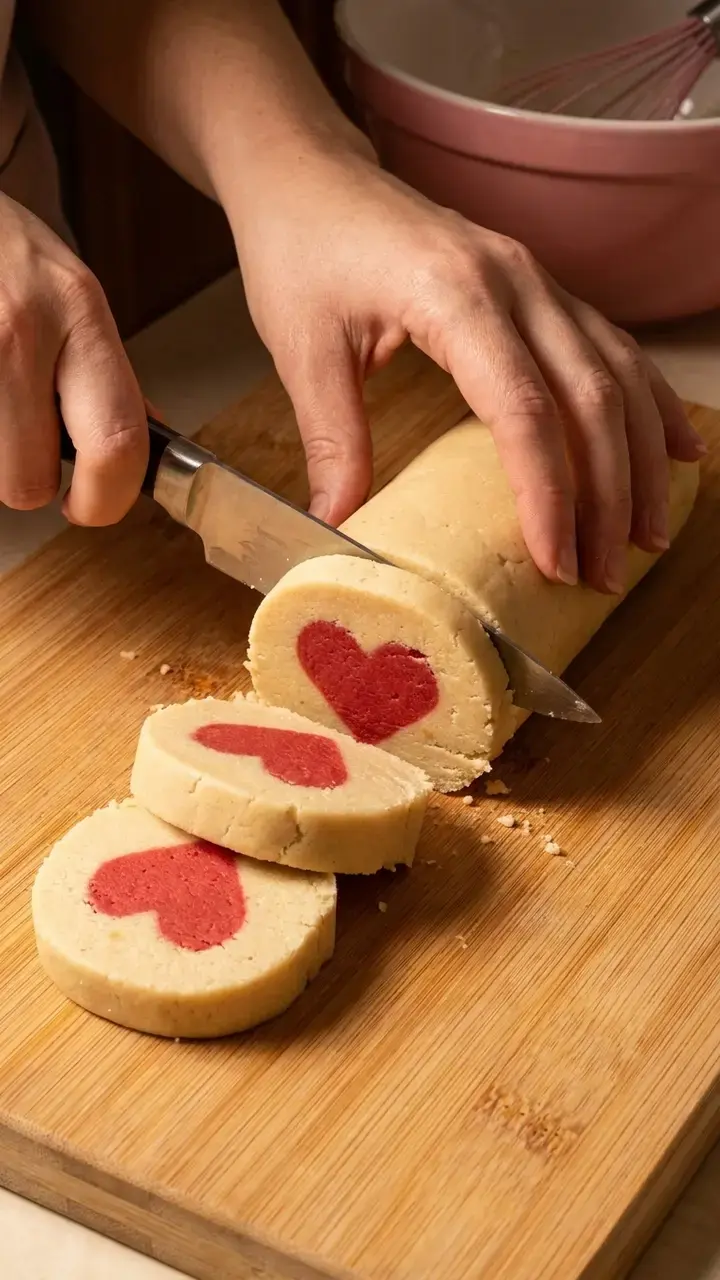
We rolled the pink dough, stacked little hearts, and wrapped them in the plain dough until the log looked like a pale polka dot sausage. When I sliced into that chilled log and saw the perfect hearts appear, we all cheered.
The best part is that the whole recipe can be prepped ahead, so on party day the only job left is slicing and baking. These are truly a cookie inside a cookie, and once you make them once, they will become a holiday tradition.
Because the dough gets shaped into a log, chilled until firm, and then cut into even rounds, the heart shape holds beautifully through baking. Every cookie comes out with a distinct, crisp heart set in a tender sugar cookie ring.
Kids love the surprise, and grown ups appreciate that the dough can be made the night before. If you are planning a classroom party, a bake sale, or a cozy afternoon tea, these homemade heart cookies bring a lot of joy with very little last minute stress.
You can also find the full recipe page for slice and bake heart cookies right here on the blog if you want to jump straight to the details.
Jump to:
- What Are Slice and Bake Heart Cookies?
- Why You’ll Love This Recipe
- Supplies
- Ingredients
- How to Make Slice and Bake Heart Cookies
- Mix and Divide the Dough
- Create the Heart Center
- Form and Chill the Log
- Slice and Bake
- How to Store
- Make Ahead Instructions
- Frequently Asked Questions
- How do you make slice and bake heart cookies with a heart in the center?
- How can I keep my slice and bake heart cookies from spreading or losing their heart shape?
- Can I make slice and bake heart cookie dough ahead of time or freeze it for later?
- What kind of food coloring works best for pink heart cookies, and can I make a dye-free version?
- Slice and Bake Heart Cookies
- Ingredients
- Instructions
- Last Step:
- Nutrition
- Did you make this recipe?
Why You’ll Love This Recipe
These cookies are not just adorable; they are also one of the most practical Valentine’s Day treats you can make. The dough splits nicely into two sessions, which is a lifesaver when you are baking with little helpers.
You can mix the butter and sugar together one afternoon, shape the pink hearts, wrap the log, and then tuck it into the fridge.
The next day all you do is slice and bake, so the kitchen stays calm and you get to enjoy the fun part together.
I love that the recipe uses everyday ingredients and a simple butter cookie base that tastes like a classic sugar cookie with a hint of vanilla.
The pop of color in the center comes from a few drops of gel food coloring mixed right into a portion of the dough. You can also use natural food dye if you prefer a softer pink that skips the synthetic color.
Either way, the result is a cheerful, make ahead dessert that feels like a small gift in every bite.
The cookie itself is tender and lightly crisp at the edges, with just the right amount of sweetness. Rolling the outer edge in red sugar sprinkles adds a crunchy, sparkly border that makes the hearts stand out even more.
I like to do half the batch with sprinkles and half without so there is something for everyone. For another take on the technique, you might also enjoy this heart shaped slice and bake cookies recipe from The Kitchn.
Supplies
You do not need any fancy equipment to make these heart cookies. A few basic baking tools plus one small heart shaped cookie cutter are all it takes to pull off the surprise center. Here is what I keep on the counter before we start:
- Electric mixer or stand mixer, for creaming the butter and sugar until fluffy
- 2 inch heart shaped cookie cutter
- Rolling pin
- Baking sheet lined with parchment paper
- Glass measuring cup and measuring spoons
- Rubber spatula for scraping the bowl
- Plastic wrap for chilling the dough
- Wire cooling rack for cooling the baked cookies completely
If you do not have a stand mixer, a hand held electric mixer works just fine. The most important tool is the heart cutter because a smaller cutter, about 2 inches wide, creates the perfect size heart to fit inside the cookie log. Using a larger cutter will make the hearts too big to wrap smoothly.
Ingredients
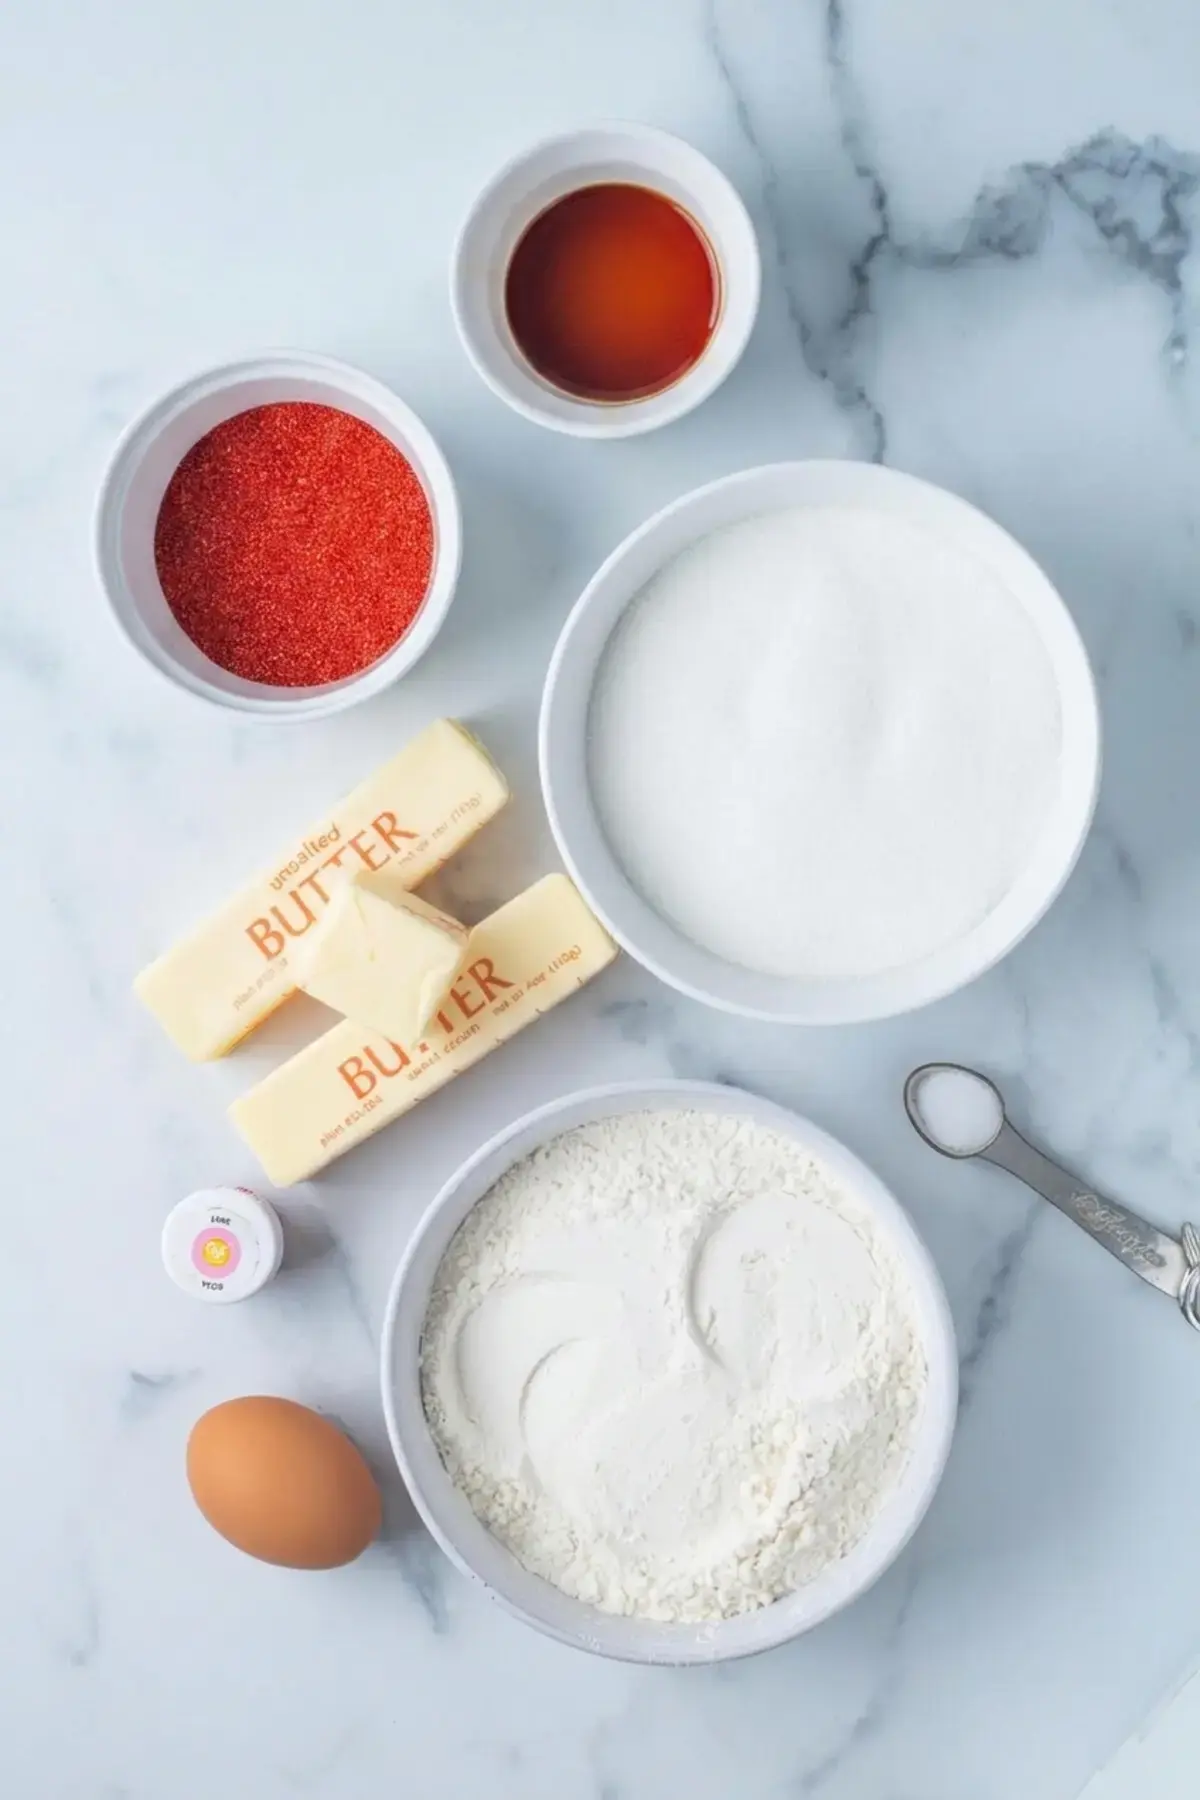
The ingredient list keeps things simple and pantry friendly. I always pull the butter and egg out of the fridge about an hour before I plan to start so they soften to room temperature. That little step makes the dough come together smoothly and helps the cookies bake evenly.
- 1 cup unsalted butter, softened to room temperature
- 1 1/2 cups granulated white sugar
- 1 large egg, at room temperature
- 2 teaspoons vanilla extract
- 2 1/4 cups all purpose flour
- 1/2 teaspoon salt
- Pink or red gel food coloring (or natural food dye for a dye free option)
- Red sugar sprinkles, optional, for rolling the edges
If you only have salted butter on hand, go ahead and use it. Just reduce the added salt to a tiny pinch so the cookies stay nicely balanced. I have made this recipe with both unbleached and regular all purpose flour and both work beautifully.
The food coloring can be a concentrated gel, which gives a vivid pink without thinning the dough, or a natural plant based dye if you want a treat free from synthetic colors.
How to Make Slice and Bake Heart Cookies
These cookies come together in four main stages, and I promise the heart shaping is much easier than it looks. The most important rule is to keep the plain dough soft while the pink dough chills, so you can press and wrap it without tearing. Let me walk you through each part.
The secret to perfectly shaped heart cookies is chilling the dough log long enough so the slices do not spread. A full overnight chill gives the cleanest hearts.
Mix and Divide the Dough
Start by adding the softened butter, sugar, egg, and vanilla extract to a large mixing bowl. Beat with an electric mixer until the mixture looks creamy and pale, scraping down the sides of the bowl with a rubber spatula once or twice so everything blends evenly.
Next, add the flour and salt and mix slowly just until the dough comes together. It will seem a little crumbly at first, then turn into a soft, pliable dough.
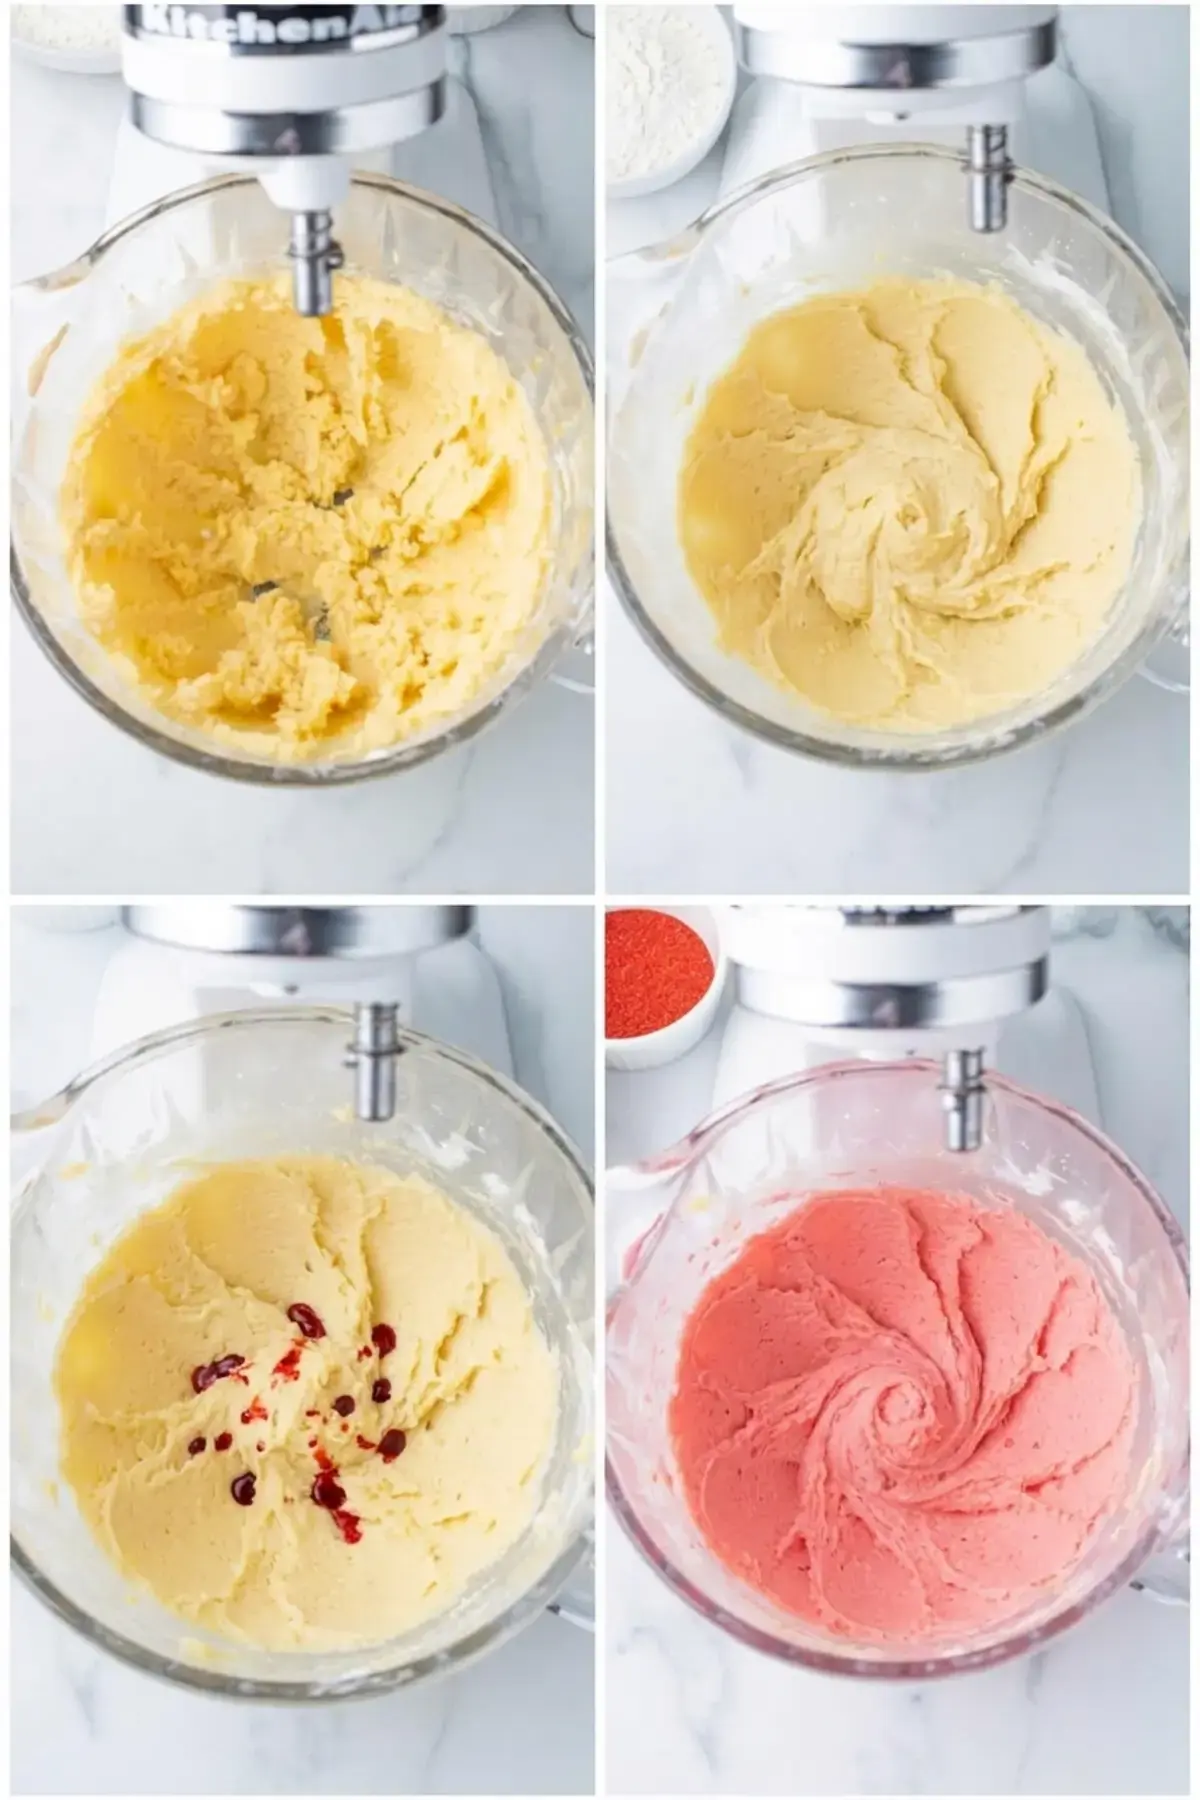
Now comes the dividing step. Scoop out about 1 3/4 cups of the plain dough and set it aside in a separate bowl. This undyed portion will become the outer wrapper for each cookie, so you want to keep it soft and uncolored.
To the remaining dough, add a few drops of pink or red food coloring and mix until the color is fully incorporated and even. If you are using gel color, start with a tiny amount and build up because a little goes a long way.
Create the Heart Center
Shape the pink dough into a flat disk, wrap it tightly in plastic wrap, and place it in the refrigerator for at least one hour. The plain dough stays at room temperature during this time so it stays soft and easy to handle later.
Once the pink dough is firm, unwrap it and place it on a surface that has been lightly dusted with flour.
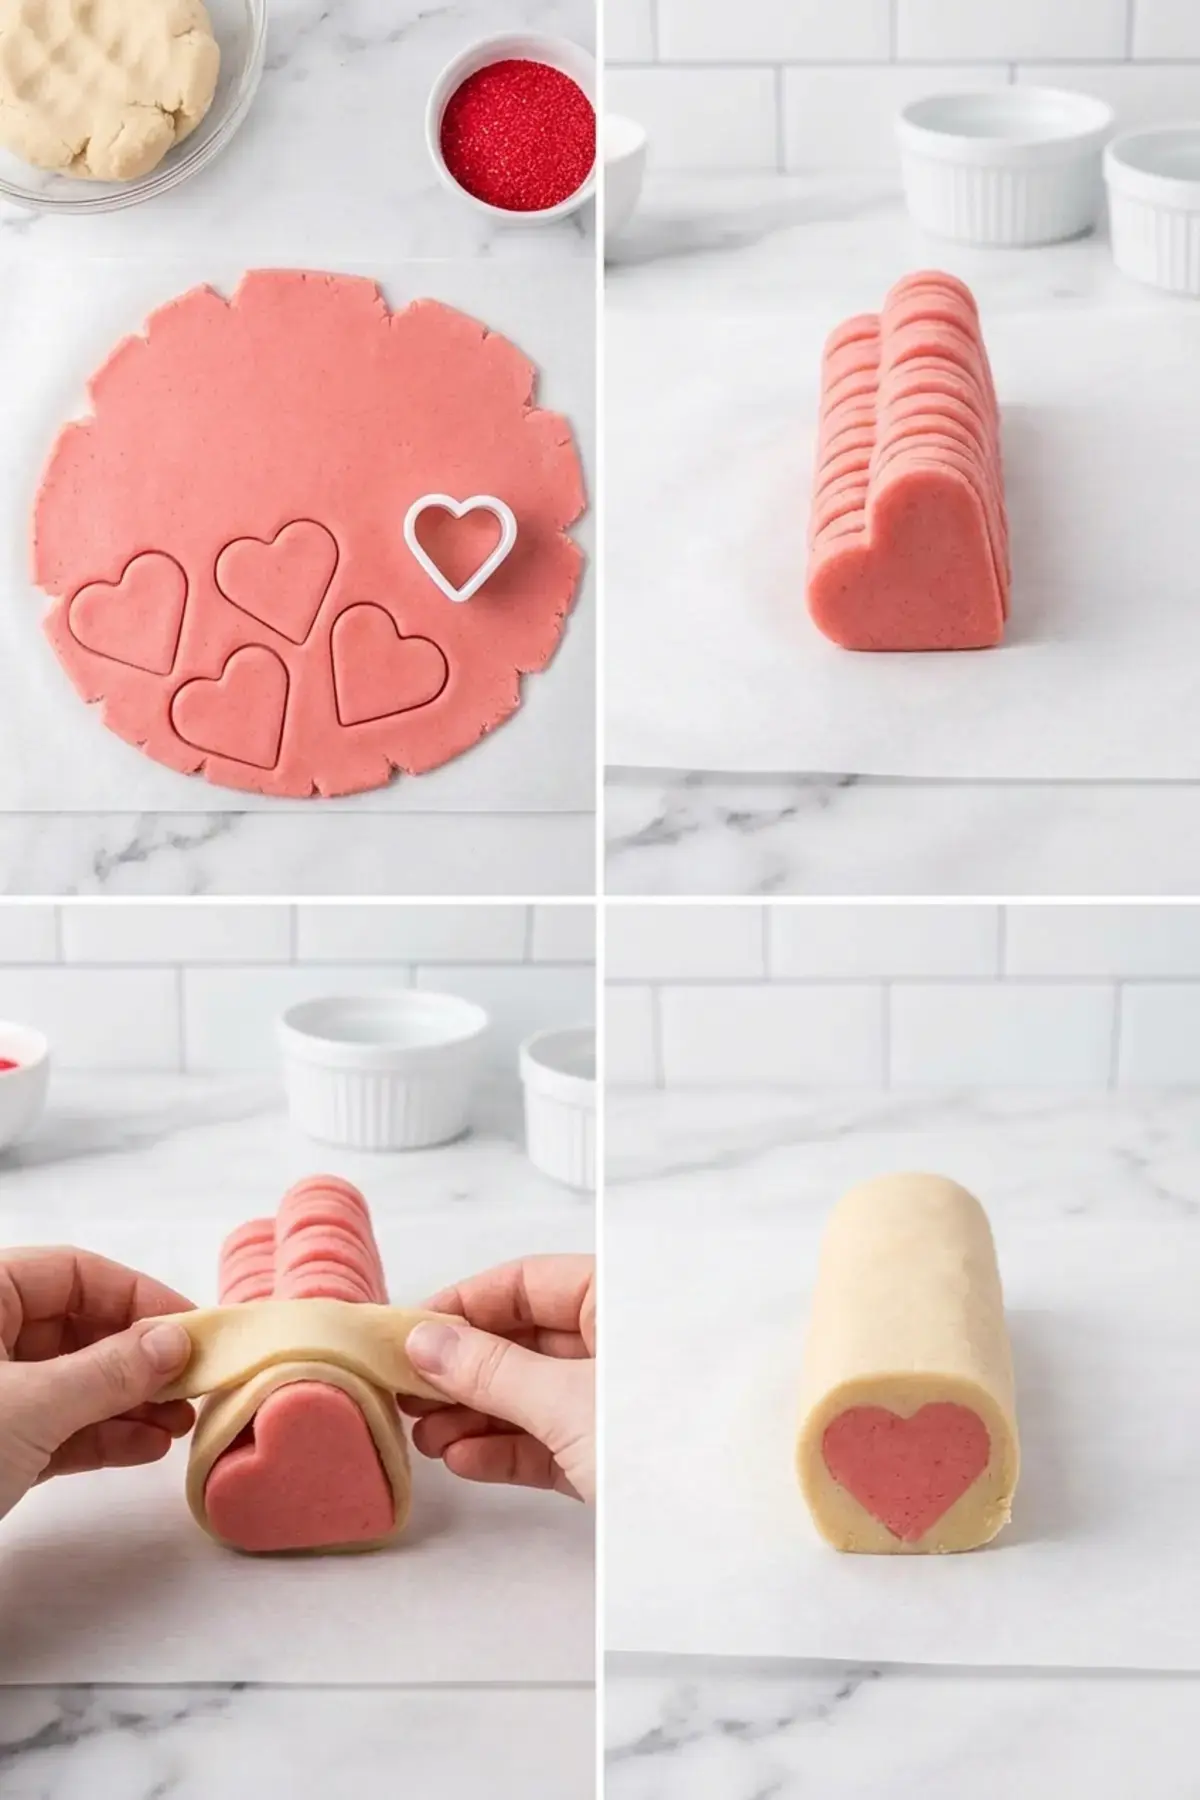
Roll it out to about 1/4 inch thickness and use your 2 inch heart shaped cookie cutter to cut out as many hearts as you can. Gather any scraps and reroll them to cut a few more.
Stack all the hearts directly on top of one another and press them together gently so they become one thick, solid column of pink dough. This stacked heart bundle will be the center of your cookie log.
Form and Chill the Log
Now take small pieces of the plain dough and roll them between your hands into strips. Press these strips around every side of the stacked hearts until no pink is showing at all.
Work your way around, patching and smoothing the plain dough until the heart column is completely covered and the log feels even. Once the pink is fully hidden, roll the log gently back and forth on the counter to smooth out any bumps.
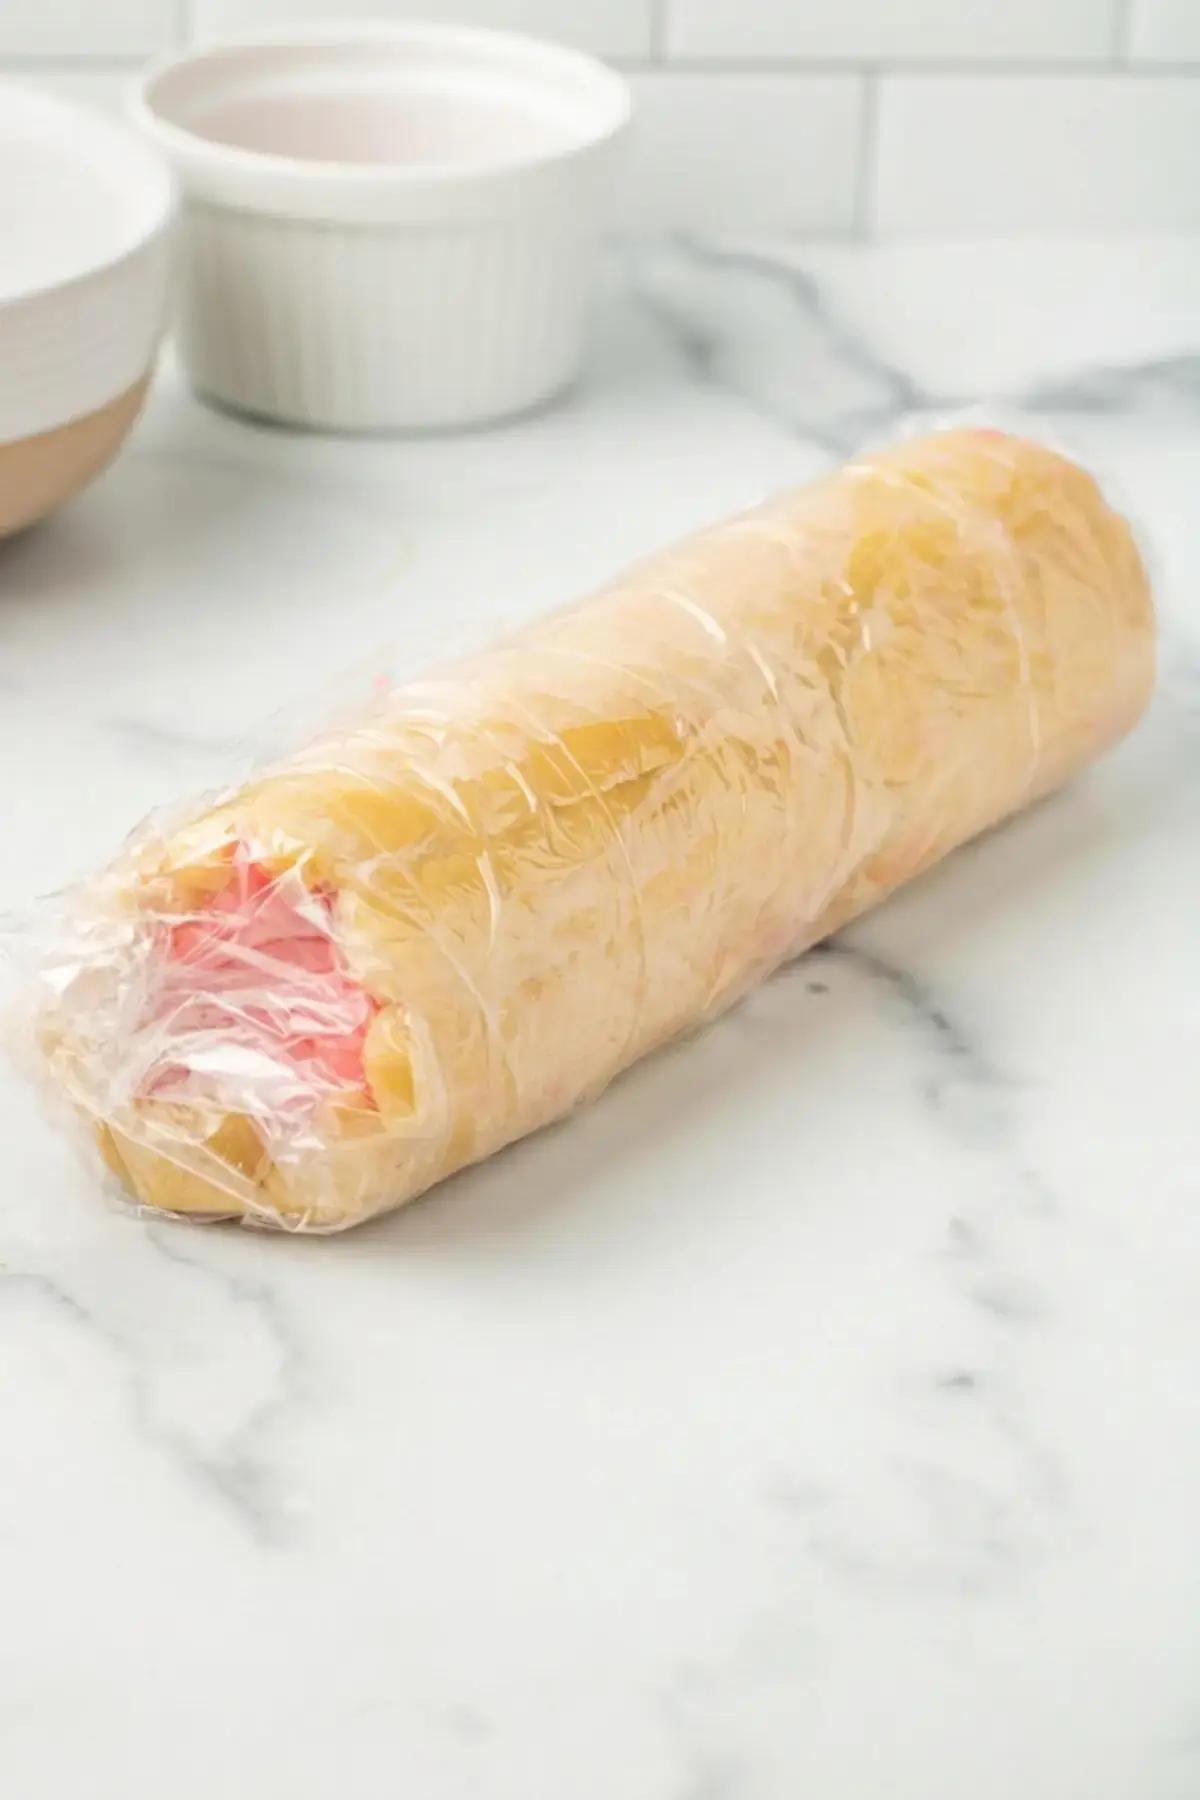
Wrap the finished log in plastic wrap and place it in the refrigerator. This is the critical chill: let it rest for a minimum of four hours, though I almost always leave it overnight.
A long, cold rest firms up the butter in the dough so the cookies hold their round shape and the hearts stay crisp when you slice them.
Slice and Bake
When you are ready to bake, preheat your oven to 350 degrees Fahrenheit. Unwrap the chilled log and place it on a cutting board. Use a sharp knife to slice the dough into rounds that are about 1/3 inch thick.
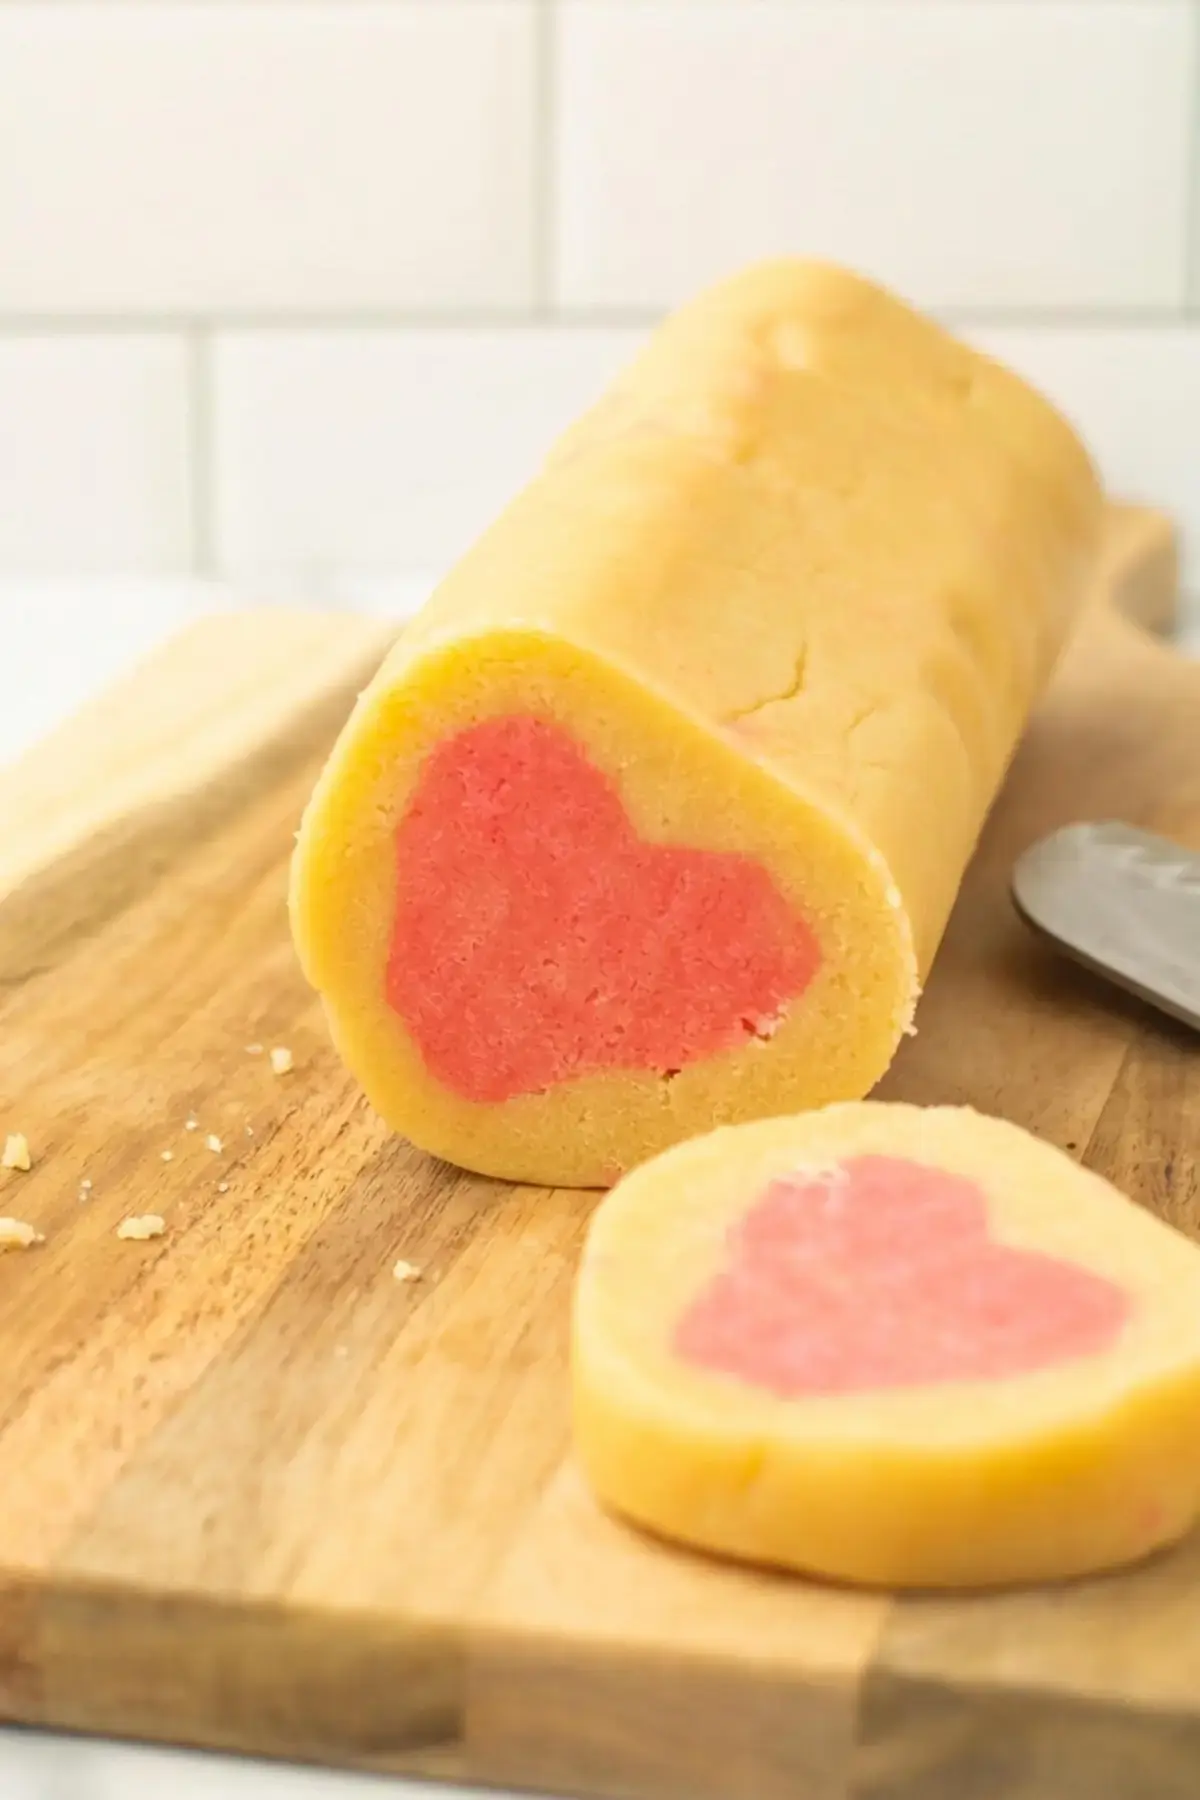
If you like, pour some red sugar sprinkles into a shallow dish and roll the edges of each slice in the sprinkles for a sparkly border. I usually do half the batch with sprinkles and half without so there is variety on the plate.
Arrange the cookies on a parchment lined baking sheet, placing about 8 per sheet and leaving a little space between them. Bake for 10 to 11 minutes, or just until the edges are lightly golden.
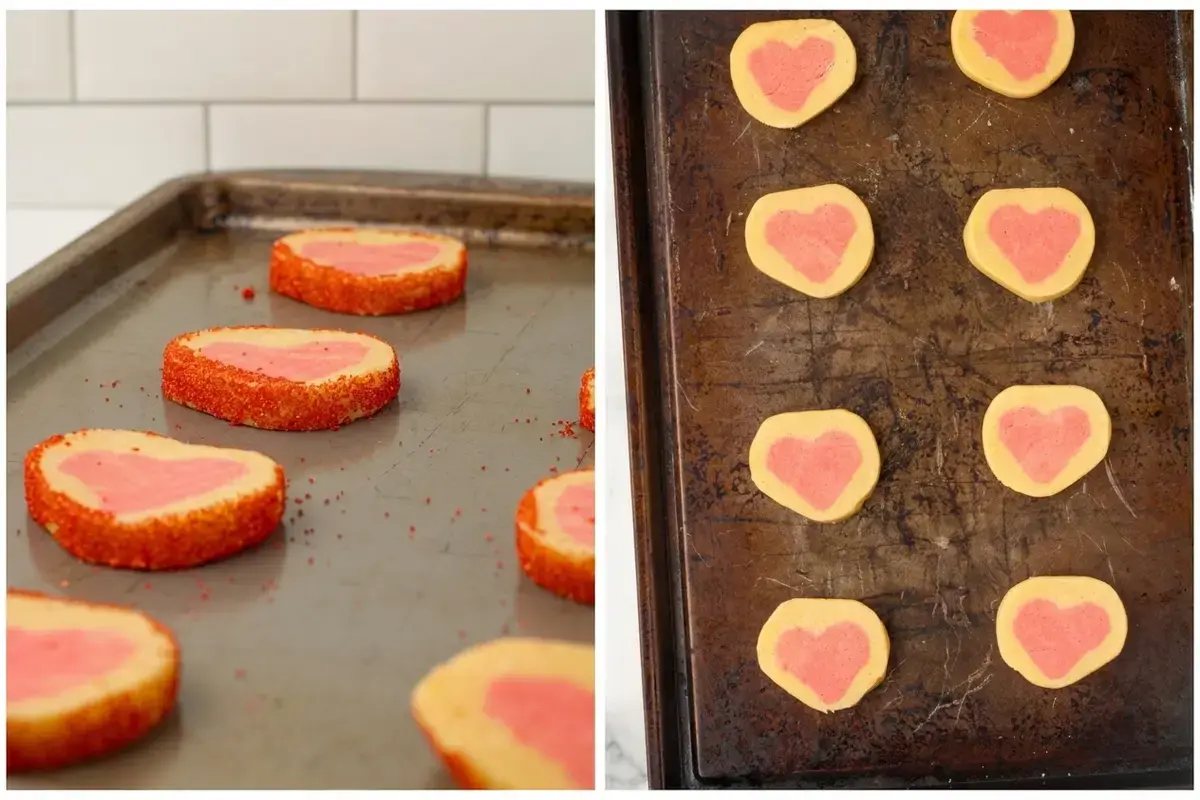
You do not want the cookies to brown much; a pale edge keeps the pink hearts bright and the texture tender. Let the cookies rest on the baking sheet for a few minutes, then transfer them to a wire rack to cool completely.
How to Store
Once the cookies have cooled all the way to room temperature, pop them into an airtight container. They stay fresh at room temperature for up to three days, and I find they taste even more buttery on the second day.
Be sure the cookies are completely cool before you seal the container; any trapped warmth will soften the edges and make the texture less crisp.
The short rest on the baking sheet after baking and the full cool on the wire rack both protect the finished cookies. If you move them too early, the warm dough can stretch and blur the heart shape. Patience here really pays off.
Make Ahead Instructions
This recipe is designed for planning ahead. The dough log can be made one day in advance, wrapped tightly, and stored in the refrigerator overnight. The next day all you do is slice, sprinkle, and bake, which turns a busy morning into a relaxing baking moment.
For even longer storage, this dough freezes beautifully. After shaping and wrapping the log, place it in a freezer safe bag and freeze for up to three months. When you want to bake, move the frozen log to the refrigerator and let it thaw overnight.
Slice and bake as usual, adding an extra minute or two to the baking time because the dough will start out colder than after a simple fridge chill.
I try to keep one log in the freezer during February so we can have fresh heart cookies anytime a friend stops by.
If you enjoy the make ahead convenience of icebox style dough, be sure to check out my guide for slice and bake cookies with 9 flavour ideas. It is a great way to keep your freezer stocked with dough logs that can become all kinds of cookies.
For a different approach to the heart design, you might also like this slice and bake heart cookie recipe from Two Peas and Their Pod.
| Storage Method | How Long | Notes |
|---|---|---|
| Refrigerator (dough log) | Up to 24 hours | Wrap tightly in plastic wrap; slice and bake directly from the fridge. |
| Freezer (dough log) | Up to 3 months | Thaw overnight in the refrigerator before slicing. |
| Baked cookies (room temp) | Up to 3 days | Store in an airtight container once completely cooled. |
Frequently Asked Questions
How do you make slice and bake heart cookies with a heart in the center?
How can I keep my slice and bake heart cookies from spreading or losing their heart shape?
Can I make slice and bake heart cookie dough ahead of time or freeze it for later?
What kind of food coloring works best for pink heart cookies, and can I make a dye-free version?

Slice and Bake Heart Cookies
What Are Slice and Bake Heart Cookies? Slice and bake heart cookies are the kind of Valentine’s Day treat that makes everyone smile the moment they see them.
- Total Time: 330 min
- Yield: 20 cookies 1x
Ingredients
1 cup unsalted butter, room temperature
1 ½ cup granulated white sugar
1 egg
2 teaspoon vanilla extract
2 ¼ cup all-purpose flour
½ teaspoon salt
pink or red food dye
red sugar sprinkles
Instructions
1-Add the butter, sugar, egg, and vanilla: Add the butter, sugar, egg, and vanilla extract to a large mixing bowl and beat with an electric mixer until creamy.
2-Scrape the sides of the bowl with: Scrape the sides of the bowl with a rubber spatula and add the flour and salt to the mixing bowl. Mix slowly until the cookie dough comes together.
3-Separate about 1 ¾ cups of cookie: Separate about 1 ¾ cups of cookie dough into a separate bowl and set aside for later.
4-Add a few drops of pink or: Add a few drops of pink or red food coloring to the remaining cookie dough and mix until the color is fully incorporated.
5-Form the dyed dough into a disk: Form the dyed dough into a disk shape, wrap it with plastic wrap, and place it in the refrigerator for at least one hour.
6-Remove the dough from the refrigerator and: Remove the dough from the refrigerator and place it on a lightly floured surface. Roll the dough out until it is ¼ inch thick.
7-Cut out cookies with a 2-inch, heart-shaped: Cut out cookies with a 2-inch, heart-shaped cookie cutter until all the pink dough is used up.
8-Stack the cookies on top of one: Stack the cookies on top of one another and compress them gently so they all stick together.
9-Roll small sections of the undyed dough: Roll small sections of the undyed dough between your hands and press the strips around all sides of the stacked hearts until no pink is showing.
10-Roll the dough log gently back and: Roll the dough log gently back and forth to smooth it out, wrap it in plastic wrap, and place it in the refrigerator for a minimum of four hours or overnight.
11-Preheat the oven to 350 degrees Fahrenheit: Preheat the oven to 350 degrees Fahrenheit when ready to bake the cookies.
12-Remove the chilled cookie dough from the: Remove the chilled cookie dough from the refrigerator and slice it into cookies that are about ⅓ inch thick.
13-Roll the edges of the cookies in: Roll the edges of the cookies in the sugar sprinkles if desired. I did half of mine with sprinkles and half without.
14-Place 8 of them, evenly spaced, on: Place 8 of them, evenly spaced, on a baking sheet and bake for 10-11 minutes, or until the edges are LIGHTLY golden brown.
15-Allow the cookies to rest on the: Allow the cookies to rest on the baking sheet for a few minutes before transferring them to a wire cooling rack to cool completely.
16-Repeat until all the cookies are baked: Repeat until all the cookies are baked. Store any leftover cookies in an airtight container for up to three days.
Last Step:
Please leave a rating and comment letting us know how you liked this recipe! This helps our business to thrive and continue providing free, high-quality recipes for you.- Prep Time: 20 min
- Cook Time: 10 min
- Method: bake
Nutrition
- Serving Size: 1 cookie
- Calories: 195
- Sugar: 15g
- Sodium: 14mg
- Fat: 10g
- Saturated Fat: 6g
- Carbohydrates: 26g
- Fiber: 0.4g
- Protein: 2g
- Cholesterol: 33mg