Why You’ll Love This Recipe
If you’re craving a dessert that’s fun, handheld, and requires zero oven time, Strawberry Crunch Cheesecake Tacos are about to become your go-to. You’ll love how this no-bake treat comes together in just 15 minutes using simple pantry ingredients. The recipe is designed for a single serving, so you can enjoy a perfectly portioned sweet without leftovers. Here’s what makes it a winner:
- No baking neededperfect for hot days or when you want instant gratification.
- Customizablemix and match shells, toppings, and flavored crunch to suit your mood.
- Kid-friendly and interactivelittle helpers love crushing cookies and assembling their own tacos.
- Nostalgic flavorit tastes like the strawberry shortcake ice cream bars you grew up with.
- Portion controleach taco is a perfect individual dessert.
Jump to:
- Why You’ll Love This Recipe
- Ingredients for One Serving
- How to Make Strawberry Crunch Cheesecake Tacos
- The Strawberry Crunch Topping
- The Cheesecake Filling
- Assembly Steps
- Best Shell Options for Cheesecake Tacos
- Making It Dairy-Free or Vegan
- Storage and Make-Ahead Tips
- Flavor Variations to Try
- Nutritional Considerations
- Pairing and Serving Suggestions
- Frequently Asked Questions
- What are strawberry crunch cheesecake tacos?
- How do you make strawberry crunch cheesecake tacos?
- Can you make strawberry crunch cheesecake tacos ahead of time?
- How do you keep the shells from getting soggy?
- Are strawberry crunch cheesecake tacos gluten free?
- Can I use fresh strawberries instead of freeze-dried?
- Conclusion
- References
- Strawberry Crunch Cheesecake Tacos
- Ingredients
- Instructions
- Last Step:
- Notes
- Nutrition
- Did you make this recipe?
Ingredients for One Serving
Everything here is measured for one taco, but you can easily multiply for a crowd. Scale the filling and crunch topping as needed while keeping the shell count per person.
For the shell:
- 1 flat-bottomed waffle cone (cake cone) or 1 sugar cone (for softening and shaping) – or use a 4-5 inch fried flour tortilla circle tossed in cinnamon sugar for an extra-crisp shell.
For the cheesecake filling:
- 2 ounces full-fat cream cheese, softened to room temperature
- 1 tablespoon powdered sugar
- 2 tablespoons whipped topping (like Cool Whip) or lightly sweetened whipped cream
- Optional: 1/4 teaspoon vanilla extract + a squeeze of lemon juice for tang
For the strawberry crunch topping:
- 6-8 Golden Oreo cookies (or similar vanilla sandwich cookies)
- 2 tablespoons freeze-dried strawberries
- 1 tablespoon melted butter
Optional garnishes:
- Fresh strawberry slices (as garnish, not mixed into crunch)
- Melted white chocolate for drizzling or shell lining
- Extra pinch of freeze-dried strawberry powder for color
How to Make Strawberry Crunch Cheesecake Tacos
This dessert breaks down into three simple prep steps, and the beauty of this recipe lies in how far ahead you can get each component ready. You can make the crunch topping up to three days ahead, the filling up to two days in the fridge, and then assemble right when you need them. Here’s how.
The Strawberry Crunch Topping
Place the Golden Oreos in a zip-top bag and crush them with a rolling pin until you have coarse crumbs – or pulse them a few times in a food processor. Add the freeze-dried strawberries and crush them into a fine powder (a few larger pieces are fine for texture). Drizzle in the melted butter and mix everything together with a fork until it looks like wet sand and holds together when pressed. Store the crunch in an airtight container at room temperature for up to 3 days.
The Cheesecake Filling
In a medium bowl, beat the softened cream cheese and powdered sugar with a hand mixer until fluffy and completely smooth – no lumps. Gently fold in the whipped topping with a spatula until the mixture is thick, creamy, and able to hold a peak. If you like a tangier cheesecake taste, stir in 1/4 teaspoon vanilla and a little squeeze of fresh lemon juice. For even more cheesecake inspiration, take a look at our cream cheese desserts collection. Cover and refrigerate the filling until ready to use; it keeps well for up to 2 days.
Assembly Steps
Timing is everything – assemble only when you’re ready to eat. Follow these steps for perfect crispy tacos every time:
- Choose your shell. If you’re using a pre-made waffle cone or a store-bought dessert taco shell, it’s ready to fill. For a fried flour tortilla shell, cut a 4-5 inch circle, pat it dry, fry in shallow oil until golden, then immediately toss it in cinnamon sugar and drape it over an upside-down muffin tin to cool into a taco shape. For a sugar cone, warm it in a 300°F oven for 2-3 minutes, bend it into a taco curve while hot, and let it harden as it cools.
- Optional moisture barrier. Brush the inside of the shell with melted white chocolate and let it set for a minute – this is your secret weapon against sogginess.
- Fill the shell. Pipe or spoon the cheesecake filling into the shell, spreading it evenly but not overstuffing. A small overhang is fine.
- Press on the crunch. Generously cover the filling with the strawberry crunch mixture, pressing it gently so it sticks.
- Garnish and serve. Top with a few fresh strawberry slices and a drizzle of melted white chocolate or strawberry sauce if you like. Serve immediately.
Common mistake to avoid: Filling shells more than 30 minutes before serving will soften them, so keep all components separate and build tacos just before dessert time.
Best Shell Options for Cheesecake Tacos
The shell is the crunchy foundation of this dessert. You’ll love how each option brings its own texture and character. Here’s a quick comparison to help you decide what to use on any given day.
| Shell Type | Description | Pros | Cons |
|---|---|---|---|
| Waffle cone (flat-bottomed cake cone) | Sturdy, pre-shaped cone with a flat base | Easiest to fill, foolproof for beginners | Slightly thicker walls may feel heavy |
| Sugar cone | Pointed cone that softens and bends with heat | Authentic taco look, lighter crispness | Requires oven step; can crack if overheated |
| Fried flour tortilla with cinnamon sugar | Homemade 4-5 inch tortilla circles fried golden | Buttery, flaky crunch; nostalgic “dessert taco” vibe | Needs frying and shaping over a mold |
| Store-bought dessert taco shells | Pre-formed cookie-like taco shapes | Zero effort, consistent size | Harder to find; may be less crisp than homemade |
| Pizzelle cookies shaped while warm | Thin Italian waffle cookie bent into a curve | Elegant presentation, delicate crunch | Fragile; must work quickly while hot |
If you’re just starting out, go with the waffle cone – it’s dependable and still gives that beautiful handheld taco experience. For an extra-crisp touch, dust the tortilla edges lightly with cornstarch before frying.
Making It Dairy-Free or Vegan
You can absolutely make a plant-based version that keeps all the creamy, crunchy charm. Here’s how to swap out the dairy:
- Cream cheese: Use a vegan cream cheese block like Kite Hill or Violife. Let it soften just like the original.
- Whipped topping: Replace with coconut whipped cream (chill the can overnight).
- Waffle cones: Check labels to confirm they are egg-free, or use certified vegan sugar cones.
- Golden Oreos: Swap for a vegan vanilla sandwich cookie; many store brands are accidentally dairy-free. For the melted butter, use refined coconut oil.
The freeze-dried strawberries stay the same, so you won’t lose that intense pink hue and tangy-sweet berry pop. The texture remains nearly identical, and nobody will guess it’s dairy-free.
Storage and Make-Ahead Tips
The single biggest trick with Strawberry Crunch Cheesecake Tacos is to think of them as a “build-your-own” dessert. Here’s how to get the time investment out of the way early and keep everything fresh.
- Crunch topping: Store in an airtight container at room temperature for up to 3 days. Don’t freeze it; the butter gets waxy.
- Cheesecake filling: Refrigerate in a covered bowl for up to 2 days. You can also freeze it for up to 1 month – thaw overnight in the refrigerator before using.
- Shells: Fried tortilla shells stay crisp for up to 3 days at room temperature in a sealed container. Store-bought cones should be used within a few hours of opening for maximum crunch.
- Assembled tacos: They will become soggy after about 30 minutes, so only build what will be eaten right away. For parties, set out bowls of filling, crunch, and shells and let guests create their own.
Never freeze assembled tacos or the crunch topping – the texture will not recover.
Flavor Variations to Try
Once you nail the classic strawberry version, you’ll love how easy it is to remix the three components. Here are five flavor riffs that use the same base formula:
- Chocolate lover’s: Replace half the cream cheese with mascarpone, add 1 teaspoon cocoa powder to the filling, and swap Golden Oreos for chocolate sandwich cookies in the crunch. Use a chocolate waffle cone for an all-in chocolate taco.
- Lemon strawberry: Stir 1/2 teaspoon lemon zest into the filling and use crushed lemon wafer cookies in place of Golden Oreos. The brightness of lemon makes the strawberry pop even more.
- Tropical twist: Gently fold 1 tablespoon of well-drained crushed pineapple into the filling, then replace the freeze-dried strawberries with freeze-dried mango in the crunch topping. A drizzle of caramel adds island flair.
- Berry medley: Combine freeze-dried strawberries, raspberries, and blueberries in the crunch. This gives you a punch of mixed berry flavor without any added moisture.
- Cookies and cream: Add crushed chocolate sandwich cookies to the filling, then make the crunch entirely with chocolate cookies – no freeze-dried strawberries needed. A white chocolate shell lining balances the richness.
For even more inspiration, browse the Strawberry Crunch Cheesecake Tacos from The Recipe Rebela fantastic version that shows how every cook adds their own twist. Another fresh take comes from Belle of the Kitchen’s Best Strawberry Crunch Tacos, which uses a slightly fluffier filling if that’s your style.
Nutritional Considerations
Like any indulgent dessert, these tacos are a treat. A single assembled taco (using a waffle cone and the standard recipe) comes in at roughly 280-320 calories, with about 18 grams of fat, 28 grams of carbohydrates, and a sugar content around 20 grams. Protein is modest at 3-4 grams. Because the numbers depend on your shell choice and topping generosity, think of them as a rough guide.
If you’re watching your intake, a few simple swaps make a noticeable difference without sacrificing the experience:
- Use reduced-fat cream cheese (Neufchâtel) instead of full-fat.
- Replace half the whipped topping with plain Greek yogurt for more protein and less sugar.
- Opt for a smaller shell or split a waffle cone in half to create a mini taco.
- Skip the butter drizzle in the crunch and just use a tiny bit of coconut oil, or let the natural oils in the cookies do the binding.
To add a nutritional boost, pile on fresh strawberry slices as garnish – they contribute vitamin C and fiber. You can also use a whole-grain waffle cone if you find one, or stir a teaspoon of chia seeds into the filling for a dose of omega-3s. The built-in single-serving format is naturally portion-friendly, which makes these tacos easier to enjoy mindfully.
Pairing and Serving Suggestions
While these tacos shine as a standalone dessert, the right drink and a little presentation can turn them into a full-on dessert moment. Here are a few ways to serve them up.
Beverage pairings:
- Iced vanilla lattethe creamy coffee balances the sweet berry.
- Sparkling strawberry lemonadea fizzy, tart counterpoint that keeps things refreshing.
- Cold brew coffeethe bitterness cuts through the richness of the cheesecake filling.
- Strawberry banana smoothiefor a fun brunch-dessert hybrid.
- Rosé winea dry sparkling rosé is lovely for a girls’ night.
Occasions:
- Birthday party dessert bar – let kids build their own.
- Summer picnic or backyard barbecue – no oven required.
- Valentine’s Day single-serving treat – one taco is a sweet personal indulgence.
- Weeknight dinner when you want something special in minutes.
Presentation tip: Set each taco on a small dessert plate with a few fresh strawberries and a dusting of powdered sugar. A mint leaf adds a pop of green that makes the pink crunch stand out even more.
If you love no-bake desserts, you’ll also enjoy our No Bake Strawberry Shortcakeanother quick strawberry treat that’s always a hit.
Frequently Asked Questions
What are strawberry crunch cheesecake tacos?
How do you make strawberry crunch cheesecake tacos?
Can you make strawberry crunch cheesecake tacos ahead of time?
How do you keep the shells from getting soggy?
Are strawberry crunch cheesecake tacos gluten free?
Can I use fresh strawberries instead of freeze-dried?
Conclusion
Strawberry Crunch Cheesecake Tacos are proof that you don’t need an oven, a long shopping list, or advanced baking skills to pull off a showstopping dessert. With just a few pantry staples and about 15 minutes, you get a handheld treat that channels the creamy, berry-packed nostalgia of strawberry shortcake ice cream bars. The beauty of this recipe lies in its flexibility – make it dairy-free, lighten it up, or spin off chocolate and lemon variations without altering the core three-step system of shell, filling, and crunch. The single-serving format makes it easy to enjoy without overdoing it. Start with the classic waffle cone version to get the technique down, and remember to press the crunch topping firmly so every bite carries that signature strawberry crunch. Once you taste it, you’ll see why this viral dessert has become a favorite at parties, picnics, and quiet weeknights alike.
References
The dessert taco trend has been popping up everywhere, inspired in part by fun fast-food innovations. Here are a couple of the announcements that helped fuel the taco-shaped dessert craze:
- Live Mas Live 2026 RevealTaco Bell’s forward-thinking menu ideas that got people talking about tacos in new ways.
- Taco Bell New Menu Items 2026 – Nacho Fries Permanenta glimpse at how the taco format keeps evolving, including sweet twists.

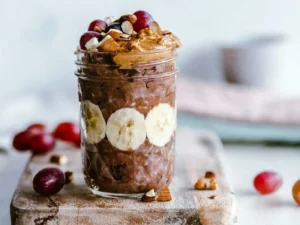
Strawberry Crunch Cheesecake Tacos
🍓 A fun handheld no-bake dessert that comes together in just 15 minutes using simple pantry ingredients.
🧀 Creamy cheesecake filling meets crunchy strawberry cookie topping in a crispy taco shell for the perfect single-serving treat.
- Total Time: 15 minutes
- Yield: 1 taco 1x
Ingredients
1 flat-bottomed waffle cone (cake cone) or 1 sugar cone
4–5 inch fried flour tortilla circle tossed in cinnamon sugar
2 ounces full-fat cream cheese, softened to room temperature
1 tablespoon powdered sugar
2 tablespoons whipped topping (like Cool Whip) or lightly sweetened whipped cream
1/4 teaspoon vanilla extract
a squeeze of lemon juice
6–8 Golden Oreo cookies (or similar vanilla sandwich cookies)
2 tablespoons freeze-dried strawberries
1 tablespoon melted butter
Fresh strawberry slices
Melted white chocolate
Extra pinch of freeze-dried strawberry powder
Instructions
1-Make the crunch topping: Crush Golden Oreos and freeze-dried strawberries, mix with melted butter until like wet sand, store in airtight container up to 3 days.
2-Make the cheesecake filling: Beat cream cheese and powdered sugar until fluffy, fold in whipped topping until thick and creamy, optionally add vanilla and lemon juice, refrigerate up to 2 days.
3-Choose and shape the taco shell: Use a pre-made shell, fry a tortilla circle until golden then drape over a muffin tin, or warm a sugar cone in the oven and bend into taco shape.
4-Apply moisture barrier: Brush inside of shell with melted white chocolate and let set to prevent sogginess.
5-Fill the shell: Pipe or spoon cheesecake filling evenly into the shell, not overstuffing.
6-Add crunch topping: Generously press strawberry crunch mixture onto the filling so it sticks.
7-Garnish and serve: Top with fresh strawberry slices and optional drizzle, serve immediately.
Last Step:
Please leave a rating and comment letting us know how you liked this recipe! This helps our business to thrive and continue providing free, high-quality recipes for you.Notes
🍪 Make the crunch topping up to 3 days ahead and store it in an airtight container at room temperature.
🧀 Prepare the cheesecake filling up to 2 days in advance and keep it refrigerated until assembly.
⏰ Assemble tacos only when ready to serve—filling shells more than 30 minutes ahead will make them soggy.
- Prep Time: 15 minutes
- Cook Time: 0 minutes
- Category: Dessert
- Method: No-Bake
- Cuisine: American
Nutrition
- Serving Size: 1 taco
- Calories: 520
- Sugar: 28g
- Sodium: 280mg
- Fat: 32g
- Saturated Fat: 16g
- Unsaturated Fat: 14g
- Trans Fat: 0g
- Carbohydrates: 52g
- Fiber: 1g
- Protein: 6g
- Cholesterol: 45mg