When you want a burger that’s ready in under 20 minutes and doesn’t need a long ingredient list, this simple burger recipe is your answer. We keep it classic with just a few staples you probably already have in your kitchen.
Ground beef (80/20)This ratio means 80% lean meat and 20% fat. We use about 1 to 1.5 pounds for four generous patties. The fat is what keeps everything juicy, so don’t go leaner than this. Trust us on this one.
SaltAbout 1/2 teaspoon of kosher salt per pound of beef. Regular table salt works fine too.
Black pepperAbout 1/4 teaspoon per pound. Freshly ground is nice if you have it, but the pre-ground stuff works just as well.
Optional seasoningsGarlic powder, onion powder, or smoked paprika can add extra flavor if you feel like mixing things up a bit.
For Serving
Burger bunsSesame seed, brioche, or soft potato rolls all work great. Pick whatever your family likes best.
Cheese slicesAmerican cheese melts fast and creamy. Cheddar, Swiss, and pepper jack are also tasty alternatives if you want to switch it up.
Classic toppingsLettuce, tomato slices, red onion rings, pickles, and whatever condiments make you happy.
Kitchen Supplies
Cast iron skillet or grillA heavy skillet gives you the best sear and a caramelized crust. An outdoor grill adds a nice smoky flavor if the weather’s cooperating.
Mixing bowlFor gently combining the beef with seasonings. Nothing fancy needed.
Meat thermometerThis is the most reliable way to know when your burgers are safe to eat. We insert it into the side of the patty for an accurate read.
Thin spatulaMakes flipping so much easier and keeps those patties intact.
Foil or lidFor covering the pan when melting cheese.
This method works on the stovetop or an outdoor grill. The key is handling the meat gently and cooking over high heat for that beautiful crust. We’ve made these more times than we can count, and this approach never fails.
Preheat your cooking surface. Heat a cast iron skillet or grill over medium-high heat for at least 5 minutes. You want it hot enough that the meat sizzles the moment it touches the surface. That sound is what you’re looking for.
Season the beef just before cooking. Put the ground beef in a mixing bowl and add salt, pepper, and any optional seasonings. Use your hands to mix lightly, just until combined. Overworking the meat makes patties tough and rubbery, so keep it gentle.
Form the patties. Gently shape the beef into patties about 1/2 inch thick. Make them slightly wider than your buns because they’ll shrink during cooking. Press a shallow thumb indent in the center of each patty. This little trick keeps them flat instead of puffing into meatballs while they cook.
Place patties on the hot surface. Lay each patty on the skillet or grill. Let them cook undisturbed for 3 to 4 minutes on the first side. You want a nice brown crust to form before you even think about flipping.
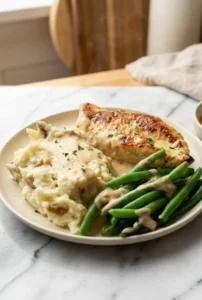
Flip once and finish cooking. Flip the burgers and cook another 3 to 4 minutes. For well-done burgers, go about 5 minutes per side. We flip only once for the best results.
Check the temperature. Insert a meat thermometer into the thickest part of a patty. The USDA recommends 160°F for ground beef safety. This is especially important when cooking for kids or older family members. Better safe than sorry.
Add cheese if desired. Place a slice of cheese on each patty during the last minute of cooking. Remove the skillet from heat and tent foil or a lid over the top for about 60 seconds. The cheese melts fast this way and gets all gooey and perfect.
Let the patties rest. Move burgers to a plate and let them sit for 2 to 3 minutes. This step matters. It lets the juices settle back through the meat instead of running out on your plate.
Toast the buns. While the burgers rest, place the cut sides of the buns on the hot skillet for about 30 seconds until golden and lightly crisp. We love this step because it adds texture and keeps the bun from getting soggy from all those tasty juices.
Quick tip: Never press down on patties while they cook. We know it’s tempting to hear that sizzle, but pressing squeezes out the flavorful juices and leaves you with dry meat. Just let them be.
Baking Instructions
If the weather isn’t cooperating or you just prefer the oven, baked burgers still turn out tasty. You won’t get the same seared crust, but the convenience is hard to beat on busy nights.
Preheat the oven to 425°F. Line a baking sheet with foil or parchment paper for easy cleanup. Nobody wants to scrub baked-on grease after dinner.
Prepare the patties. Season and shape the beef the same way you would for the skillet method. Remember that thumb indent in the center. It works in the oven too.
Arrange on the baking sheet. Space the patties apart so air circulates and they cook evenly. Don’t crowd them.
Bake for 15 to 20 minutes. Use a meat thermometer to confirm the internal temperature reaches 160°F. Ovens vary, so start checking around the 15-minute mark.
Add cheese optionally. Place a slice on each patty for the last 2 minutes of baking. You can switch to broil briefly to melt it, but stay nearby so it doesn’t burn. Trust us, burnt cheese is not what you’re after.
Rest and serve. Let the patties rest a few minutes, then serve on toasted buns with your favorite toppings.
Serving
Building your burger is where the fun begins. Everyone in our family likes something different, so we usually set out a spread and let people customize. It’s easier than trying to remember who wants pickles and who doesn’t. Here are some of our favorite ways to serve them:
Classic American style: Lettuce, a thick tomato slice, red onion rings, pickles, ketchup, and mustard. Simple and satisfying.
Cheeseburger: Melted American or cheddar with your favorite condiments and veggies. You really can’t go wrong here.
Bacon burger: Crispy bacon strips on top of the cheese take things to a whole new level. My hubs requests this one often.
Homemade burger sauce: Stir together mayonnaise, ketchup, mustard, and a spoonful of sweet pickle relish. We make this often and it’s so good you’ll want to put it on everything.
Spicy kick: Sliced jalapenos or a dash of hot sauce if you like things fiery.
One tip we love: lightly butter the cut sides of the buns before toasting. It adds flavor and creates a little barrier so the bun doesn’t get soggy from sauce and meat juices. Small step, big difference.
Storing
If you somehow end up with leftovers (rare in our house), or if you want to prep patties ahead of time, here’s how we handle storage.
Cooked Patties
Let the cooked patties cool completely first. Transfer them to an airtight container and keep them in the fridge for 3 to 4 days. When ready to eat, reheat gently in a skillet over medium-low heat or in a 300°F oven until warmed through. Go easy on the heat or the meat will dry out and nobody wants that.
For longer storage, freeze cooked patties for up to 6 months. Wrap each one in plastic wrap or foil, then place in a freezer bag. Thaw in the fridge overnight before reheating.
Uncooked Patties
Uncooked patties freeze beautifully for later. Place a square of parchment paper between each one so they don’t stick together in a frozen clump. Stack them in an airtight container or freezer bag and freeze for up to 6 months. Thaw overnight in the fridge before cooking as usual.
Tips and Tricks
These small details make a big difference in how your burgers turn out. We learned some of these the hard way so you don’t have to.
Choose the right beef. Ground chuck with an 80/20 ratio is the sweet spot. The fat keeps the meat juicy and flavorful. If you go with 90/10 or leaner, expect dry, crumbly patties that fall apart on the grill.
Handle the meat gently. Overworking compresses the proteins and creates a dense, rubbery texture. Light hands make tender burgers. Think of it like you’re handling something fragile.
Season at the last minute. Salt draws moisture out of meat. If you salt your patties too early, they can lose juiciness before they even hit the heat. We season right before cooking every time.
Make the dimple. That shallow thumbprint in the center keeps the patty flat while cooking. It really works. Skip it and you’ll wonder why your burgers look like meatballs.
Flip only once. Flipping multiple times prevents good crust formation and can lead to uneven cooking. Patience pays off here.
Skip the spatula press. We know it’s tempting to squash the patty down and hear that sizzle, but that just forces out the juices. Leave it alone and let it cook properly.
Use a thermometer. Color isn’t a reliable doneness indicator. A thermometer ensures you hit 160°F without overcooking and drying out the meat.
Rest before serving. Those 2 to 3 minutes of rest let the juices redistribute through the meat so they stay inside the burger where they belong.
Try mixing shredded cheese into the beef for pockets of gooey flavor inside the patty. Just know it can make the burgers more prone to falling apart, so handle them carefully when flipping.
What to Serve with Homemade Burgers
Burgers are filling on their own, but a good side dish makes the meal feel complete. Here are some of our go-to options for cookouts and weeknight dinners:
Side Dish
Best For
Corn on the cob
Summer cookouts
Red potato salad
Backyard gatherings
Sweet potato fries
Weeknight dinners
Tomato and onion salad
Lighter meals
Fruit salad
Balancing richer flavors
Sometimes we keep it simple with a green salad or just open a bag of potato chips. No judgment here. The goal is a meal that makes everyone happy without extra stress.
Frequently Asked Questions
What is the best meat for homemade burgers?
For juicy burgers, use ground beef with 80/20 lean-to-fat ratio. The 20 percent fat keeps patties moist and flavorful during cooking. Ground chuck is a popular choice.
How do you season a simple burger patty?
Season generously with salt and black pepper just before cooking. You can also add garlic powder, onion powder, or paprika. Do not overmix the meat to avoid dense patties.
What is the best way to cook burgers at home?
You can grill them over medium-high heat, pan fry in a cast iron skillet, or use a flat top griddle. Cook for about 3 to 5 minutes per side depending on thickness and desired doneness.
What internal temperature should a burger be cooked to?
The USDA recommends cooking ground beef to an internal temperature of 160 F for safety. For medium doneness, aim for 140 F to 145 F and let it rest briefly.
How do you keep homemade burger patties from falling apart?
Do not overwork the meat, chill the formed patties for 15 to 20 minutes before cooking, and avoid pressing them with the spatula while cooking. This helps them hold together.
Do you need eggs or breadcrumbs for burger patties?
No, a simple burger recipe does not need eggs or breadcrumbs if you use the right meat and handle it gently. Season the beef and shape it without binders for a classic pure beef patty.
Did you make this? Let me know!
If you tried this simple burger recipe, I’d love to hear how it went. Drop a comment below and tell me what you thought, any changes you made, or your favorite way to top your burger. Hearing from you makes my day.
Want more easy recipes sent straight to your inbox? Subscribe to the newsletter and you’ll never miss a new post. Happy cooking, friends!
Post may contain affiliate links. As a member of the Amazon affiliate program, I may earn a small commision from qualifying purchases. To read my affiliate policy, click here.
🍔 Juicy homemade burgers ready in under 20 minutes with ingredients you already have in your kitchen.
🔥 Simple stovetop or grilling method delivers a perfectly seared crust and tender, flavorful patties every time.
Total Time:20 minutes
Yield:4 burgers 1x
Ingredients
Scale
1 to 1.5 pounds ground beef (80/20)
1/2 teaspoon kosher salt (per pound of beef)
1/4 teaspoon black pepper (per pound)
Garlic powder
Onion powder
Smoked paprika
Burger buns
Cheese slices
Lettuce
Tomato slices
Red onion rings
Pickles
Condiments
Instructions
1-Preheat the cooking surface: Heat a cast iron skillet or grill over medium-high for at least 5 minutes until sizzling hot.
2-Season the beef: Gently mix ground beef with salt, pepper, and optional seasonings just until combined.
3-Form patties: Shape into 1/2-inch thick patties, slightly wider than buns, with a thumb indent in the center.
4-Cook first side: Place patties on hot surface and cook undisturbed for 3–4 minutes to form a brown crust.
5-Flip once: Flip and cook another 3–4 minutes (5 per side for well-done), flipping only once.
6-Check temperature: Insert a meat thermometer into thickest part; 160°F is recommended for safety.
7-Add cheese if desired: Place cheese on patties in the last minute, cover for 60 seconds to melt.
8-Rest the patties: Move to a plate and let rest for 2–3 minutes so juices redistribute.
9-Toast the buns: Toast cut sides on the hot skillet for about 30 seconds until golden and crisp.
Last Step:
Please leave a rating and comment letting us know how you liked this recipe! This helps our business to thrive and continue providing free, high-quality recipes for you.
Notes
✋ Never press down on patties while cooking, as this squeezes out flavorful juices and makes them dry.
🌡️ Always use a meat thermometer to confirm 160°F internal temperature for food safety, especially when serving kids.
👍 Let patties rest for a few minutes before assembling to keep juices inside the meat instead of running onto the plate.