Tiramisu Framboise Et Mascarpone: Why This No-Bake Dessert Works So Well
Tiramisu Framboise Et Mascarpone is the kind of dessert that feels fancy but is still easy enough for everyday home cooks. It brings together soft ladyfinger biscuits, creamy mascarpone, and bright raspberries for a dessert that tastes fresh, light, and rich at the same time. If you want a treat that can be made ahead and served cold, this is a very smart choice.
It is also a great fit for busy parents, students, and working professionals because most of the work happens early, then the fridge does the rest. Since the dessert needs time to rest, it is ideal for planning ahead for a dinner, family meal, or special weekend treat.
Tip: This dessert tastes even better after a long chill, so making it a day ahead is not just helpful, it is part of the magic.
Ease of preparation
- It only takes about 25 minutes of active prep time.
- The steps are simple and follow a clear order, so there is no stress in the kitchen.
- No oven is needed, which makes it practical for warm days and small kitchens.
Health benefits
- Raspberries bring natural color, fiber, and a fresh fruit taste. For more on their benefits, see these raspberry nutrition benefits.
- Mascarpone adds richness, so a small portion feels satisfying.
- The dessert can be served in modest slices, which helps with portion control.
Versatility
- You can make it with fresh raspberries or frozen raspberries.
- Strawberries can replace raspberries if that is what you have at home.
- It works for family dinners, brunch tables, and make-ahead dessert trays.
Distinctive flavor
- The tart berries balance the sweet cream.
- The soaked ladyfingers add a soft, cake-like base.
- The mascarpone filling gives a smooth finish that feels classic and comforting.
Jump to:
- Tiramisu Framboise Et Mascarpone: Why This No-Bake Dessert Works So Well
- Ease of preparation
- Health benefits
- Versatility
- Distinctive flavor
- Essential Ingredients for Tiramisu Framboise Et Mascarpone
- Main ingredients
- Special dietary options
- How to Prepare the Perfect Tiramisu Framboise Et Mascarpone: Step-by-Step Guide
- First Step: Prepare the dish and fruit
- Second Step: Build the biscuit base
- Third Step: Add the raspberry layer
- Fourth Step: Separate the eggs
- Fifth Step: Make the mascarpone cream
- Sixth Step: Whip and fold the egg whites
- Seventh Step: Finish the layering
- Eighth Step: Chill before serving
- Dietary Substitutions to Customize Your Tiramisu Framboise Et Mascarpone
- Protein and main component alternatives
- Vegetable, sauce, and seasoning modifications
- Mastering Tiramisu Framboise Et Mascarpone: Advanced Tips and Variations
- Pro cooking techniques
- Flavor variations
- Presentation tips
- Make-ahead options
- How to Store Tiramisu Framboise Et Mascarpone: Best Practices
- Refrigeration
- Freezing
- Reheating
- Meal prep considerations
- FAQs: Frequently Asked Questions About Tiramisu Framboise Et Mascarpone
- Tiramisu Framboise Et Mascarpone
- Ingredients
- Instructions
- Last Step:
- Notes
- Nutrition
- Did you make this recipe?
Essential Ingredients for Tiramisu Framboise Et Mascarpone
This ingredient list includes every item needed for the recipe, with the exact measurements from the recipe notes.
Main ingredients
- 24 ladyfinger biscuits, for the base layers and structure
- Milk, for soaking the ladyfinger biscuits
- 500 grams raspberries, fresh or frozen, for the fruity layer
- 30 grams sugar, for mashing the raspberries
- 3 eggs, or 4 if the eggs are small, for the mascarpone cream
- 1 packet vanilla sugar, for flavoring the egg yolk mixture
- 250 grams mascarpone, for the creamy filling
Special dietary options
- Vegan: Use plant-based ladyfingers, dairy-free cream cheese or vegan mascarpone style cream, and a whipped aquafaba mixture instead of eggs.
- Gluten-free: Replace the ladyfingers with gluten-free sponge fingers or a gluten-free biscuit base.
- Low-calorie: Use a lighter mascarpone style product, reduce the sugar a little, and serve smaller portions with extra raspberries on top.
| Ingredient | Amount | Role in the recipe |
|---|---|---|
| Ladyfinger biscuits | 24 | Create the base and absorb the milk |
| Raspberries | 500 grams | Add freshness and tang |
| Sugar | 30 grams | Sweeten the mashed fruit |
| Eggs | 3 eggs, or 4 if small | Build the airy mascarpone cream |
| Vanilla sugar | 1 packet | Add gentle vanilla flavor |
| Mascarpone | 250 grams | Gives the dessert a rich, creamy texture |
How to Prepare the Perfect Tiramisu Framboise Et Mascarpone: Step-by-Step Guide
First Step: Prepare the dish and fruit
Start by getting out a shallow serving dish or baking dish. This dessert works best in a dish that lets you build layers clearly. Measure out the raspberries, sugar, mascarpone, milk, ladyfingers, vanilla sugar, and eggs before you begin, because once you start, the process moves quickly.
Place the 500 grams of raspberries in a bowl and mash them with 30 grams of sugar. If you are using frozen raspberries, let them thaw first so they break down more easily. Stir until the fruit becomes soft and juicy, but do not worry if a few pieces stay whole. That little texture is nice in the finished dessert.
Second Step: Build the biscuit base
Pour a little milk into a shallow bowl. Dip each ladyfinger biscuit very briefly into the milk, just long enough to soften the outside. Do not let them sit too long, or they will turn mushy and lose their shape.
Arrange the soaked ladyfingers at the bottom of the dish in a single layer. If needed, break a few biscuits so the base is covered well. This layer gives the dessert structure and soaks up some of the fruit juices and cream later on.
Third Step: Add the raspberry layer
Spoon the mashed raspberries evenly over the biscuits. Spread them gently so every bite gets some fruit. This layer gives the dessert its bright color and fresh flavor.
Once the raspberry layer is in place, put the dish in the refrigerator for a short chill while you make the cream. This helps the layers settle and keeps the dessert cooler while you work.
Fourth Step: Separate the eggs
Carefully separate the egg whites from the yolks. Put the yolks in one bowl and the whites in another clean bowl. This step matters because the whites need to whip properly, and even a little yolk can stop them from becoming stiff.
If your eggs are small, use 4 eggs instead of 3. That gives you enough volume for a smooth cream. Take your time here, because clean separation helps the whole recipe turn out better.
Fifth Step: Make the mascarpone cream
Beat the egg yolks with the sugar and 1 packet vanilla sugar until the mixture turns pale and creamy. This usually takes a few minutes with a whisk or mixer. The color should lighten, and the sugar should mostly dissolve.
Next, add the 250 grams of mascarpone and mix until smooth. The filling should become thick, soft, and silky. Do not overmix, because mascarpone can lose its nice texture if it is beaten too much.
Sixth Step: Whip and fold the egg whites
Whip the egg whites until they form stiff peaks. This means the whites should hold their shape when you lift the whisk. A clean bowl and whisk help a lot here.
Gently fold the whipped whites into the mascarpone mixture in batches. Use a spatula and move slowly so you keep the air in the mixture. This is what gives the dessert a lighter feel instead of a heavy cream.
Seventh Step: Finish the layering
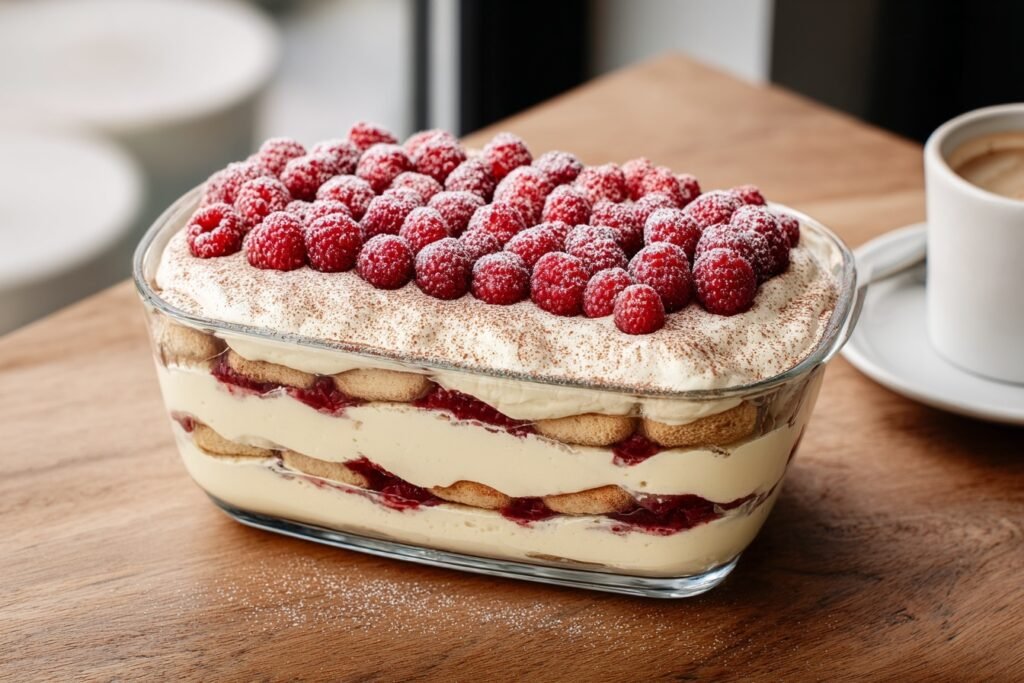
Pour the mascarpone mixture over the chilled raspberry layer. Spread it evenly with a spatula so the top looks smooth. If you want a prettier finish, you can swirl the top lightly instead of making it perfectly flat.
At this stage, the dessert is already looking beautiful, but it still needs time in the refrigerator to set properly. Do not rush this part.
Eighth Step: Chill before serving
Refrigerate the tiramisu for 24 to 48 hours before serving. The recipe works after one day, but 48 hours gives a firmer texture and deeper flavor. If you can plan ahead, that longer rest is worth it.
Right before serving, you can add a few extra raspberries on top if you like. Slice carefully with a sharp knife and use a spatula to lift each piece from the dish.
Best result: Make it 48 hours in advance if you want a firmer, cleaner slice.

Dietary Substitutions to Customize Your Tiramisu Framboise Et Mascarpone
Protein and main component alternatives
If you want to change the main ingredients a little, there are a few easy swaps. For a lighter version, some cooks use a reduced-fat mascarpone style product, though the texture will be a bit less rich. If mascarpone is hard to find, a thick cream cheese style spread can work in a pinch, but the taste will be more tangy and less traditional.
For the eggs, the recipe depends on whipped whites for its airy texture. If you need an egg-free version, use aquafaba whipped to stiff peaks. This will change the flavor slightly, but it still gives good structure.
Vegetable, sauce, and seasoning modifications
This dessert does not use vegetables, but the fruit layer can be changed based on season and taste. Strawberries work very well in place of raspberries. When mashing strawberries, add a little lemon juice to keep the flavor bright and balanced. Blueberries can also be used, though they will give a sweeter, softer result.
You can also adjust the sweetness. If your berries are very ripe, reduce the sugar slightly. If they are more tart, keep the full 30 grams of sugar or add a little more to taste. A touch of lemon zest in the cream can also add a fresh note without changing the basic recipe.
Mastering Tiramisu Framboise Et Mascarpone: Advanced Tips and Variations
Pro cooking techniques
The biggest secret is to avoid over-soaking the ladyfingers. A quick dip in milk is enough. If they absorb too much liquid, the base becomes too soft and the layers may collapse when sliced. Another useful tip is to fold the egg whites gently so the cream stays light and airy.
For a cleaner result, chill the mascarpone mixture for a few minutes before assembling the layers. This can help it sit better on top of the fruit.
Flavor variations
If you like a stronger berry flavor, mix a few chopped raspberries into the mascarpone cream. You can also swap part of the raspberries for strawberries or add a few thin slices of fresh strawberry on top. A little lemon juice with strawberries gives a sharper fruit taste, which works nicely with the creamy filling.
For a warmer note, some cooks like a tiny bit of grated lemon zest in the cream. Keep it light so the vanilla and berry flavors stay front and center.
Presentation tips
Serve the tiramisu in a clear glass dish if you want the layers to show. Individual glasses also work well for dinner parties, picnics, or packed dessert portions. Finish with a few fresh raspberries, a light dusting of sugar if you like, or a small mint leaf for color.
Make-ahead options
This dessert is perfect for planning ahead. In fact, the recipe gets better after resting overnight. If you want the best texture, prepare it 48 hours before serving. That makes it a very convenient choice for holidays, birthdays, or busy weeks.
If you enjoy make-ahead desserts, you may also like the simple ideas in these pumpkin cream cheese muffin recipes for another easy treat to prep in advance.
How to Store Tiramisu Framboise Et Mascarpone: Best Practices
Refrigeration
Keep the tiramisu covered in the refrigerator and eat it within 2 to 3 days for the best texture. Since it contains eggs and mascarpone, it should stay cold at all times. A tight lid or plastic wrap helps stop it from picking up other fridge smells.
Freezing
This dessert can be frozen, but the texture may change a little after thawing. If you do freeze it, wrap portions well and store them in airtight containers. Thaw in the refrigerator rather than at room temperature so the cream stays safer and smoother.
Reheating
There is no need to reheat tiramisu framboise et mascarpone. It is meant to be served chilled. In fact, warming it would ruin the texture and soften the layers too much.
Meal prep considerations
For batch prep, make individual servings in small cups or jars. That makes storage easier and helps with portion control. If you are preparing dessert for guests, assemble it the day before and keep it in the fridge until serving time.

FAQs: Frequently Asked Questions About Tiramisu Framboise Et Mascarpone
Print
Tiramisu Framboise Et Mascarpone
🍓 Juicy raspberry-infused tiramisu – lighter, fruitier twist on Italian classic for fresh indulgence!
☕ Foolproof no-bake delight: make-ahead creamy layers wow guests with minimal effort.
- Total Time: 24 hours 25 minutes
- Yield: 8 servings
Ingredients
– 24 ladyfinger biscuits for the base layers and structure
– Milk for soaking the ladyfinger biscuits
– 500 grams raspberries, fresh or frozen for the fruity layer
– 30 grams sugar for mashing the raspberries
– 3 eggs, or 4 if the eggs are small for the mascarpone cream
– 1 packet vanilla sugar for flavoring the egg yolk mixture
– 250 grams mascarpone for the creamy filling
Instructions
1-First Step: Prepare the dish and fruit Start by getting out a shallow serving dish or baking dish. This dessert works best in a dish that lets you build layers clearly. Measure out the raspberries, sugar, mascarpone, milk, ladyfingers, vanilla sugar, and eggs before you begin, because once you start, the process moves quickly. Place the 500 grams of raspberries in a bowl and mash them with 30 grams of sugar. If you are using frozen raspberries, let them thaw first so they break down more easily. Stir until the fruit becomes soft and juicy, but do not worry if a few pieces stay whole. That little texture is nice in the finished dessert.
2-Second Step: Build the biscuit base Pour a little milk into a shallow bowl. Dip each ladyfinger biscuit very briefly into the milk, just long enough to soften the outside. Do not let them sit too long, or they will turn mushy and lose their shape. Arrange the soaked ladyfingers at the bottom of the dish in a single layer. If needed, break a few biscuits so the base is covered well. This layer gives the dessert structure and soaks up some of the fruit juices and cream later on.
3-Third Step: Add the raspberry layer Spoon the mashed raspberries evenly over the biscuits. Spread them gently so every bite gets some fruit. This layer gives the dessert its bright color and fresh flavor. Once the raspberry layer is in place, put the dish in the refrigerator for a short chill while you make the cream. This helps the layers settle and keeps the dessert cooler while you work.
4-Fourth Step: Separate the eggs Carefully separate the egg whites from the yolks. Put the yolks in one bowl and the whites in another clean bowl. This step matters because the whites need to whip properly, and even a little yolk can stop them from becoming stiff. If your eggs are small, use 4 eggs instead of 3. That gives you enough volume for a smooth cream. Take your time here, because clean separation helps the whole recipe turn out better.
5-Fifth Step: Make the mascarpone cream Beat the egg yolks with the sugar and 1 packet vanilla sugar until the mixture turns pale and creamy. This usually takes a few minutes with a whisk or mixer. The color should lighten, and the sugar should mostly dissolve. Next, add the 250 grams of mascarpone and mix until smooth. The filling should become thick, soft, and silky. Do not overmix, because mascarpone can lose its nice texture if it is beaten too much.
6-Sixth Step: Whip and fold the egg whites Whip the egg whites until they form stiff peaks. This means the whites should hold their shape when you lift the whisk. A clean bowl and whisk help a lot here. Gently fold the whipped whites into the mascarpone mixture in batches. Use a spatula and move slowly so you keep the air in the mixture. This is what gives the dessert a lighter feel instead of a heavy cream.
7-Seventh Step: Finish the layering Pour the mascarpone mixture over the chilled raspberry layer. Spread it evenly with a spatula so the top looks smooth. If you want a prettier finish, you can swirl the top lightly instead of making it perfectly flat. At this stage, the dessert is already looking beautiful, but it still needs time in the refrigerator to set properly. Do not rush this part.
8-Eighth Step: Chill before serving Refrigerate the tiramisu for 24 to 48 hours before serving. The recipe works after one day, but 48 hours gives a firmer texture and deeper flavor. If you can plan ahead, that longer rest is worth it. Right before serving, you can add a few extra raspberries on top if you like. Slice carefully with a sharp knife and use a spatula to lift each piece from the dish.
Last Step:
Please leave a rating and comment letting us know how you liked this recipe! This helps our business to thrive and continue providing free, high-quality recipes for you.Notes
⏰ Prepare 48 hours ahead for the firmest, most flavorful texture.
🍓 Substitute strawberries with a squeeze of lemon juice when mashing.
🥚 Use pasteurized eggs for safety when consuming raw.
- Prep Time: 25 minutes
- Chill Time: 24-48 hours
- Category: Dessert
- Method: No Bake
- Cuisine: Italian
- Diet: Vegetarian
Nutrition
- Serving Size: 1 slice
- Calories: 350 kcal
- Sugar: 20g
- Sodium: 120mg
- Fat: 22g
- Saturated Fat: 12g
- Unsaturated Fat: 8g
- Trans Fat: 0g
- Carbohydrates: 28g
- Fiber: 3g
- Protein: 8g
- Cholesterol: 110mg