Ingredients
– 24 ladyfinger biscuits for the base layers and structure
– Milk for soaking the ladyfinger biscuits
– 500 grams raspberries, fresh or frozen for the fruity layer
– 30 grams sugar for mashing the raspberries
– 3 eggs, or 4 if the eggs are small for the mascarpone cream
– 1 packet vanilla sugar for flavoring the egg yolk mixture
– 250 grams mascarpone for the creamy filling
Instructions
1-First Step: Prepare the dish and fruit Start by getting out a shallow serving dish or baking dish. This dessert works best in a dish that lets you build layers clearly. Measure out the raspberries, sugar, mascarpone, milk, ladyfingers, vanilla sugar, and eggs before you begin, because once you start, the process moves quickly. Place the 500 grams of raspberries in a bowl and mash them with 30 grams of sugar. If you are using frozen raspberries, let them thaw first so they break down more easily. Stir until the fruit becomes soft and juicy, but do not worry if a few pieces stay whole. That little texture is nice in the finished dessert.
2-Second Step: Build the biscuit base Pour a little milk into a shallow bowl. Dip each ladyfinger biscuit very briefly into the milk, just long enough to soften the outside. Do not let them sit too long, or they will turn mushy and lose their shape. Arrange the soaked ladyfingers at the bottom of the dish in a single layer. If needed, break a few biscuits so the base is covered well. This layer gives the dessert structure and soaks up some of the fruit juices and cream later on.
3-Third Step: Add the raspberry layer Spoon the mashed raspberries evenly over the biscuits. Spread them gently so every bite gets some fruit. This layer gives the dessert its bright color and fresh flavor. Once the raspberry layer is in place, put the dish in the refrigerator for a short chill while you make the cream. This helps the layers settle and keeps the dessert cooler while you work.
4-Fourth Step: Separate the eggs Carefully separate the egg whites from the yolks. Put the yolks in one bowl and the whites in another clean bowl. This step matters because the whites need to whip properly, and even a little yolk can stop them from becoming stiff. If your eggs are small, use 4 eggs instead of 3. That gives you enough volume for a smooth cream. Take your time here, because clean separation helps the whole recipe turn out better.
5-Fifth Step: Make the mascarpone cream Beat the egg yolks with the sugar and 1 packet vanilla sugar until the mixture turns pale and creamy. This usually takes a few minutes with a whisk or mixer. The color should lighten, and the sugar should mostly dissolve. Next, add the 250 grams of mascarpone and mix until smooth. The filling should become thick, soft, and silky. Do not overmix, because mascarpone can lose its nice texture if it is beaten too much.
6-Sixth Step: Whip and fold the egg whites Whip the egg whites until they form stiff peaks. This means the whites should hold their shape when you lift the whisk. A clean bowl and whisk help a lot here. Gently fold the whipped whites into the mascarpone mixture in batches. Use a spatula and move slowly so you keep the air in the mixture. This is what gives the dessert a lighter feel instead of a heavy cream.
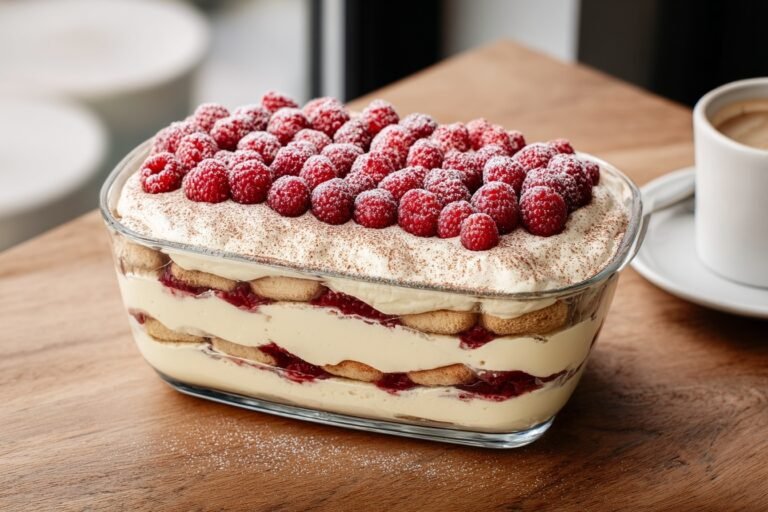
7-Seventh Step: Finish the layering Pour the mascarpone mixture over the chilled raspberry layer. Spread it evenly with a spatula so the top looks smooth. If you want a prettier finish, you can swirl the top lightly instead of making it perfectly flat. At this stage, the dessert is already looking beautiful, but it still needs time in the refrigerator to set properly. Do not rush this part.
8-Eighth Step: Chill before serving Refrigerate the tiramisu for 24 to 48 hours before serving. The recipe works after one day, but 48 hours gives a firmer texture and deeper flavor. If you can plan ahead, that longer rest is worth it. Right before serving, you can add a few extra raspberries on top if you like. Slice carefully with a sharp knife and use a spatula to lift each piece from the dish.
Last Step:
Please leave a rating and comment letting us know how you liked this recipe! This helps our business to thrive and continue providing free, high-quality recipes for you.Notes
⏰ Prepare 48 hours ahead for the firmest, most flavorful texture.
🍓 Substitute strawberries with a squeeze of lemon juice when mashing.
🥚 Use pasteurized eggs for safety when consuming raw.
- Prep Time: 25 minutes
- Chill Time: 24-48 hours
- Category: Dessert
- Method: No Bake
- Cuisine: Italian
- Diet: Vegetarian
Nutrition
- Serving Size: 1 slice
- Calories: 350 kcal
- Sugar: 20g
- Sodium: 120mg
- Fat: 22g
- Saturated Fat: 12g
- Unsaturated Fat: 8g
- Trans Fat: 0g
- Carbohydrates: 28g
- Fiber: 3g
- Protein: 8g
- Cholesterol: 110mg