What Is Pâte Sablée?
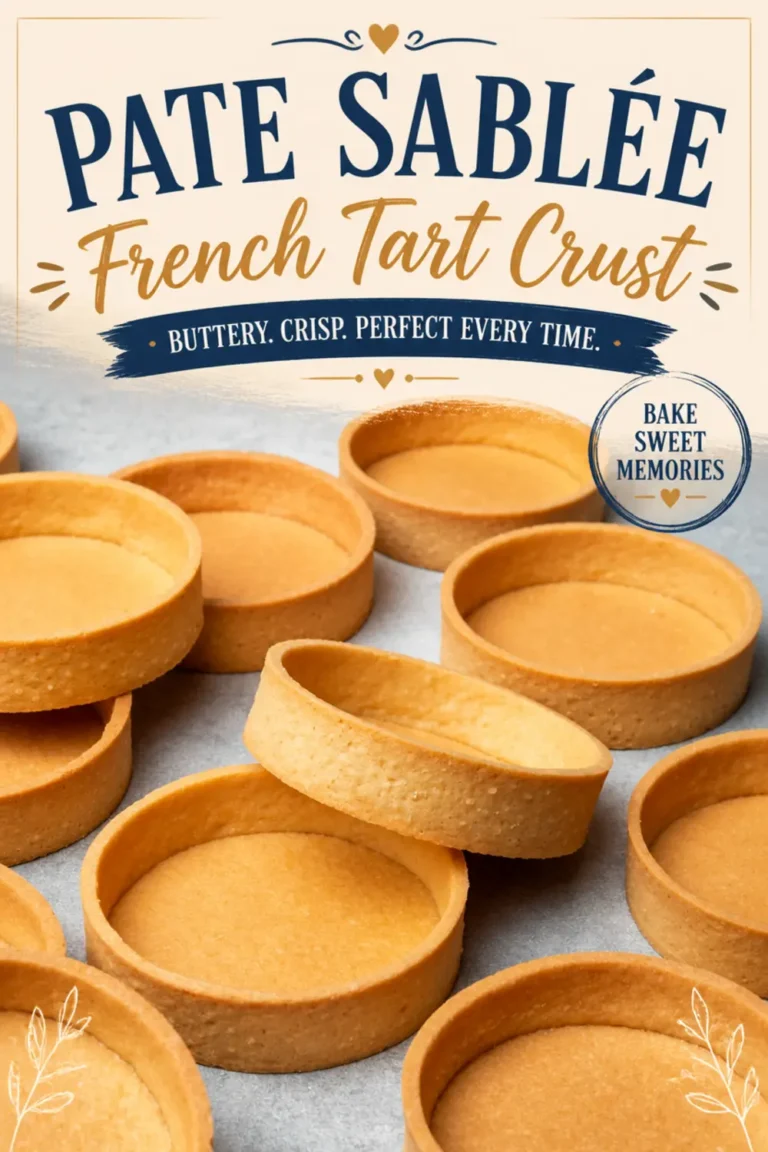
Pâte sablée is a classic French sweet shortcrust pastry that creates the most delicate, crisp tart shells you will ever bake.
The word “sablé” means sandy in French, and that describes the texture perfectly once the dough is mixed: a buttery, crumbly mixture that transforms into a golden, cookie like shell after baking.

Unlike an American flaky pie crust with its visible layers and savory lean, pâte sablée is sleek, thin, and just sweet enough to complement any filling without overpowering it.
When you bite into a properly made pâte sablée tartlet, the shell shatters gently, delivering a melt in your mouth richness that pie crust simply cannot match. This pastry is the foundation of elegant fruit tarts, glossy chocolate ganache tartlets, and silky lemon curd creations.
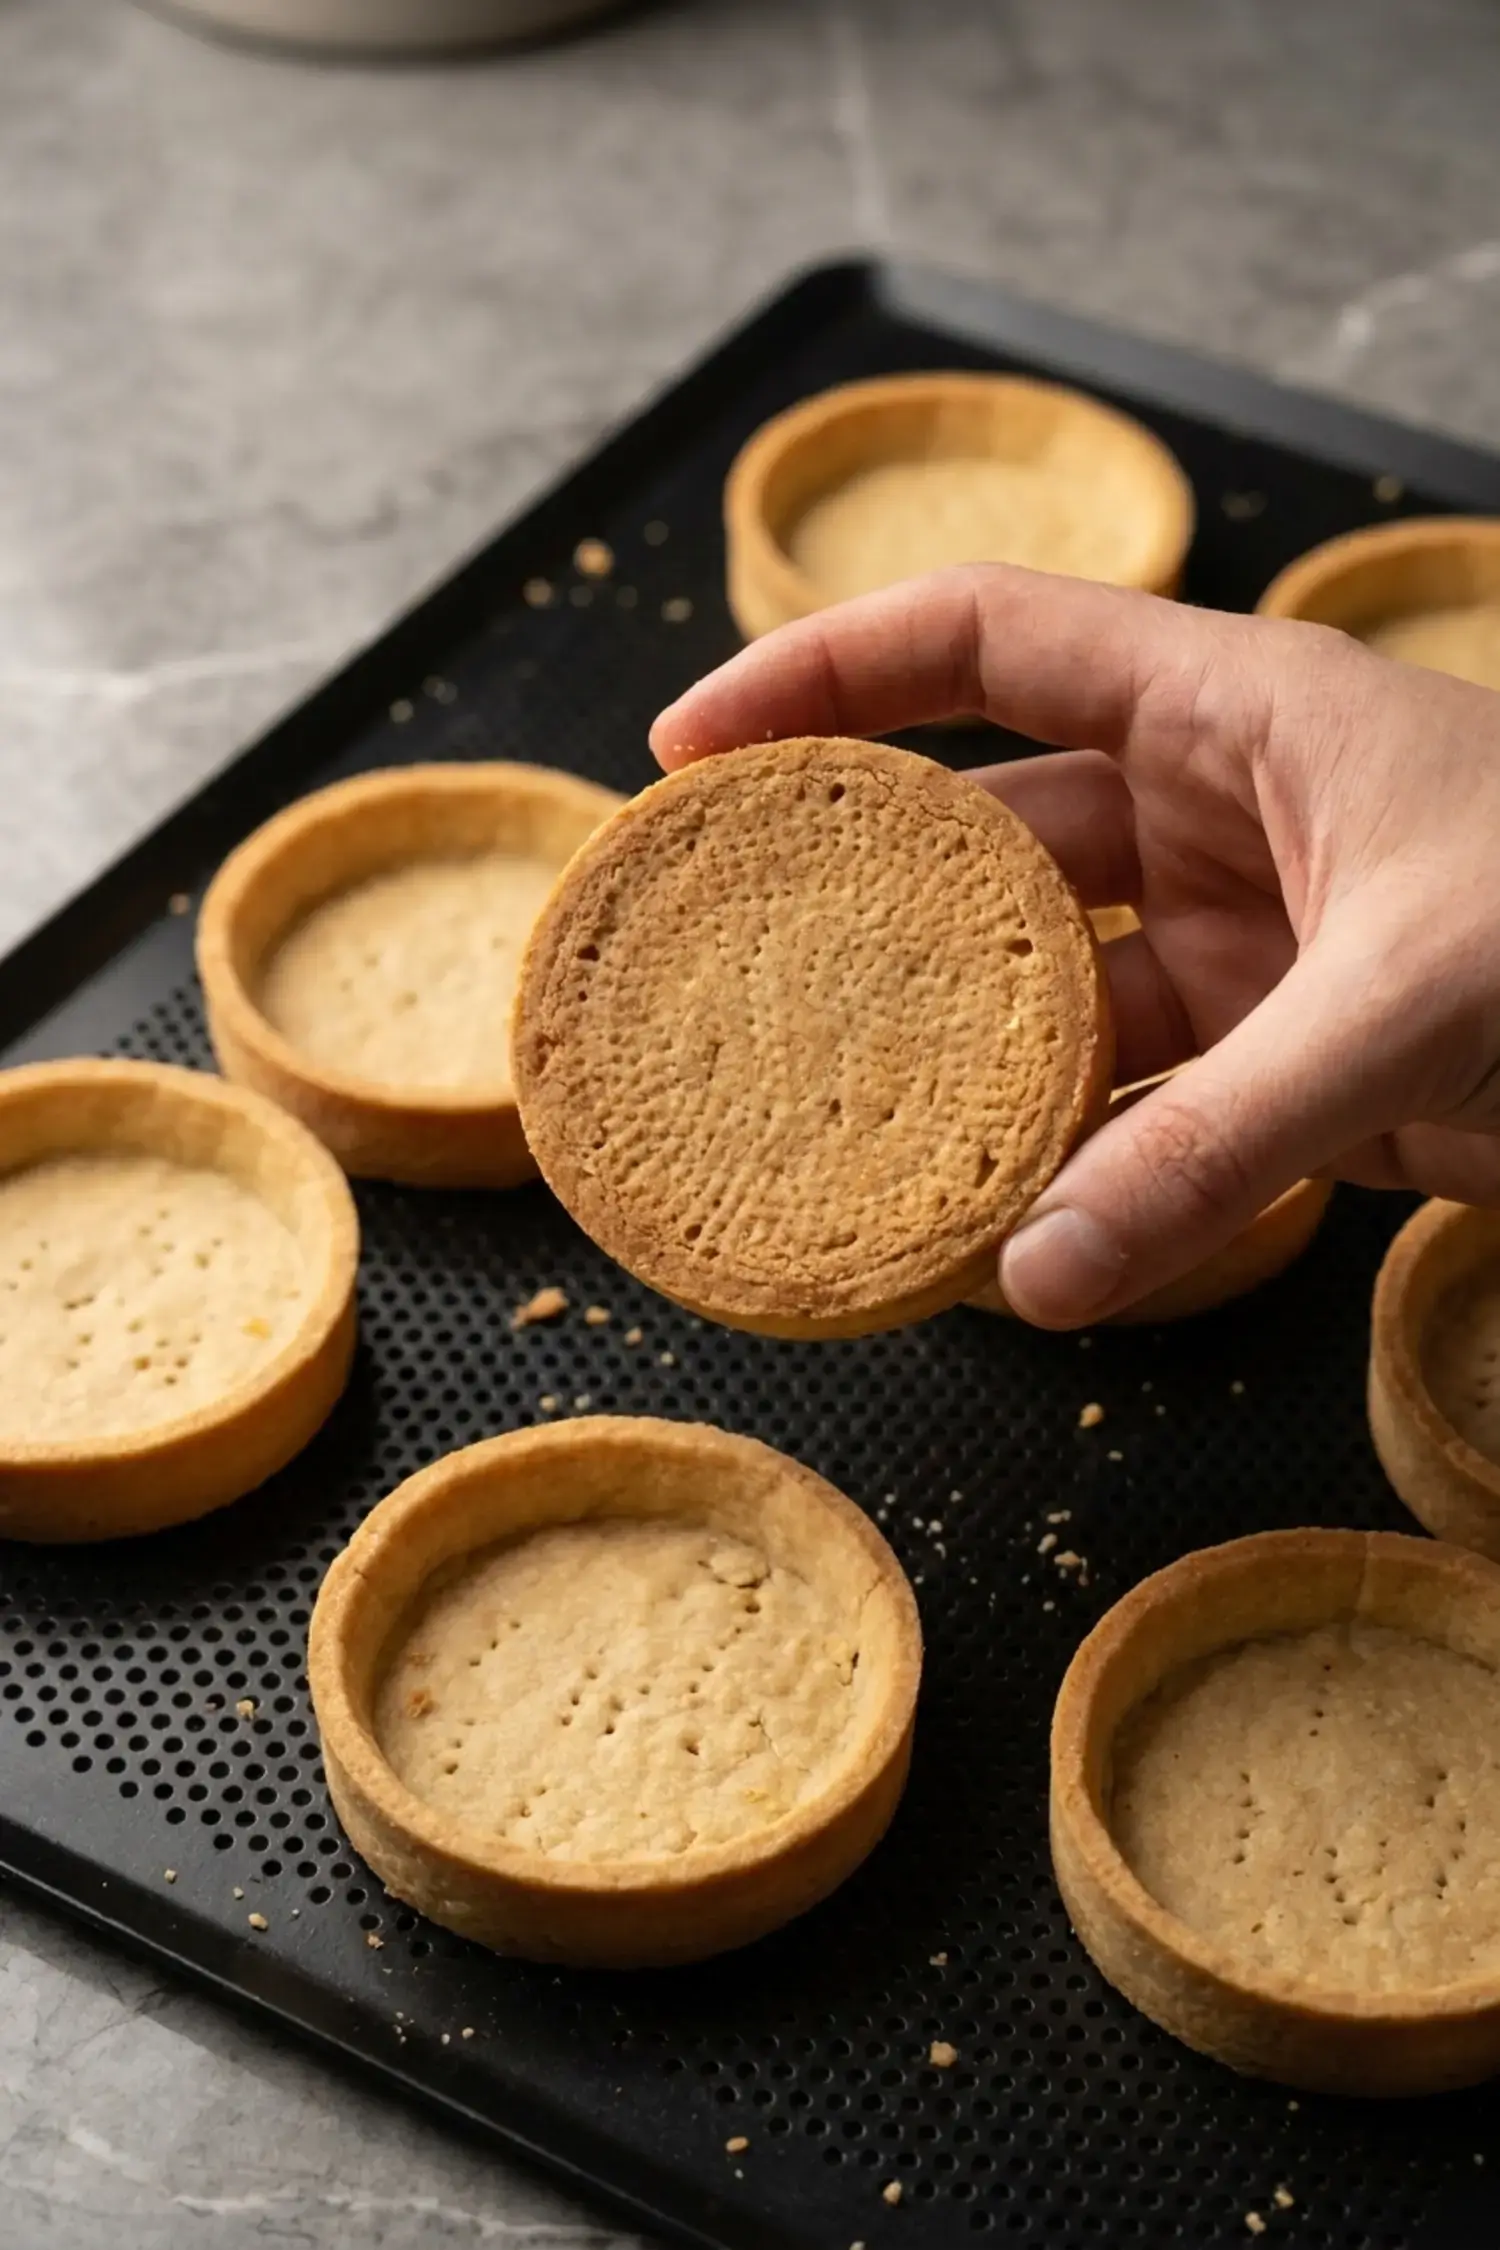
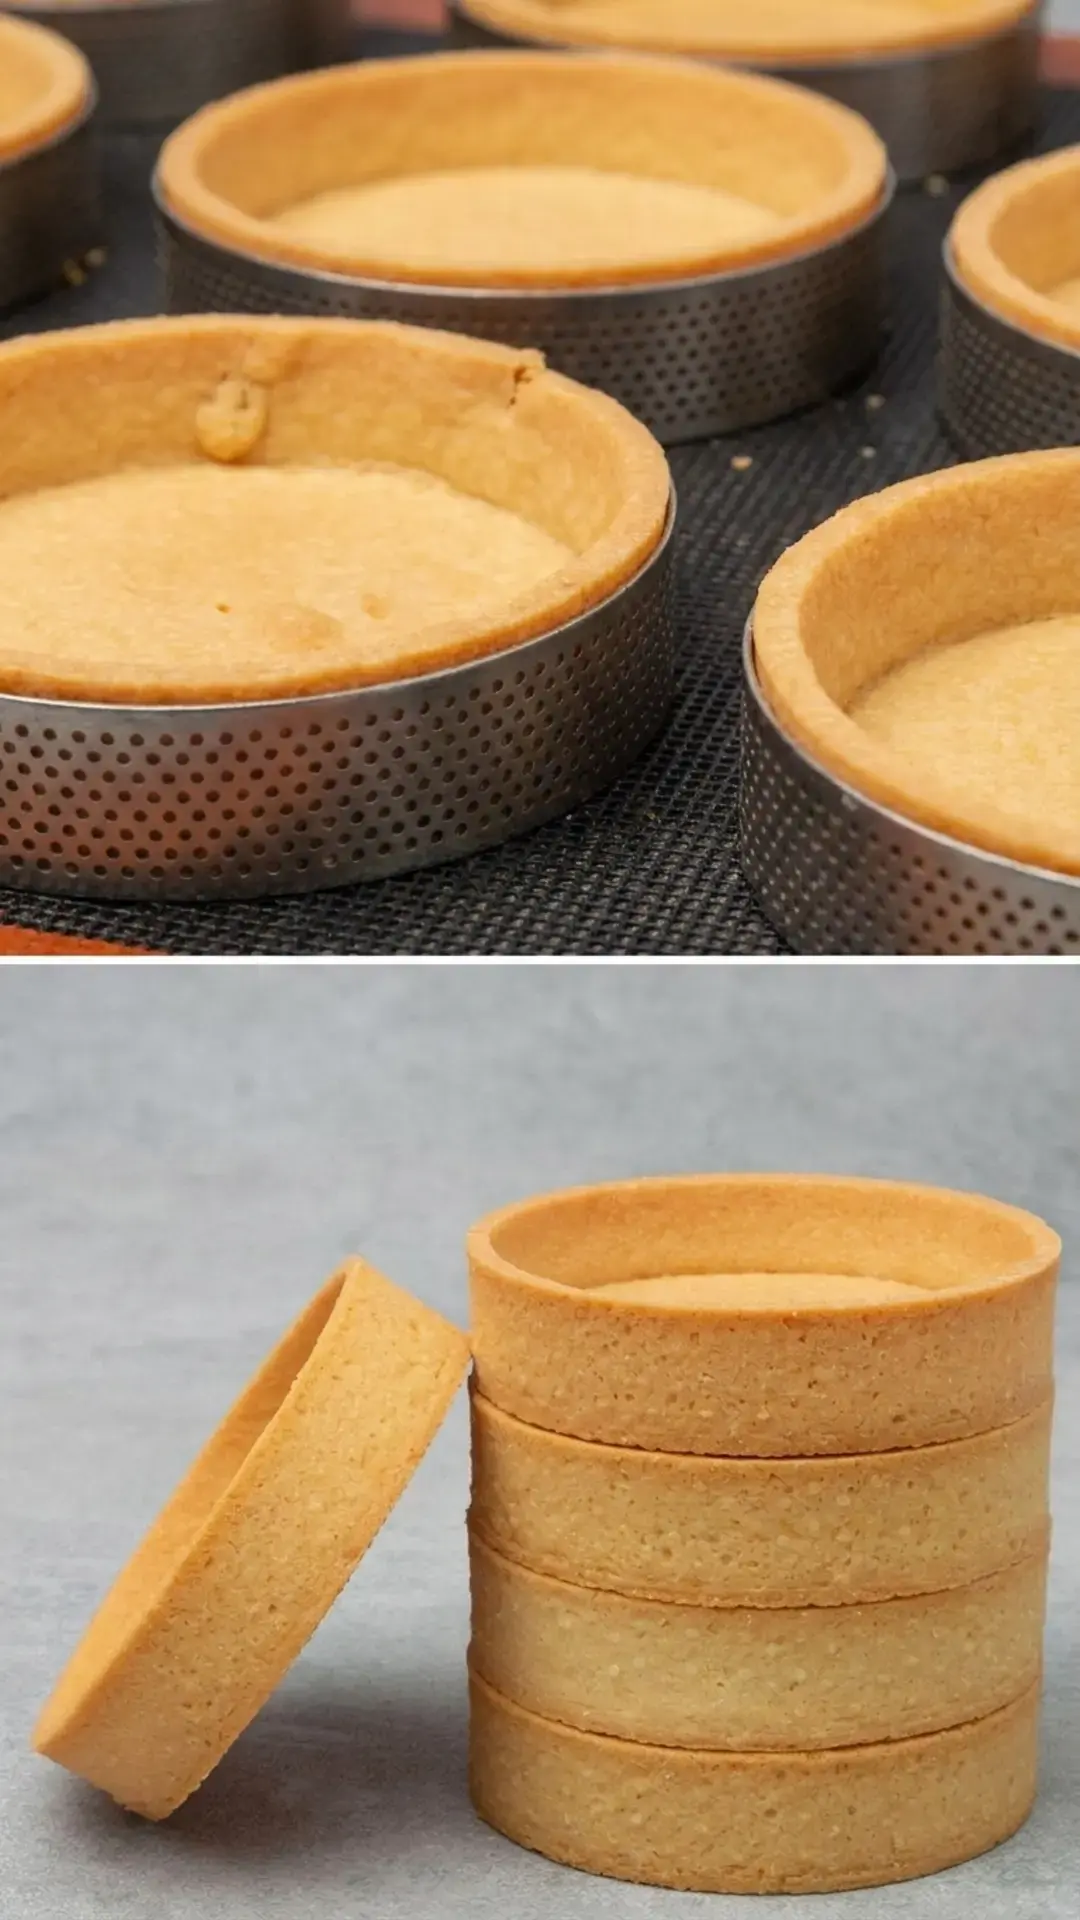
Many home bakers assume such professional looking results require blind baking, but this method uses perforated tart rings and a perforated baking mat to circulate heat and eliminate that extra step.
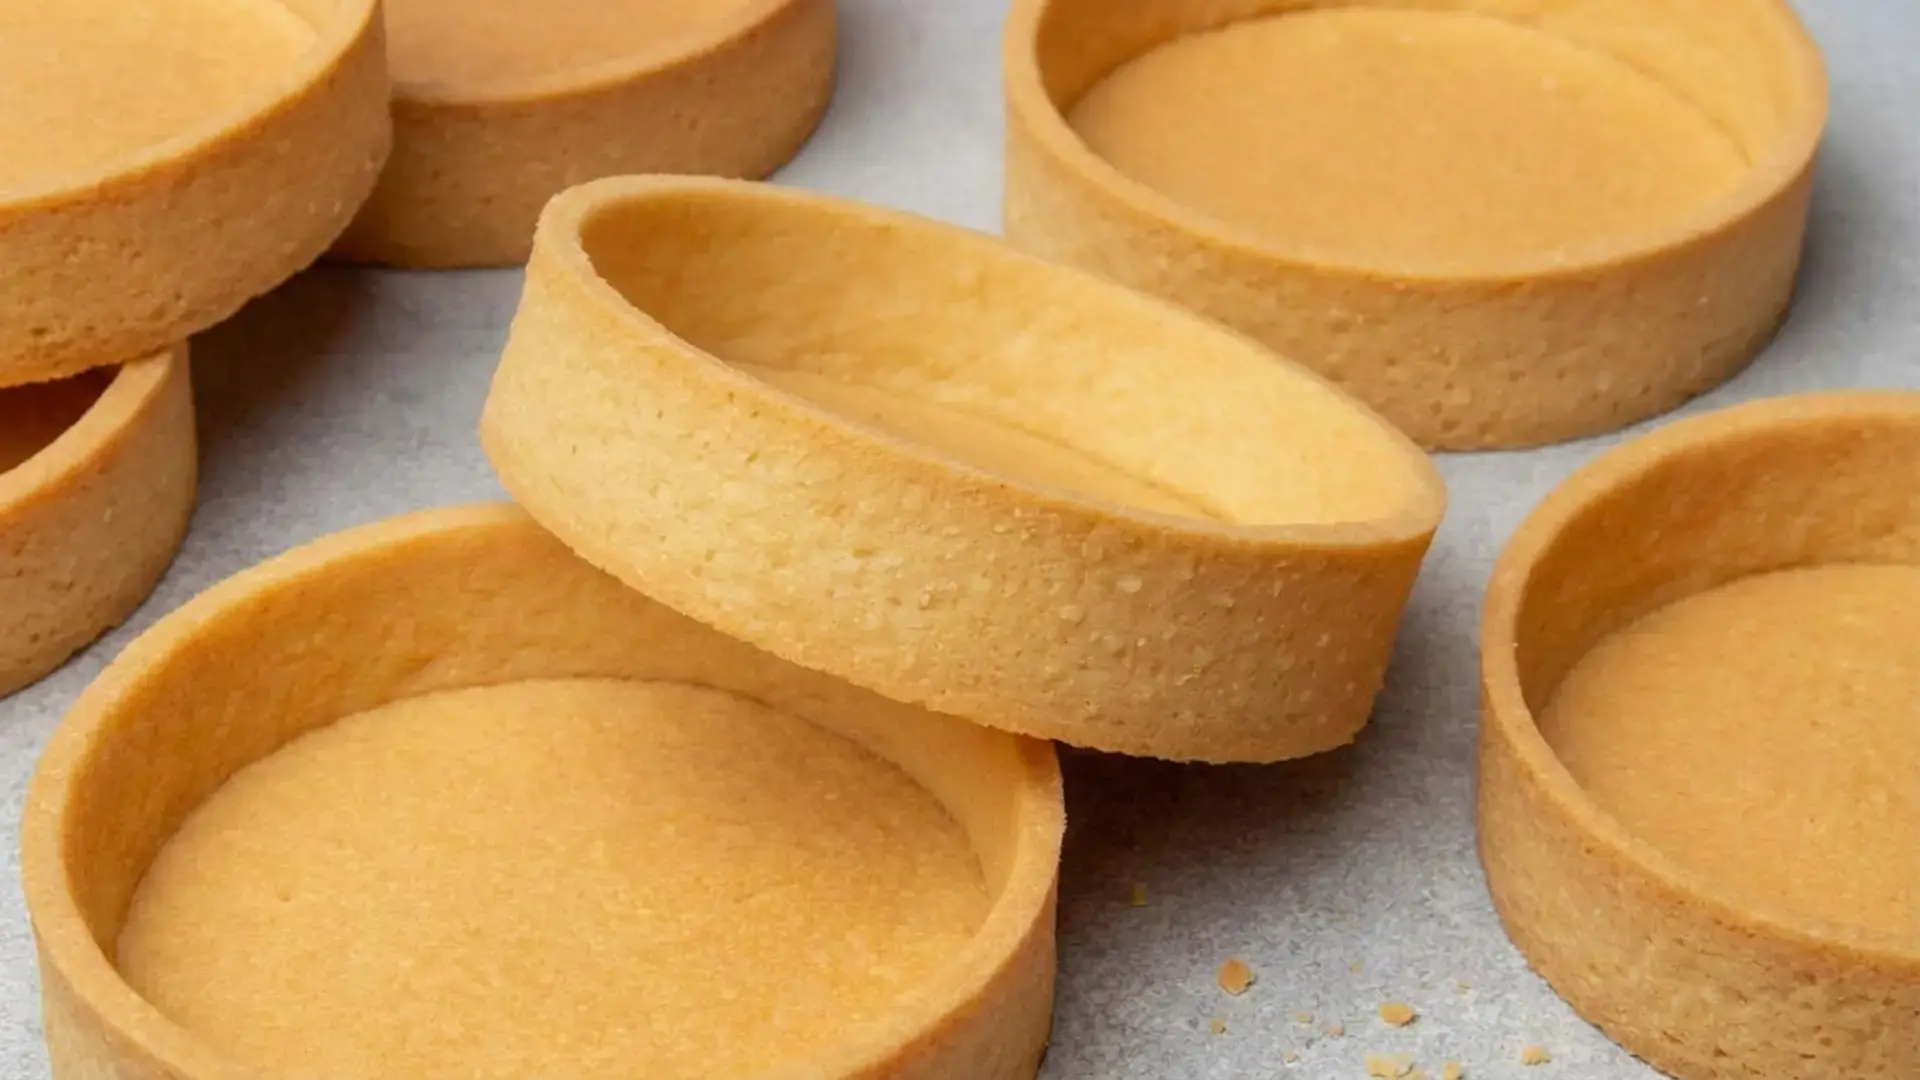
The pastry contracts slightly as it bakes, releasing cleanly from the rings without any greasing or pie weights.
I like to think of pâte sablée as the little black dress of the pastry world, it works for any occasion, from a casual summer berry tart to an impressive dinner party dessert.
Once you master the temperature control technique, you can produce eight picture perfect mini tartlet shells or one large 9 inch tart case.
The recipe may feel unfamiliar if you grew up with American style pie dough, but after a few attempts, the sandy, buttery dough becomes second nature.
Jump to:
- What Is Pâte Sablée?
- How Difficult Is Homemade Pâte Sablée?
- Ingredient Advice
- How to Make Pâte Sablée
- Mix the Dough with the Crumbling Method
- Roll the Pastry Evenly
- Assemble the Tart Shells
- Bake Until Golden
- Ingredient Substitutions
- Flavor Variations
- Make Ahead Storage and Freezing
- Helpful Equipment
- Expert Tips
- Troubleshooting Pâte Sablée
- How to Fill the Tart Shells
- Frequently Asked Questions
- What is pâte sablée and how is it different from an American pie crust?
- How do I make a classic pâte sablée French tart crust at home?
- Why does my pâte sablée tart crust shrink, puff, or lose its shape in the oven?
- Can I store or freeze pâte sablée tart shells and dough in advance?
- Pâte Sablée, Sweet Shortcrust Pastry Tart Shells
- Ingredients
- Instructions
- Last Step:
- Nutrition
- Did you make this recipe?
How Difficult Is Homemade Pâte Sablée?
I won’t sugarcoat it: pâte sablée requires patience and a reliable freezer. Is it difficult? Not if you respect the temperature of the dough.
The biggest challenge is keeping everything cold without letting the pastry become hard and brittle. When the butter warms up, the dough turns sticky and tears easily, leading to messy assembly and shrunken shells.
On the flip side, overly chilled dough will crack when you try to roll or shape it.
Think of it as a balancing act. You will learn to judge by feel: the dough should be pliable yet cool to the touch, not clinging to your fingers.
If you have a warm kitchen, you will make more trips to the freezer, and that is completely normal. The good news is that this recipe has been refined for home ovens and normal tools.
With a digital scale, a pair of silicone baking mats, and perforated tart rings, a beginner can achieve crisp, professional looking shells. Practice truly makes the difference, and each batch teaches you something about timing and touch.
Ingredient Advice
Baking is chemistry, and every component of pâte sablée matters. Below is a breakdown of the essential ingredients, with precise quantities measured by weight for accuracy. If you want to explore another approach, King Arthur Baking has a classic pâte sablée tart crust recipe that also uses powdered sugar.
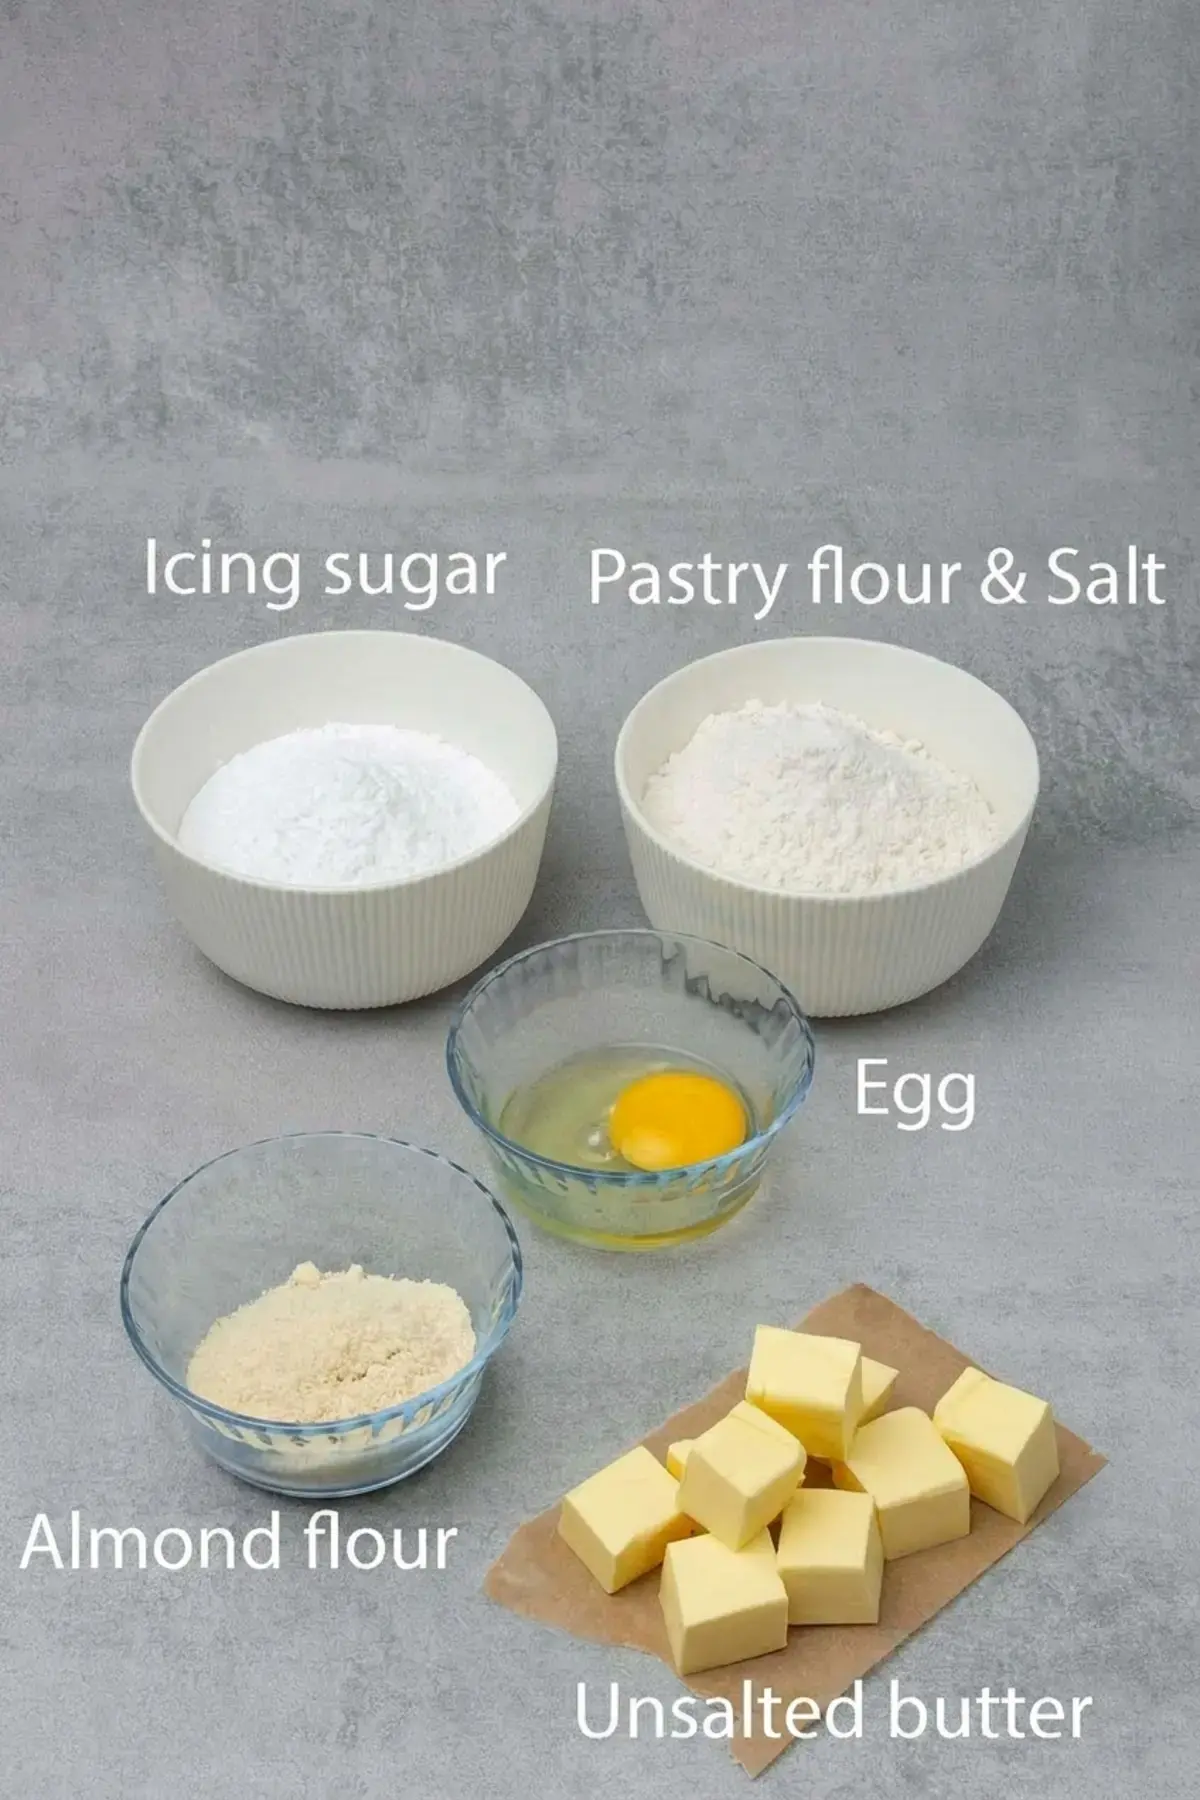
- Powdered sugar (90 g): Also labeled confectioners’ sugar. It dissolves instantly and gives the crust a delicate sweetness without graininess. Do not substitute with granulated sugar, which would create a coarser texture.
- Pastry flour (230 g): With a lower protein content than all purpose flour, pastry flour yields a tender, short bite. All purpose flour works as a substitute, and the shells will still be delicious, though they may be a touch less delicate. I often reach for pastry flour when I want that melt in your mouth finish.
- Almond flour (30 g): Made from finely ground blanched almonds, it adds a subtle nuttiness and contributes to the cookie like crispness. Avoid almond meal with skins, which would darken the dough and introduce a coarser texture.
- Salt (a pinch): Don’t skip it. Salt sharpens the butter flavor and balances the sweetness, making the crust moreish rather than flat.
- Unsalted butter (110 g): The star of the show. You must use European style butter with at least 82% fat content. Its lower water content means less steam during baking, which reduces shrinkage and keeps the shell crisp. Keep the butter very cold, cut into small chunks, and pop it back into the freezer for a few minutes before using.
- Egg (50 g, about 1 large): Bring it to room temperature so it blends smoothly into the dough. A cold egg can seize the butter and make the dough difficult to bring together.
Using a kitchen scale instead of cups guarantees consistent results, especially with a temperamental pastry like this. If you haven’t invested in a scale yet, now is the time.
How to Make Pâte Sablée
The crumbling method, also known as sablage, is the key to this recipe. Unlike the creaming method where butter and sugar are beaten until fluffy, sablage involves rubbing cold butter into the dry ingredients by hand, creating a sandy texture that yields a tight, crisp crumb.
This keeps the butter particles solid so they create tiny pockets of steam in the oven, resulting in that coveted short, melt in your mouth consistency.
I always make the dough by hand; a food processor would overwork the gluten and introduce heat, which goes against everything we want. Serious Eats offers a good easy French shortcrust pastry guide if you want to compare methods.
Here is how to do it step by step.
Mix the Dough with the Crumbling Method
Begin by cutting the 110 g of cold butter into small cubes and placing them in the freezer while you weigh and sift the dry ingredients.
In a large bowl, sift together the 90 g powdered sugar, 230 g pastry flour, 30 g almond flour, and a pinch of salt. This aerates the flour and removes any lumps.
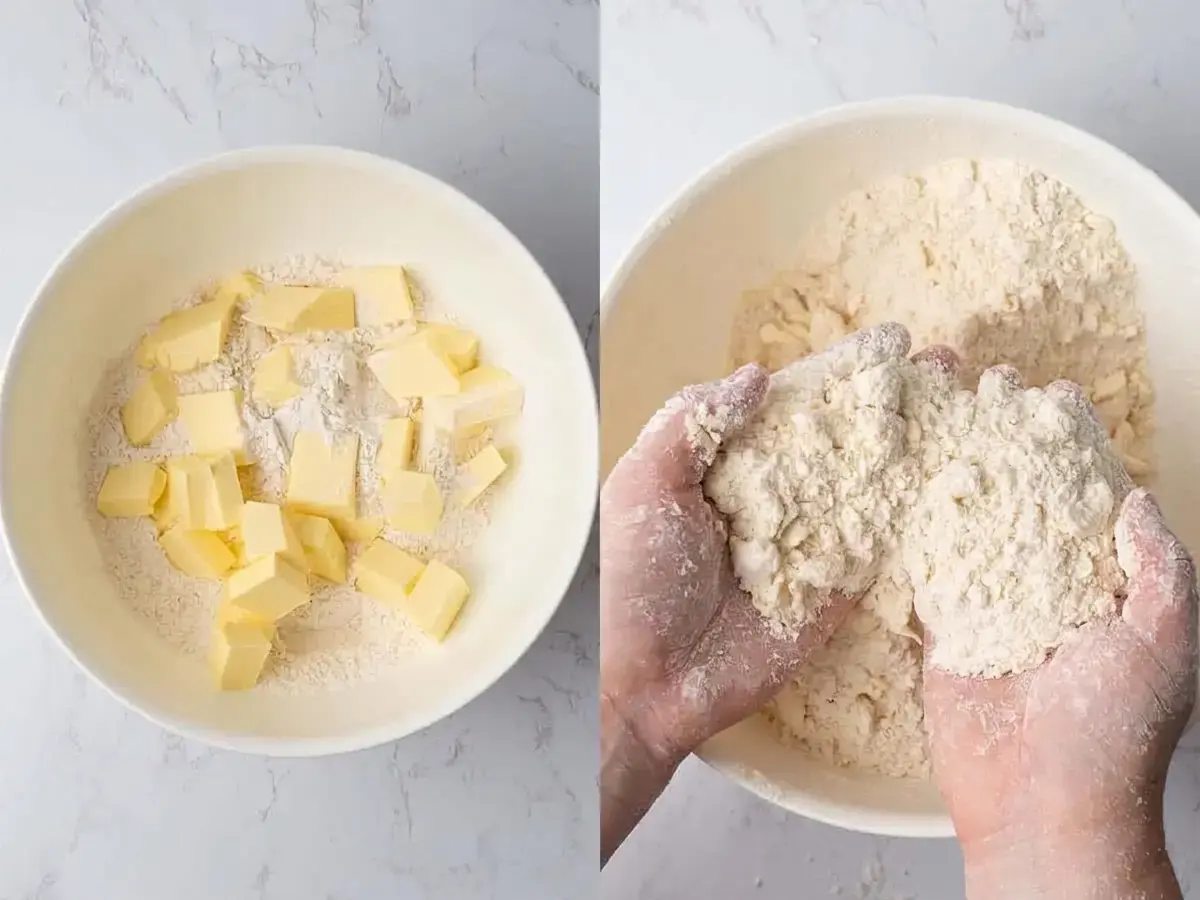
Next, add the chilled butter cubes and rub them into the flour mixture using your fingertips. Work quickly until the blend looks like damp sand with no visible butter pieces. I imagine the texture of coarse breadcrumbs, that’s your target.
Pour in the 50 g of room temperature egg and use your hands to bring the dough together. It will seem crumbly at first, but resist the urge to add any extra liquid or flour.
Knead the dough with the palm of your hand for just one or two minutes, smoothing it into a cohesive mass. Over kneading activates gluten and leads to tough, shrinking shells, so stop as soon as it feels uniform.
If your kitchen is warm and the dough becomes sticky, shape it into a flat rectangle, wrap it, and refrigerate for 10 to 15 minutes before rolling.
Roll the Pastry Evenly
Place the dough between two silicone baking mats. This trick prevents sticking without adding extra flour, which would toughen the pastry. Using a rolling pin, apply steady pressure to roll the dough to an even 2 mm thickness.
Rotate the dough 90 degrees every few passes to keep the shape uniform. I like to lift the top mat occasionally to check for thin spots and gently patch them with trimmings.
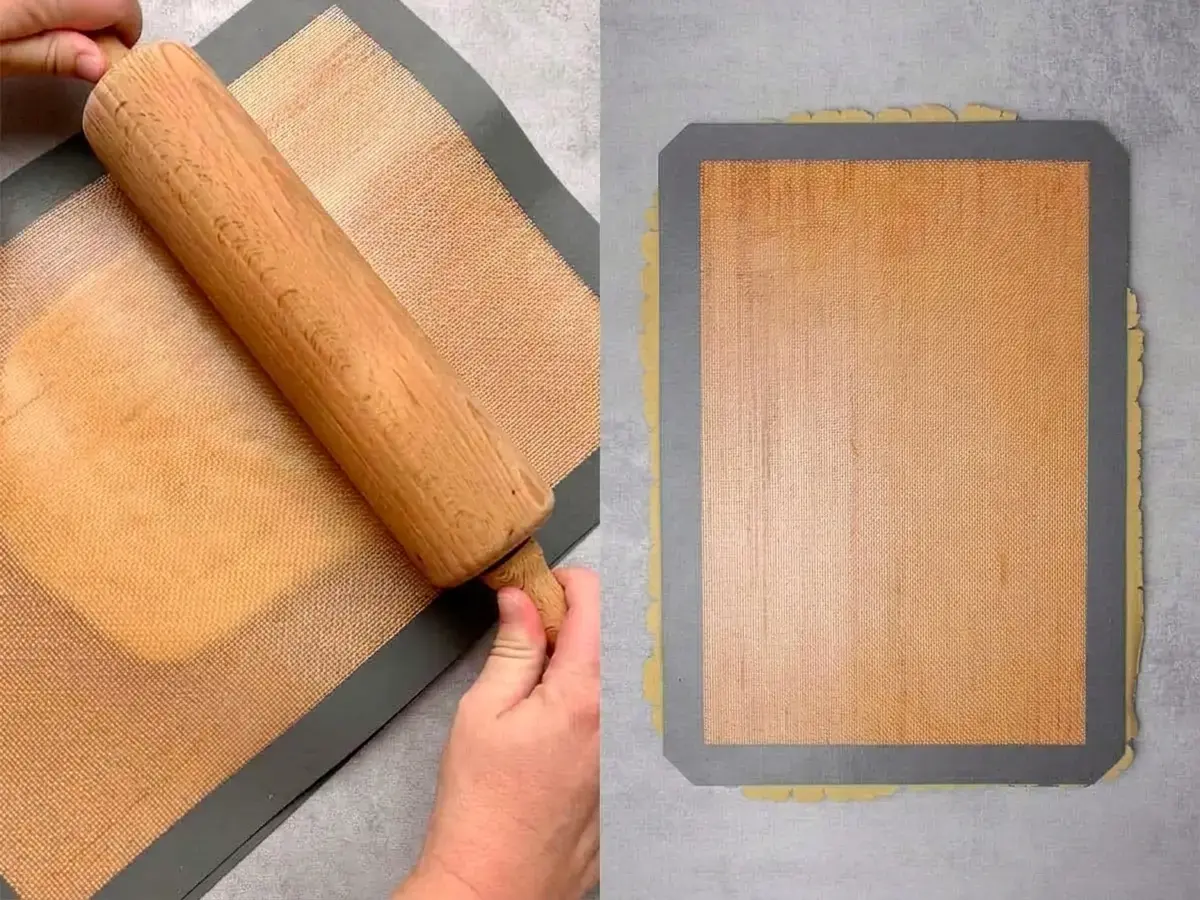
Once the dough reaches the desired thinness, leave it sandwiched between the mats and slide the whole package into the freezer for 10 to 15 minutes. This firms it up enough to cut clean circles and strips.
Assemble the Tart Shells
Remove the chilled dough from the freezer, peel off the top silicone mat, and get ready to cut. With a sharp knife, slice 8 long strips about 3.5 cm wide for the sides of the tart rings.
I find it easiest to cut all the strips at once and then use a perforated tart ring to stamp out 8 circles for the bottoms. If the dough warms up and becomes sticky, pop it back into the freezer for 5 minutes. Keep moving efficiently.
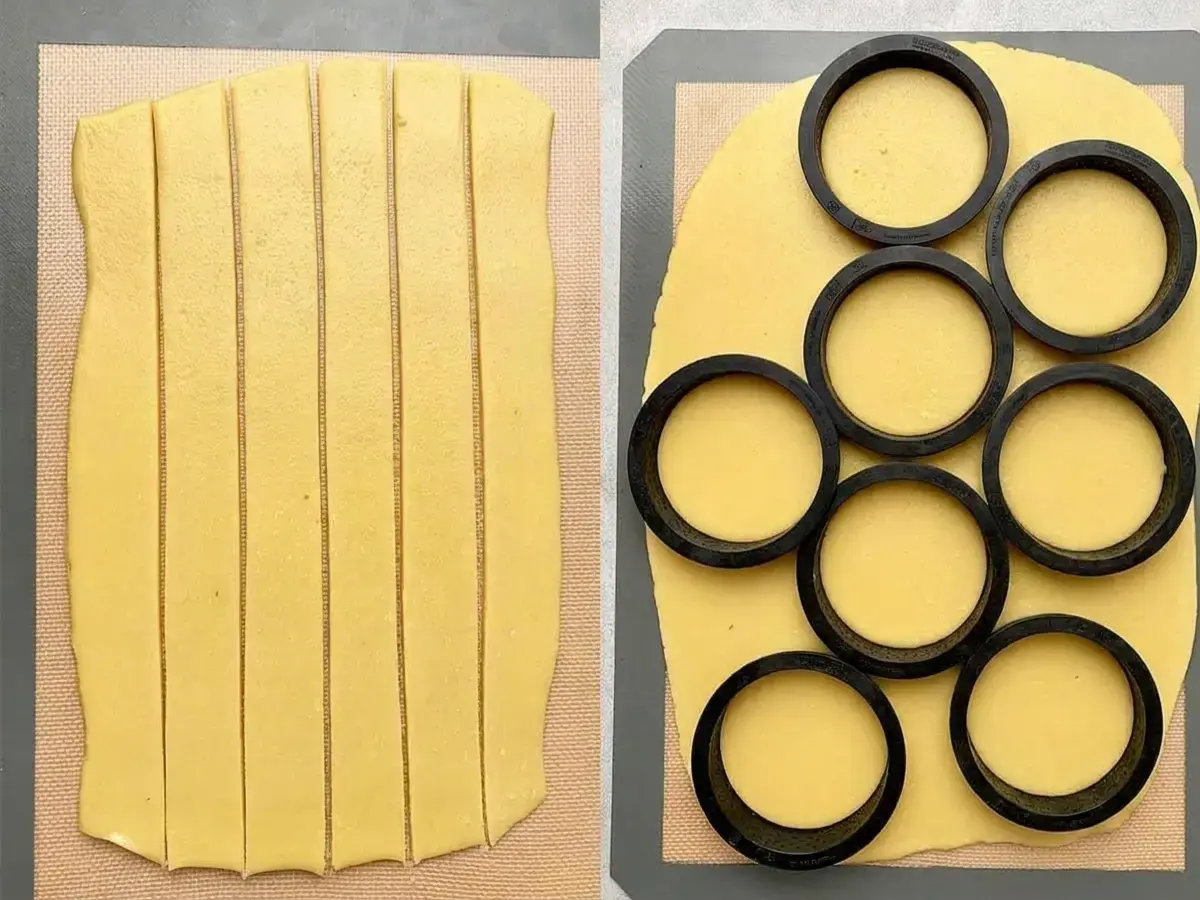
Position the perforated tart rings directly on a perforated “air” baking mat set over an oven rack. There is no need to grease the rings.
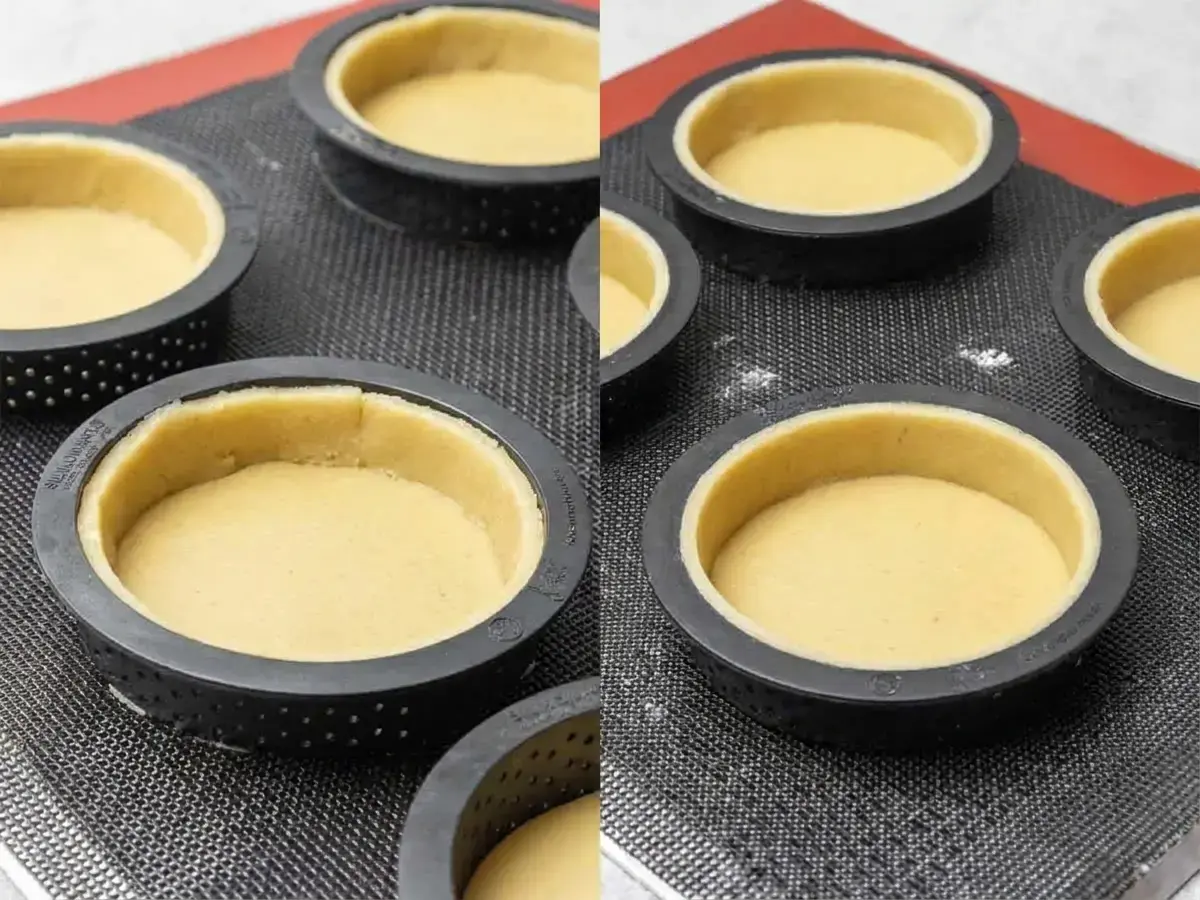
Place one dough circle inside each ring, then take a strip and press it gently against the inner side of the ring, sealing it to the circle at the bottom. Work quickly, and if the dough feels too soft, freeze the rings briefly.
Once all 8 are assembled, place the tray in the freezer for a full hour. This thorough freezing is what allows the shells to hold their shape without blind baking.
Bake Until Golden
Towards the end of that freezing hour, preheat your oven to 160°C (320°F) using the conventional setting; avoid the fan, which can dry out the pastry too fast.
Once the oven is ready, take the frozen tart rings out and use a sharp knife to trim any dough overhang level with the top of the rings. I like to do this while they are still rock solid for the cleanest edge.
Bake the shells for 20 minutes. At that point, the pastry should be partially cooked and may contract slightly inside the ring. Use a gentle touch to lift the rings off, hold opposite top edges and ease them upward.
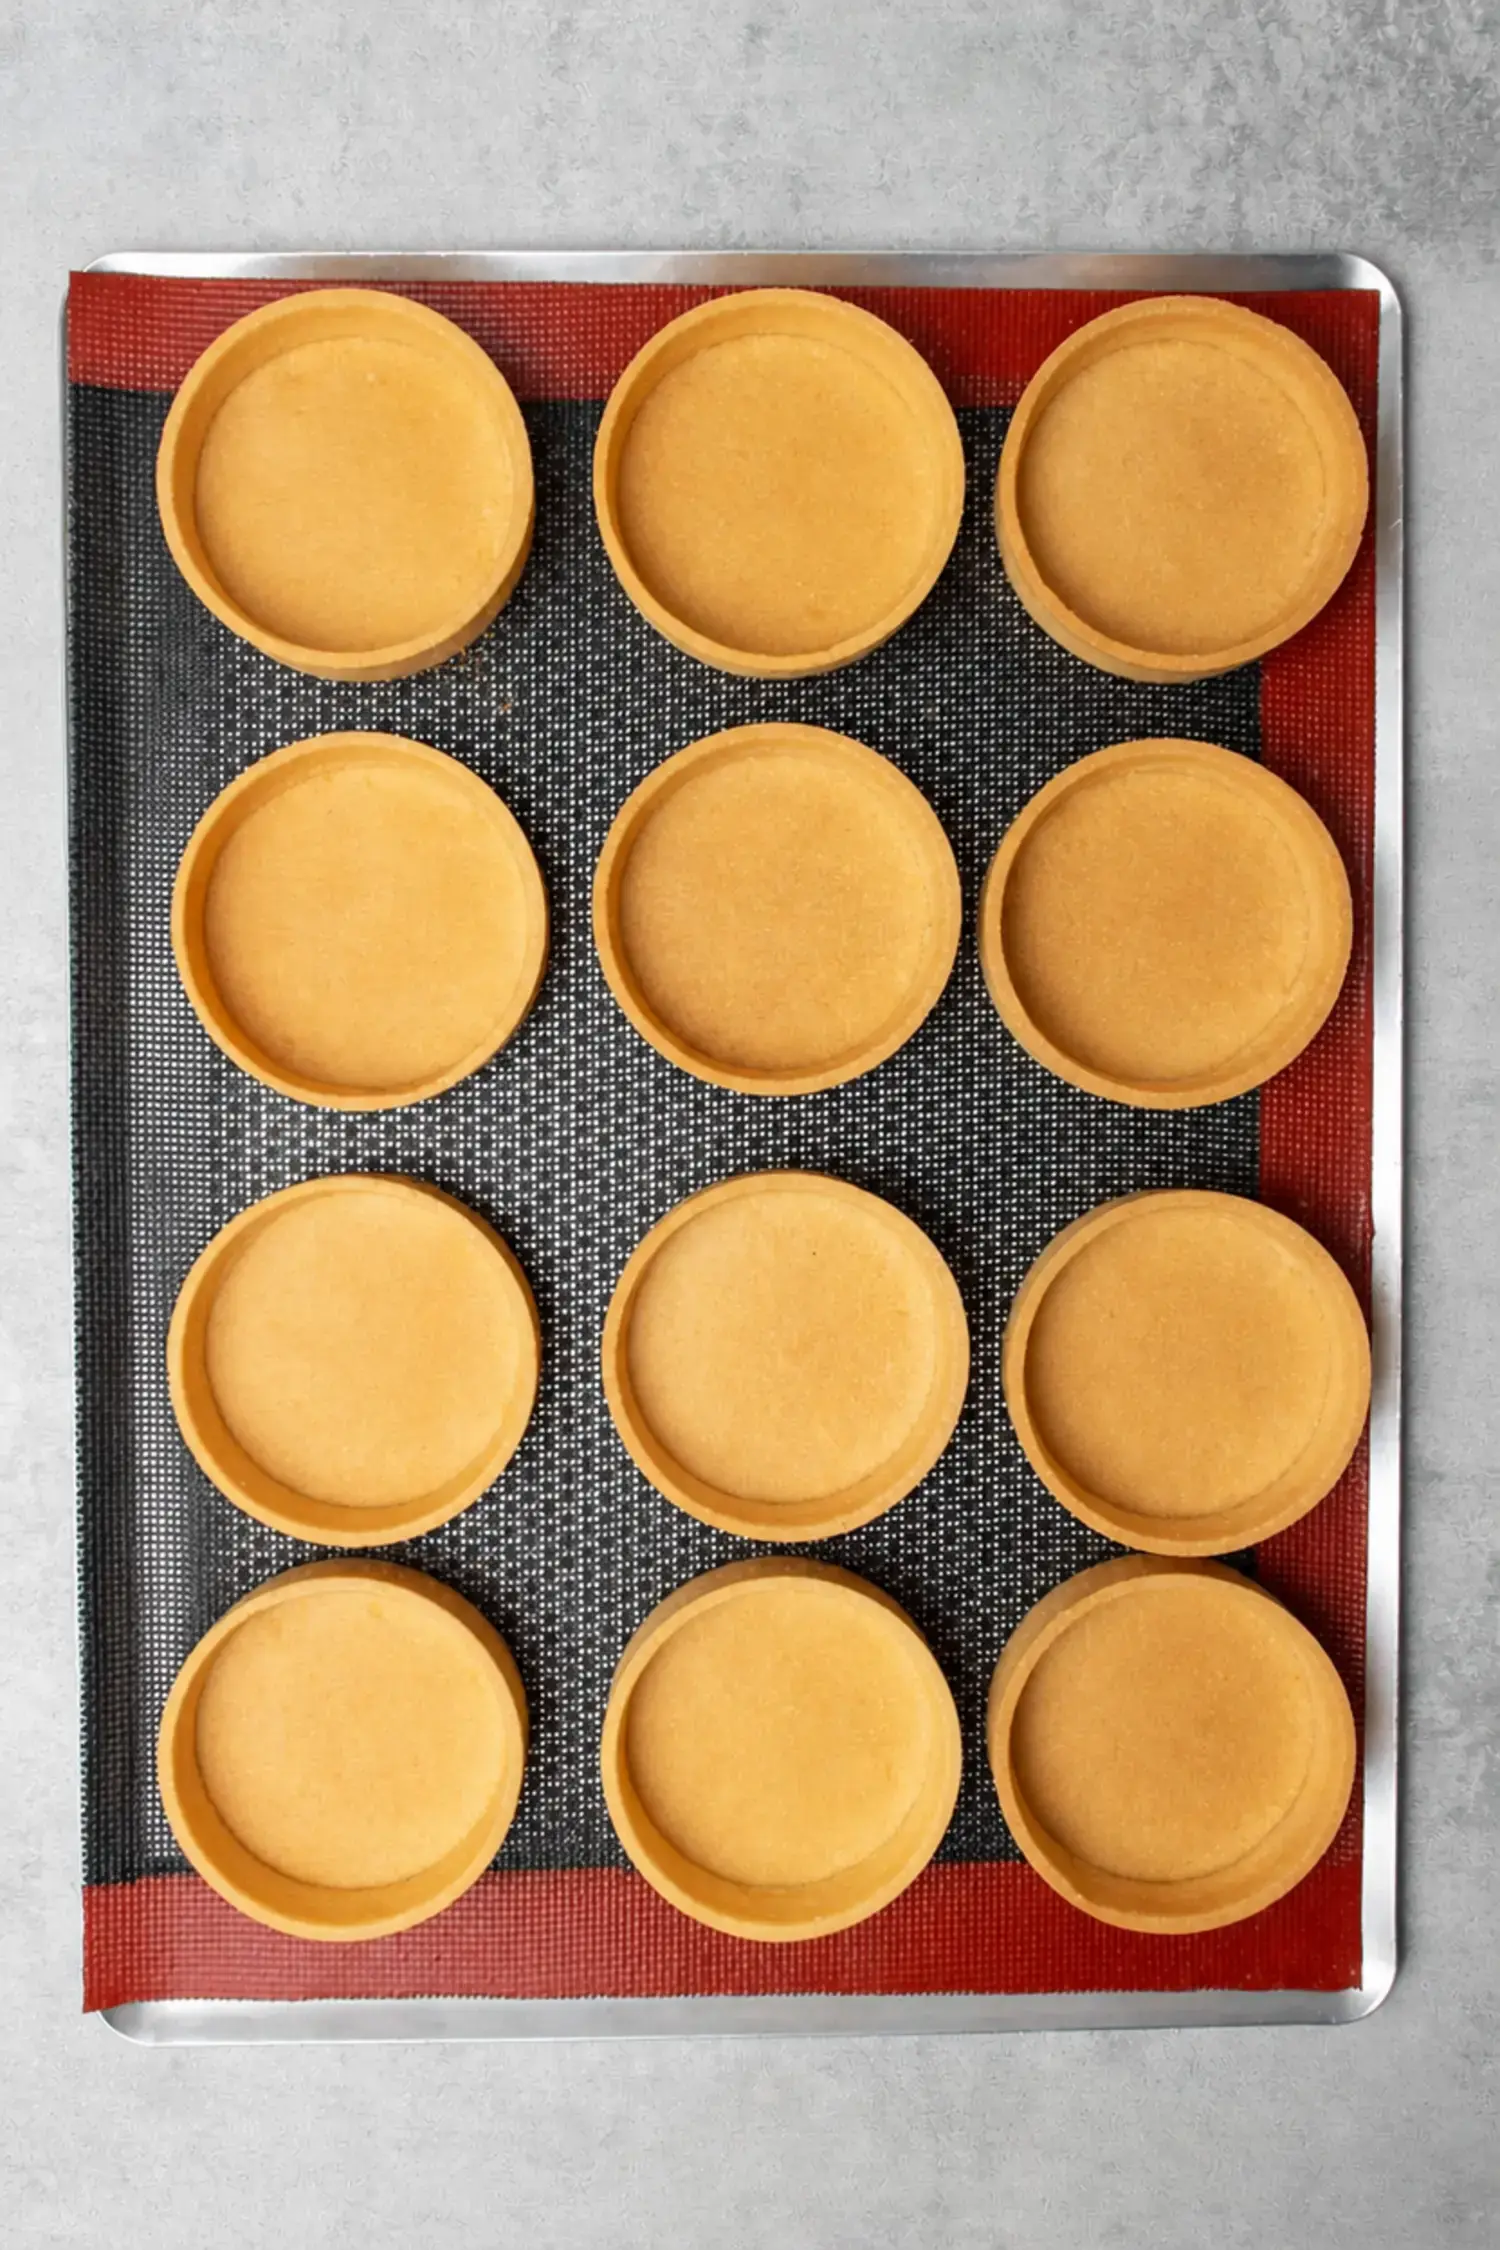
If a ring sticks, bake for another minute or two. After removing the rings, continue baking the shells for an additional 5 to 10 minutes, until they are evenly golden brown. Let the tart shells cool completely on the perforated mat before filling.
This cooling period is just as important as the baking itself; a warm shell will turn a cold filling soggy.
Ingredient Substitutions
I am often asked whether you can swap out the butter or egg in pâte sablée. The short answer is no, not without completely reformulating the recipe.
Butter with less than 82% fat will introduce more water, leading to steamed rather than crisp shells and potential shrinkage. Replacing the egg with a liquid egg substitute or flax egg changes the dough’s structure and is not reliable.
That said, if you need a nut free tart crust, you can replace the 30 g of almond flour with an equal weight of pastry flour or all purpose flour.
The resulting shell will be slightly less crisp and will lose that subtle nutty flavor, but it will still bake into a lovely, buttery tart case.
When I make this substitution for friends with nut allergies, I add an extra pinch of salt to compensate for the missing almond richness. Otherwise, stick to the original ingredient list for the most consistent results.
Flavor Variations
Once you have the base technique down, pâte sablée becomes a canvas for creativity. I love swapping half of the almond flour for hazelnut flour when I’m planning a chocolate ganache tart; the nutty depth pairs beautifully.
Pistachio flour works equally well and tints the dough a pale green. For a bright flavor, mix in the finely grated zest of one lemon or orange after rubbing in the butter.
A teaspoon of black sesame seeds folded into the dough creates an elegant, speckled crust with a toasty note that I adore with honey sweetened pastry cream. If you crave a chocolate version, substitute 15 g of the pastry flour with Dutch process cocoa powder.
The dough will be darker and slightly more crumbly, so handle it with extra care. And don’t forget: this dough makes excellent cookies. Simply roll, cut into shapes, and bake until set.
If you like delicate butter cookies, you might enjoy my recipe for Homemade Butter Cookies, which captures a similar melt in your mouth quality.
In cooler months, I also add a scant teaspoon of cinnamon to the dough, which reminds me of my Cinnamon Brown Sugar Cookies.
Make Ahead Storage and Freezing
Pâte sablée is a pastry that rewards planning ahead. Baked tart shells stay wonderfully crisp when stored in an airtight container at room temperature for up to three days.
If I know I will need them later in the week, I refrigerate them in a sealed container for up to a week, then let them sit at room temperature for 30 minutes before filling.
Bring them back to room temp so the shell isn’t cold enough to firm up a creamy filling too fast. For longer storage, unbaked tart shells can be frozen directly in their perforated rings for up to three months.
I arrange the assembled rings on a baking sheet, freeze until solid, then transfer them to a zip top bag or airtight container, rings still on.
When a dessert craving hits, I bake them straight from frozen, adding maybe 2 to 3 extra minutes to the initial baking time. Baked shells can also be frozen, but I find they lose a bit of their crispness upon thawing.
If you must freeze baked shells, wrap each one tightly in plastic wrap and place in a rigid container. Just be sure never to freeze a tart that has already been filled; the filling will turn watery and ruin the pastry.
Helpful Equipment
Precision tools take this recipe from frustrating to foolproof. I rely on just a handful of items:
- Digital kitchen scale: Volume measurements are too inconsistent for pastry. Weighing every ingredient in grams is the single most important upgrade you can make. I use a scale with 1 gram increments.
- Silicone baking mats (2): They replace parchment paper and dusting flour. I roll the dough between them, freeze it, and peel off the top mat. Cleanup is minimal, and the dough never sticks.
- Perforated tart rings (8 cm or 3.14 inch): These allow hot air to circulate and bake the sides evenly, eliminating the need for blind baking. I prefer the 8 cm size for individual tartlets, but one 23 cm ring works for a large tart.
- Perforated “air” baking mat: Placed on the oven rack, this mat ensures heat reaches the bottom of the rings for a crisp base. A regular perforated silicone mat or metal mesh sheet will also work.
- Rolling pin: A simple French style pin without handles gives me the best control for even thickness.
- Offset spatula: For lifting delicate dough circles without tearing.
- Sharp paring knife: For trimming the dough overhang precisely.
- Digital oven thermometer: Many home ovens run hot or cold. I hang a thermometer on the rack to confirm 160°C (320°F) before the shells go in.
With this kit, you eliminate guesswork and set yourself up for neat, professional looking tart shells every time.
Expert Tips
The secret to perfect tart shells is controlling the dough temperature at every step, so have your freezer ready and don’t rush the chilling.
Over the years, I’ve developed a few habits that make pâte sablée almost easy. First, always preheat your oven well in advance and never use the fan setting. A conventional bake with steady, gentle heat helps the pastry set slowly and evenly.
If your kitchen is warm, don’t fight it. Work in bursts and return the dough to the freezer whenever it feels tacky. I often keep a rimmed baking sheet in the freezer to plop the dough onto between steps.
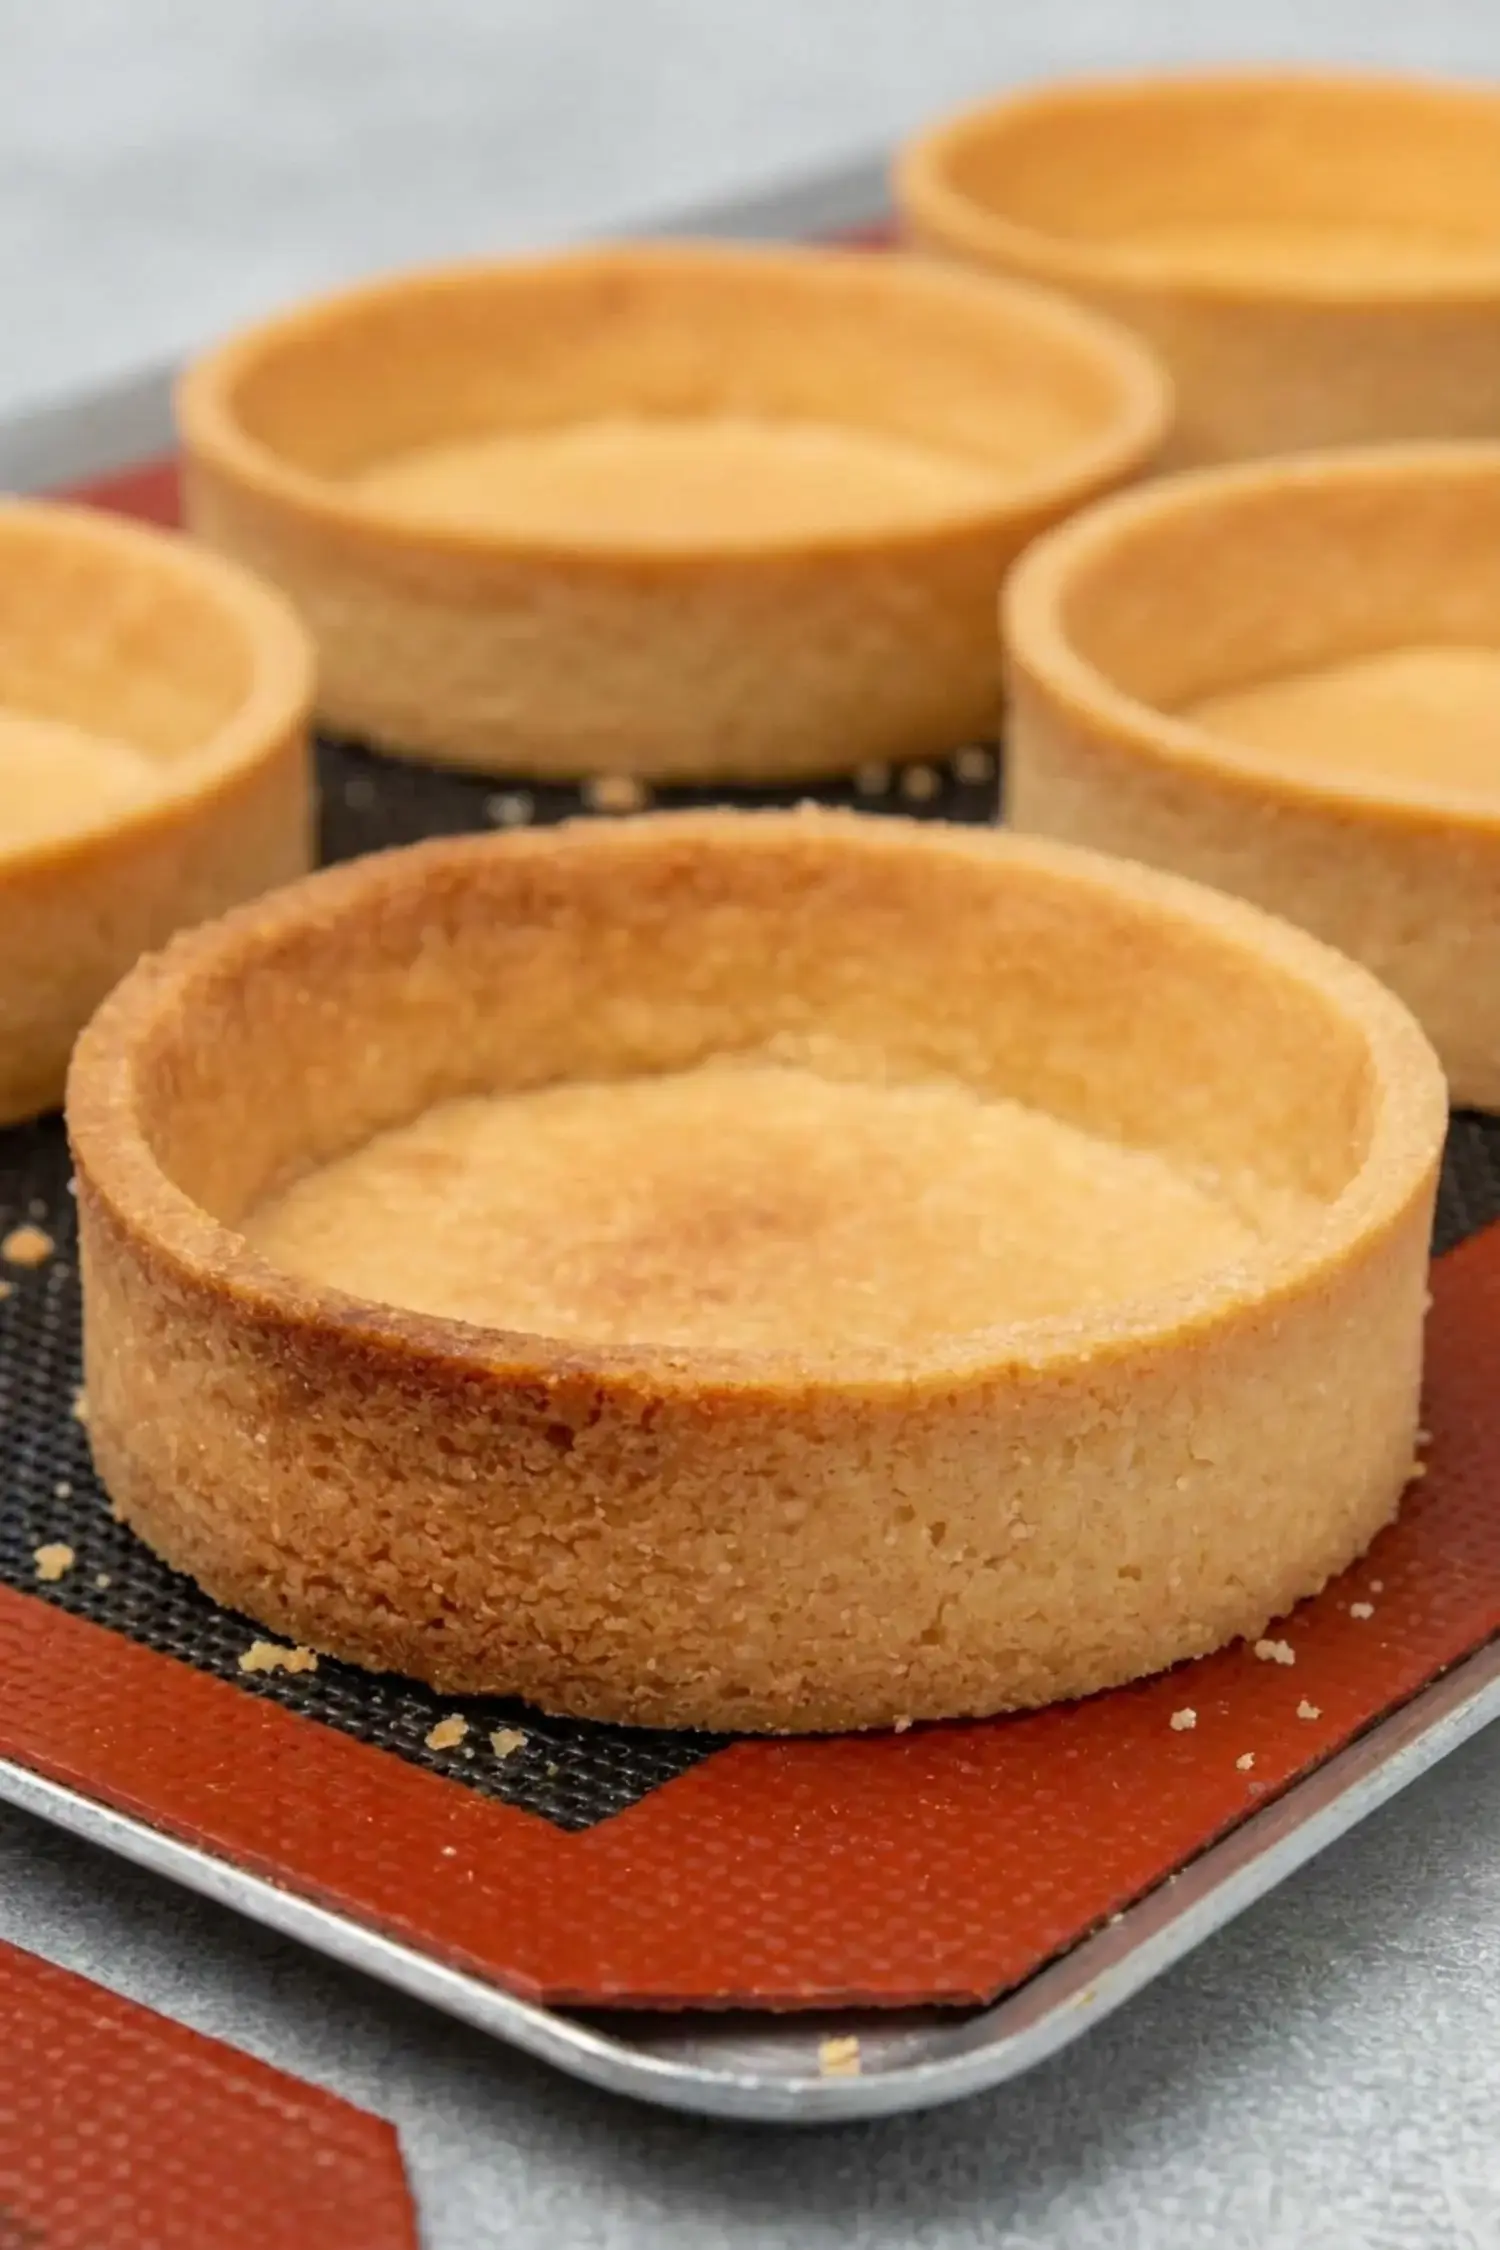
When you are ready to remove the tart rings after the initial 20 minute bake, grip the top edges of the ring between your thumbs and forefingers and gently lift. Never press the center of the tart shell, or you might crack the fragile base.
If a ring resists, pop the whole tray back in the oven for an extra minute; the pastry will contract further and release on its own. And one last thing: perforated equipment truly makes a difference.
If you don’t have perforated rings, you can use solid tart rings with removable bottoms and blind bake with parchment and pie weights, but the perforated version is more convenient and yields straighter sides.
Troubleshooting Pâte Sablée
Even seasoned bakers encounter hiccups. Here are the most common problems and how to fix them:
- Shrunken shells: This is the classic frustration. Excessive handling, over kneading, or adding too much liquid (even from a larger than average egg) can trigger gluten development and fat melting, which causes the dough to pull inward during baking. Stick to 50 g of egg, knead minimally, and keep the dough cold. Using high fat butter also minimizes shrinkage because less water is present to create steam that shrinks the pastry.
- Shells losing shape: If your tart ring sides slump or the bottom puffs, the dough likely wasn’t frozen solid before baking. The one hour freeze is non negotiable; it sets the butter firmly so the structure holds. Also check your oven temperature. A low oven lets the butter melt before the dough sets, causing sagging. Always confirm the temperature with a digital thermometer.
- Dough puffing up: Rolling the pastry too thick (more than 2 mm) traps extra air pockets. Use a ruler or thickness guides if needed. Perforated rings also help steam escape, reducing puffing. If you still get bubbles after blind baking? You can gently press them down with the back of a spoon as soon as the shells come out of the oven.
- Pastry sticking to the ring: Resist the instinct to force the ring off. Instead, bake the shells for an extra 1 to 2 minutes. The natural contraction as the pastry dries will loosen the bond. After that, the rings should lift away easily.
- Dough cracks when rolling: It is too cold. Let it sit at room temperature for 2 to 3 minutes, just until it becomes slightly pliable. Gently knead once or twice to redistribute the warmth.
Remember that humidity and kitchen temperature play a role. On a hot summer day, I double my freezer time because my hands are just a little warmer. Be observant, and you will learn to read your dough.
How to Fill the Tart Shells
Once your tart shells have cooled completely, they are ready to cradle almost any filling you dream up. Because the crust is already baked and crisp, you can focus on the creative part without worrying about soggy bottoms.
I often make a quick lemon curd and spoon it into the shells, topped with a dollop of whipped cream and a few fresh raspberries.
For chocolate lovers, a silky dark chocolate ganache poured into the still in ring shell (before removing the ring after baking) can set into a glossy finish; just be sure the ganache isn’t too hot.
Pastry cream, stabilized whipped cream, or frangipane smoothed beneath sliced stone fruit all work beautifully.
This recipe yields enough dough for eight mini tartlets or one 9 inch tart. If you are making a large tart, simply roll the dough slightly larger, line a 23 cm ring, and freeze as directed.
The larger shell bakes for roughly the same time, though you may need 5 extra minutes at the end. Fill the large tart with a generous layer of vanilla pastry cream and arrange seasonal berries on top for a showstopper.
Just remember: always fill only after the crust is completely cool to maintain that perfect crunch.
Frequently Asked Questions
What is pâte sablée and how is it different from an American pie crust?
How do I make a classic pâte sablée French tart crust at home?
Why does my pâte sablée tart crust shrink, puff, or lose its shape in the oven?
Can I store or freeze pâte sablée tart shells and dough in advance?
Pâte Sablée, Sweet Shortcrust Pastry Tart Shells
What Is Pâte Sablée? Pâte sablée is a classic French sweet shortcrust pastry that creates the most delicate, crisp tart shells you will ever bake.
- Total Time: 135 min
- Yield: 8 mini tartlets (3.14 inch / 8cm diameter) or 1 larger tart (9 inch / 23 cm diameter) 1x
Ingredients
90 g Powdered sugar
230 g Pastry flour
30 g Almond flour
Pinch Salt
110 g Unsalted butter, 82% fat content, very cold, cut into chunks
50 g Egg, approx. 1 egg, at room temperature
Instructions
Assemble the dough
1-Cut the butter into chunks and place: Cut the butter into chunks and place them in the freezer for a few minutes.
2-Sift the dry ingredients together: Sift the dry ingredients together: flour, powdered sugar, almond, and salt.
3-Add the cold butter chunks to the: Add the cold butter chunks to the dry ingredients and rub the mixture between your hands until it reaches a sand-like texture.
4-Add the egg to the mixture and: Add the egg to the mixture and combine with your hands until the dough comes together.
5-Knead the dough with the palm of: Knead the dough with the palm of your hand for one to two minutes, just until it becomes smooth. Avoid over-kneading and do not use a mixer or food processor.
6-If the dough is too warm and: If the dough is too warm and sticky, refrigerate it for 10-15 minutes. Otherwise, roll the dough out to a 2mm thickness between two silicone baking mats.
7-Place the dough, still between the two: Place the dough, still between the two silicone baking mats, into the freezer for 15 minutes. Do not remove the mats at this stage.
8-Set up your oven rack with a: Set up your oven rack with a perforated “air” baking mat and place the perforated tart rings on top. There is no need to grease the ring; the pastry will contract as it bakes, making it easy to remove the ring.
9-Remove the dough from the freezer and: Remove the dough from the freezer and peel off the top silicone mat.
Assemble the tart shells
10-Cut 8 long strips from the dough: Cut 8 long strips from the dough to form the sides of the tart.
11-Using a perforated tart ring, cut out: Using a perforated tart ring, cut out 8 circles to form the bottoms of your tarts. Carefully lift each dough circle with an offset spatula and place them into the rings one by one.
12-If the dough becomes too warm to: If the dough becomes too warm to handle at any point, return it to the freezer for 5 minutes. Depending on the temperature of your kitchen, you may need to repeat this process several times. It’s crucial to work with dough that is cold enough to be manageable (not sticky), but not so cold that it becomes brittle and breaks.
13-Carefully place each strip into the ring: Carefully place each strip into the ring one by one, pressing each one onto the ring as well as to the bottom to ensure it sticks. Again, the dough should be at the right temperature-pliable enough that it doesn’t stick (not too warm) but still flexible enough that it won’t break (not too cold).
14-Place the perforated tart rings with the: Place the perforated tart rings with the pastry dough into the freezer for 1 hour. Toward the end of the freezing time, preheat the oven to 160°C (320°F).
15-Remove the tart rings from the freezer: Remove the tart rings from the freezer and use a sharp knife to trim the top of the dough before baking each tart individually.
Bake
16-Bake the tarts at 160°C (320°F) for: Bake the tarts at 160°C (320°F) for 20 minutes. Then, carefully remove the rings and bake for an additional 5-10 minutes, or until golden brown. By the 20-minute mark, the pastry should be partially baked and may contract within the ring. If the pastry feels stuck to the ring, bake for an extra 1-2 minutes.
17-Allow the tart shells to cool on: Allow the tart shells to cool on the perforated “air” baking mat before filling.
18-Tart shells can be frozen for up: Tart shells can be frozen for up to 3 months. To freeze them, place the unbaked tart shells on a baking sheet and freeze until solid. Once frozen, transfer them to an airtight container or freezer bag (leave the ring on them). When the time comes, simply bake from frozen, as explained above. If freezing after baking, allow the shells to cool completely, then wrap them tightly in plastic wrap and place them in an airtight container or freezer bag.
19-To store tart shells that are not: To store tart shells that are not frozen, place them in an airtight container at room temperature. They should stay fresh for several days. Make sure the container is sealed tightly to prevent them from becoming stale. If you need to store them for a longer period, you can refrigerate them for up to a week. Just make sure to let them come to room temperature before filling or serving.
Last Step:
Please leave a rating and comment letting us know how you liked this recipe! This helps our business to thrive and continue providing free, high-quality recipes for you.- Prep Time: 30 min
- Cook Time: 30 min
- Method: bake
Nutrition
- Calories: 226kcal
- Sugar: 0.3g
- Sodium: 11mg
- Fat: 14g
- Saturated Fat: 8g
- Carbohydrates: 33g
- Fiber: 3g
- Protein: 5g
- Cholesterol: 53mg